Digital Signature Creation/Setup (TOTAL Only)
This document explains how to set up a digital signature in TOTAL.
Document 6056 | Last updated: 02/09/2023 CW7
TOTAL makes it easy to sign your reports with a few simple clicks once you've configured a signature for your User Profile. The overall process for setting up a digital signature is as follows:
- If you don't already have a digital signature image file, create an image of your signature in JPG, PNG, GIF, BMP, or PDF format using your scanner.
If you previously had a signature set up in WinTOTAL Aurora, you can reuse that signature. It's located here:
C:\a la mode
\WinTOTAL \Users\*USERNAME* (Replace the term *USERNAME* with your WinTOTAL username.)
- Then, load your digital signature image into TOTAL.
- Lastly, fine‑tune the signature settings.
Follow the instructions below to set up your digital signature for signing reports in TOTAL.
Haven't scanned your digital signature to your PC yet? Start here.
If you don't already have a digital signature image file:
The best way to create a digital signature image file is to use a scanner to scan your signature into your PC. Alternatively, using your phone or camera to take a picture of your signature works in a pinch, but can lack in quality. This guide focuses on using a scanner since this method provides the highest quality. To create a digital signature image file:
- On a blank sheet of paper, using a medium‑tipped (preferably black) pen, sign your signature as you would normally.
- Scan the signature using your scanner. Generally, you're be able to control settings like DPI and file format. For best results use 300 DPI resolution, and set the file format to JPG, PNG, GIF, or PDF.
Keep in mind that scanner software varies depending on the manufacturer. For assistance with your scanner settings or help with using your scanner, refer to the product manual or contact the manufacturer.
- Now, crop the image as closely to your signature as possible — leaving as little white space around the signature as possible. Many scanners help you with this. However, if your scanner doesn't offer such a feature, use a separate program or image editing software to accomplish this.
Windows comes with a program called Paint that helps with this process. Locate this software by going to Start, (All) Programs, Accessories, and click Paint. If you're using Windows 8 or 10, simply type Paint into the Start screen and press Enter. Open the image that you just scanned, and use the Crop feature. Microsoft Paint provides a help menu that assists with this, but for further assistance you must contact Microsoft or a local technician.
- Once you've cropped the signature, save the file to a convenient location, such as your Pictures folder or your Windows Desktop, and follow the instructions below to load your digital signature file into TOTAL.
Creating Licenses and Signatures for multiple appraisers? Start here.
If you're setting up a signature for more than one appraiser, use the User Management utility to easily select the appraiser profiles you wish to edit. Follow the steps below to navigate to the appropriate user:
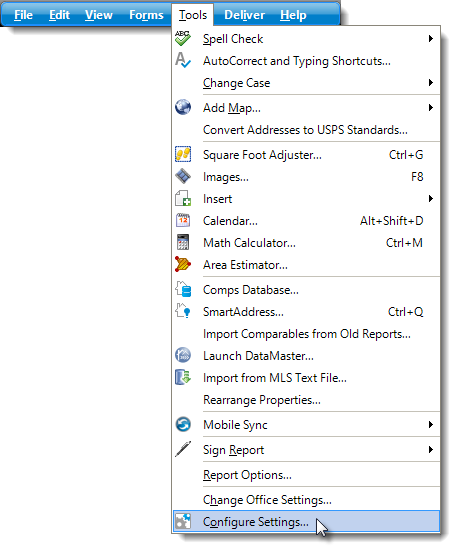
- In TOTAL, click Tools in the upper left, and then click Configure Settings.
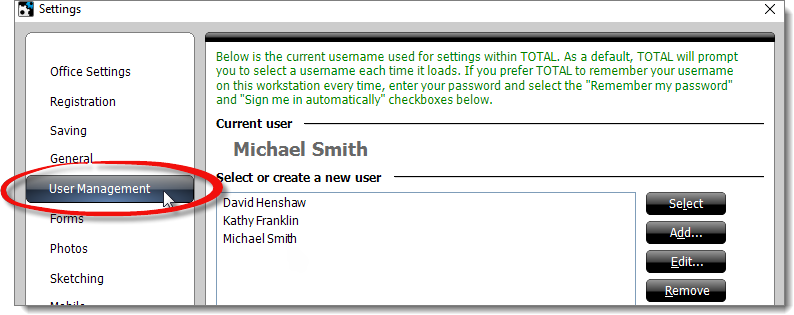
- In the Settings window, click User Management on the left.
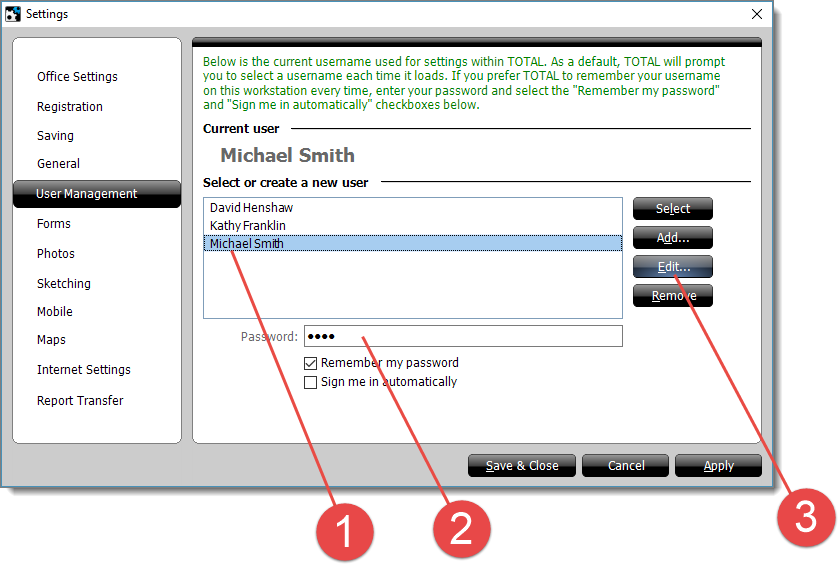
- Now, select the name of the user that needs a signature configured (1), enter the password for the user if necessary (2), and click Edit (3).
- Click the User and License Settings tab.
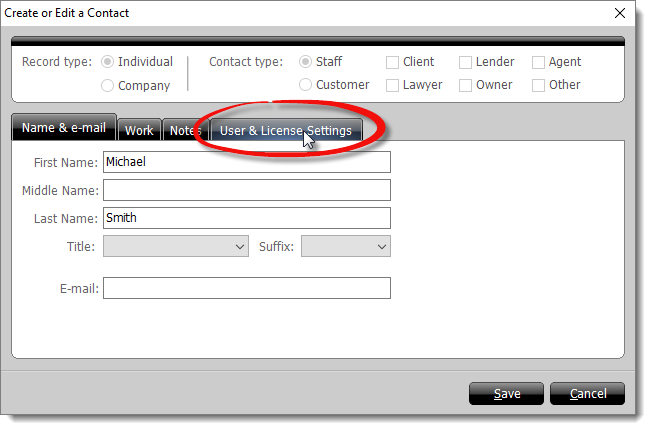
Once you've navigated the User and License Settings tab, click here to follow instructions for loading a digital signature file into TOTAL.
Loading Your Digital Signature File into TOTAL
Digital signatures are tied to the licenses configured for each user profile in TOTAL, although the same digital signature image file may be used for multiple licenses. Once the signature has been set up for a given user's license, that signature may be used to sign any report. If you're licensed in multiple states, you'll need to configure a license for each state.
To set up your digital signature for one of your licenses:
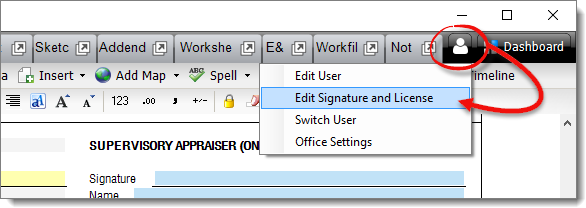
- In TOTAL, click the User Profile Menu (
 ) on the upper right, and then select Edit Signature and License.
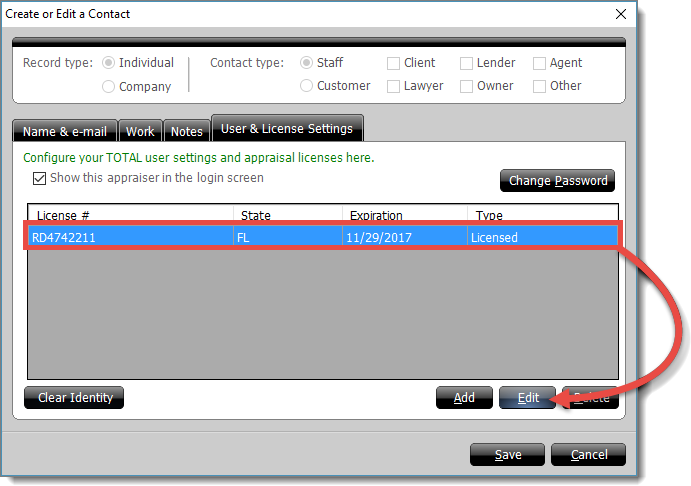
- Select the license you wish to update and click Edit. If there's no license displayed, click Add.
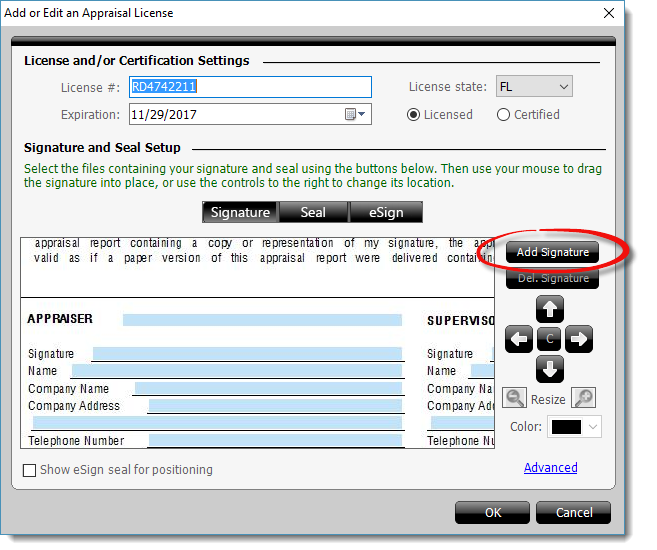
- Enter the user's license or certification information. Then, click Add Signature.
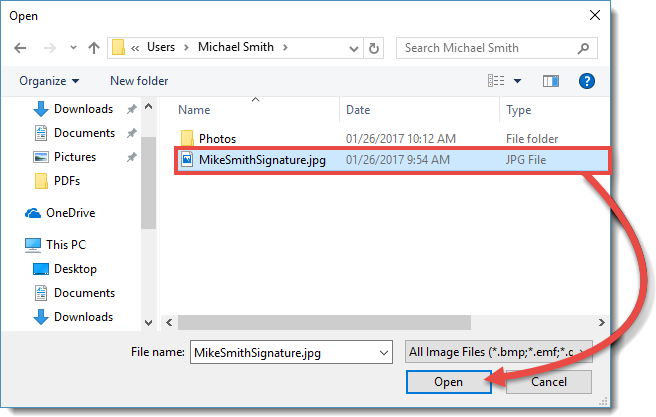
- Now, browse to the digital signature image on your PC, select the file, and click Open.
- In the Crop Your Signature window, ensure any additional whitespace around your image is cropped out while keeping your signature contained in the blue box. Adjust the box by dragging and dropping, or use the corner adjustment. When you're finished, click Crop on the lower right.
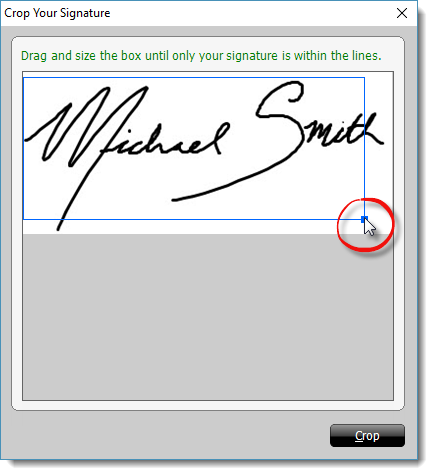 If your signature is too large to be adjusted appropriately, you may need to resize the image in an editor program like Paint or Photoshop.
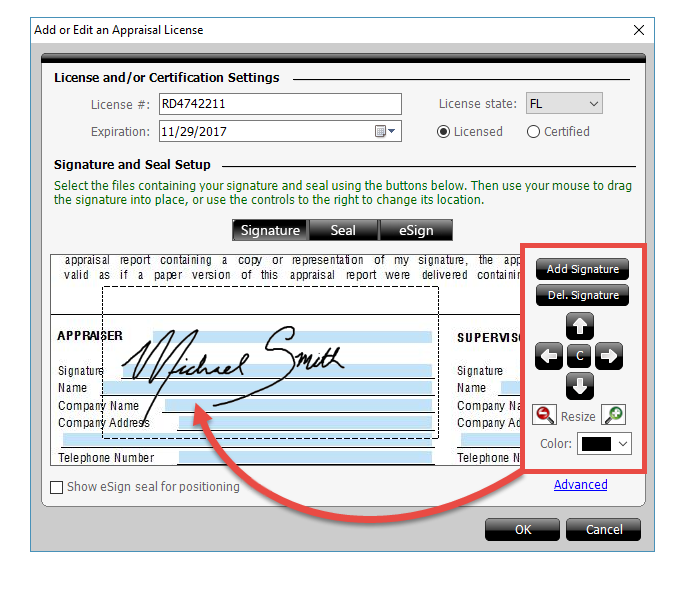
 - Your signature now appears in the preview pane on the left. You have a few options available to adjust the appearance of your signature:
- Use your mouse to click and drag the signature, or use the directional arrows on the right to position the signature on the signature line.
- Click the C button to clear any resizing and to re‑center the image in the preview pane.
- If your signature needs to be resized, use the magnifying glass icons on the right to adjust the zoom level.
- Use the Color drop‑down menu to choose a color for your signature.
- If you need to start over, click Cancel to reset your signature and go back to Step 2.
- To add a state seal to your signature, click the center Seal button, and then click Add Seal on the right. Then, follow the instructions starting from Step 4 to add your seal image to your signature.
The AppraisalPort plugin only converts a signature and doesn't convert a separate seal. If you need your seal to be included, it must be included in the image of your signature. Click here for more information and instructions on how to work around this issue.
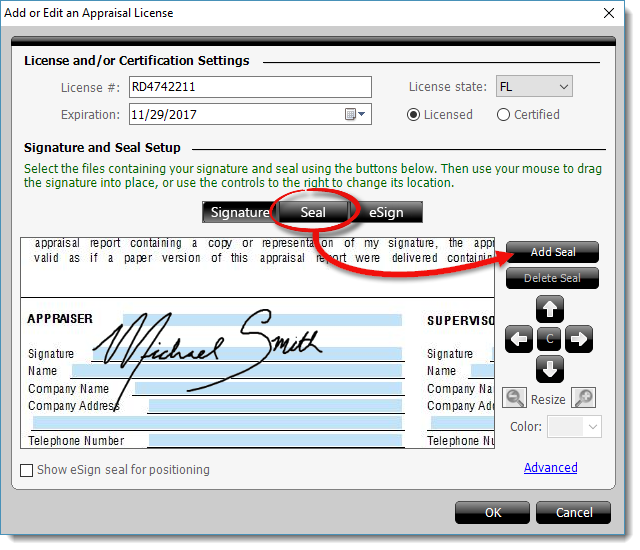
- Once you're satisfied with the appearance of your signature and/or seal, click OK. Then, click Save to save your changes and return to TOTAL.
If you have an additional license to add, such as a license from another state, repeat these steps beginning with Step 2.
That's it! You can now sign reports with your newly created signature and/or seal. For more information on signing your report, including how to sign a report securely, click here.

