How to export data from your MLS for use with QuickSource and Titan Analytics
To import MLS property data into QuickSource or Titan Analytics, the first thing you need to do is set up an export template on your MLS website. This is a one‑time process — once you create your template, all you need to do is simply choose your custom template from a list, export your data and save it to a convenient location on your computer, and import it into your a la mode software.
Document 3003 | Last updated: 11/19/2024 MJY
Select your MLS from the drop‑down menu below to view step‑by‑step instructions on creating your custom template and then using the template to export your data:
Select your MLS:
We provide these instructions as a courtesy to our customers, and are not affiliated with the MLS boards or MLS vendors outlined in our instructions. The steps in this document are accurate to the best of our knowledge at the time they were written.
—
Follow the instructions in Part I below to create a custom export template. If you've already created a custom export template and you're ready to export data, skip ahead to Part II.
Some San Diego REALTOR associations use CRMLS Paragon instead of SDMLS. If you're not sure what your MLS uses, review the logo on the upper left after you log in. If the logo displays CRMLS Paragon, click here and follow the instructions for CRMLS Paragon. If the logo simply says Paragon, continue with the instructions below.
Part I — Create your template (first-time setup)
- Log in to the your MLS website.
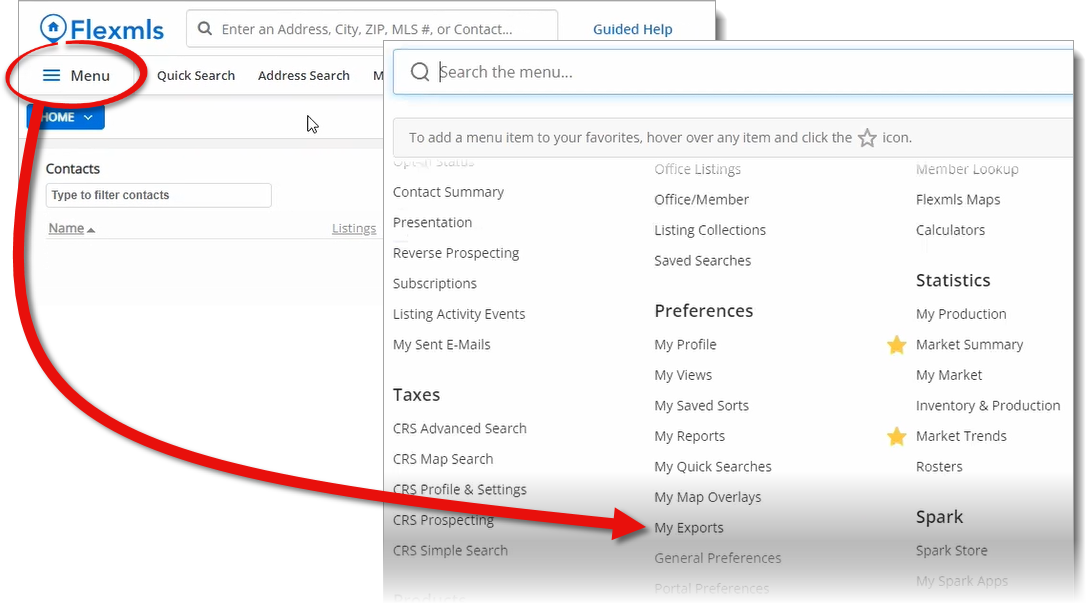
- Click Menu on the upper left, and then click My Exports in the Preferences section.
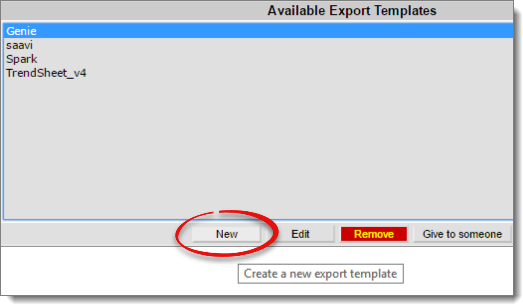
- Click New to create a new export template.
- Choose your options for the Export Template Properties:
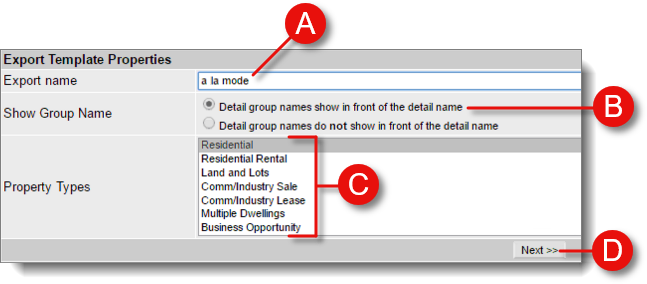
- Enter a name for the export template in the Export Name field — such as a la mode.
- Select Detail group names show in front of the detail name for the Show Group Name option.
- Choose the Property Types you use when performing your comp search — typically, this is the Residential property type. If you search for comps using more than one property type, you'll need to repeat this process and create an export template for each property type you use.
- When you're finished, click Next.
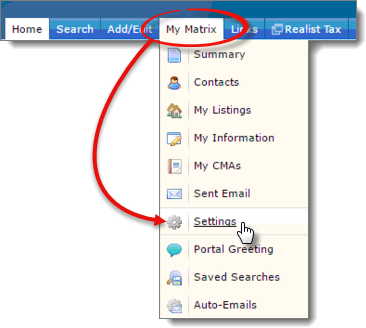
- Click your name in the top right and select Settings.
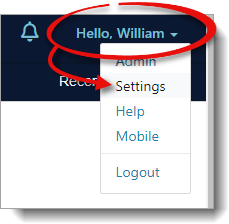
If you don't see your name on the upper right, hover over My Matrix or My on the upper left, and select Settings from the drop‑down menu.
- Click Custom Exports.

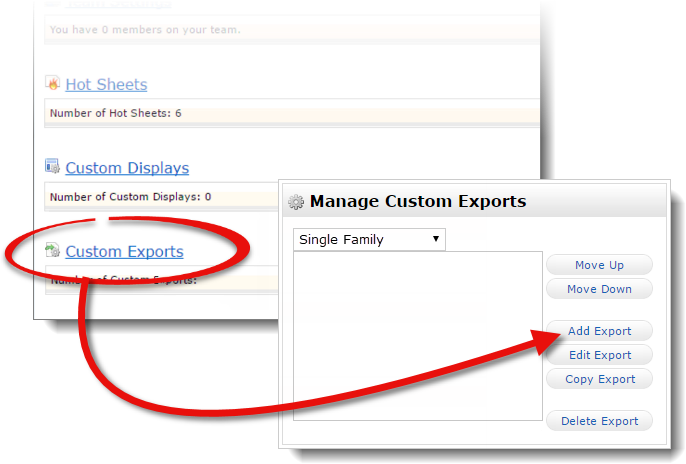
- In the Manage Custom Exports screen, click the drop‑down menu and select the property class you use when searching for comps — such as Residential or Single Family. If your MLS doesn't have different property class options, choose Cross Property. Then, click Add Export to create a new export template.
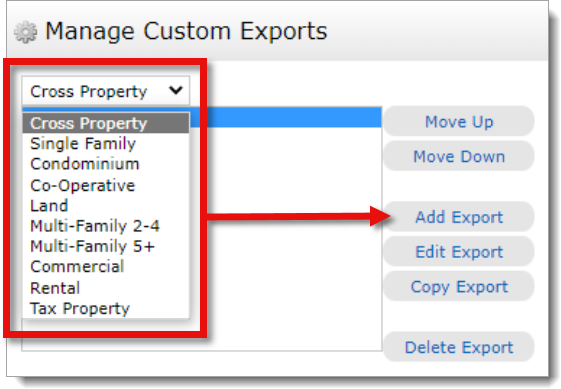 if you search for comps using more than one property class, you'll need to create a template for each one. Just create and save your template for the first class. Then, select the next class from the dropdown and create another template using the same fields in the steps below.HGMLS has different categories for Single Family, Condominium, and Cross Property. You'll need to create an export template for each one you use to search for comps. We recommend you create an export template in the CROSS PROPERTY category and also use the CROSS PROPERTY search to find comps. This way, you can find comparables in all property categories from one screen and export using one template.If you need to export from categories other than Single Family (e.g. Farm & Ranch), create your export template using the Cross Property category and perform your comps search using the Cross Property search screen. This allows you to search and export any property type.
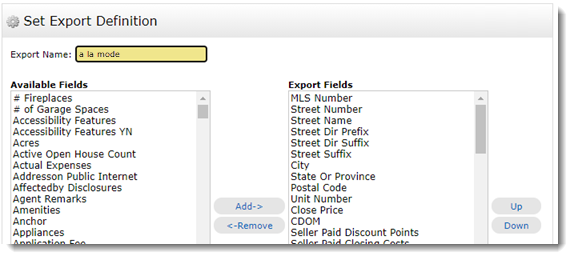
 - Enter a name for the export template in the Export Name field — such as a la mode.
- Click Resources in the menu on the left, and go to the Custom Exports tab.
- Click New Export to create a new export template.
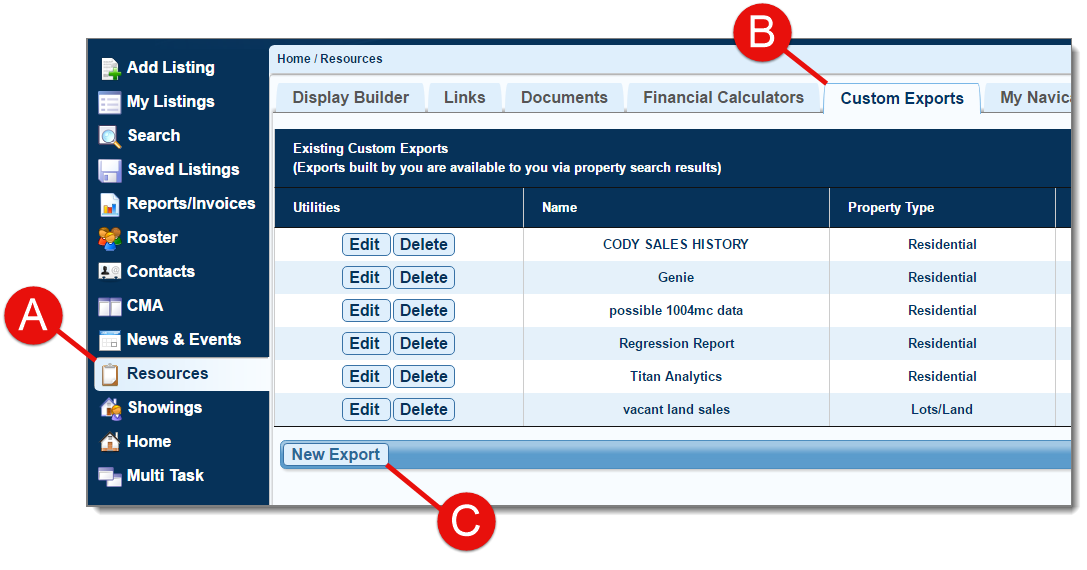
- In the screen that appears:
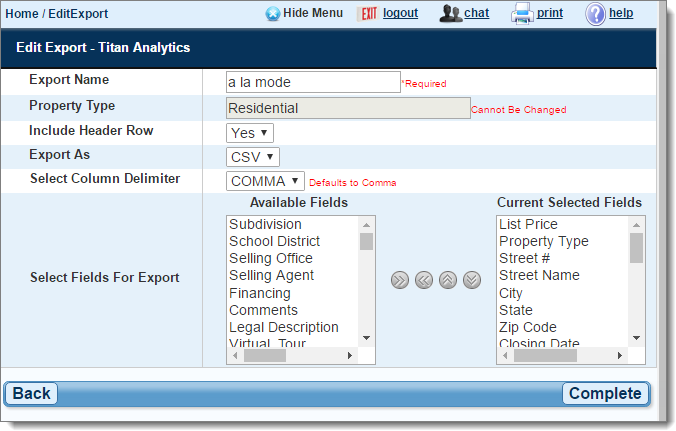
- Enter a name for the export template in the Export Name field — such as a la mode.
- For the Include Header Row option, select Yes from the drop‑down menu.
- For the Export As option, select CSV from the drop‑down menu.
- Leave the Select Column Delimiter option set to the COMMA default.
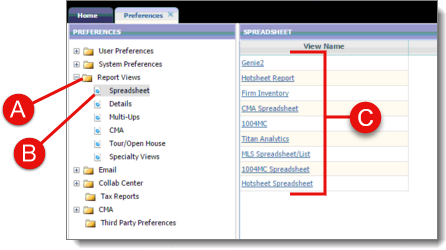
- Click Preferences in the main toolbar, and use the fly‑out menu to select Reports.

- Expand the Report Views folder on the left ( A ), click Spreadsheet ( B ), and then choose an unused spreadsheet listed on the right to edit ( C ).
Because has a limited number of available spreadsheets and doesn't allow you to create a new spreadsheet, select an existing spreadsheet or a default spreadsheet and modify it to use as your export template.
- Configure your export template:
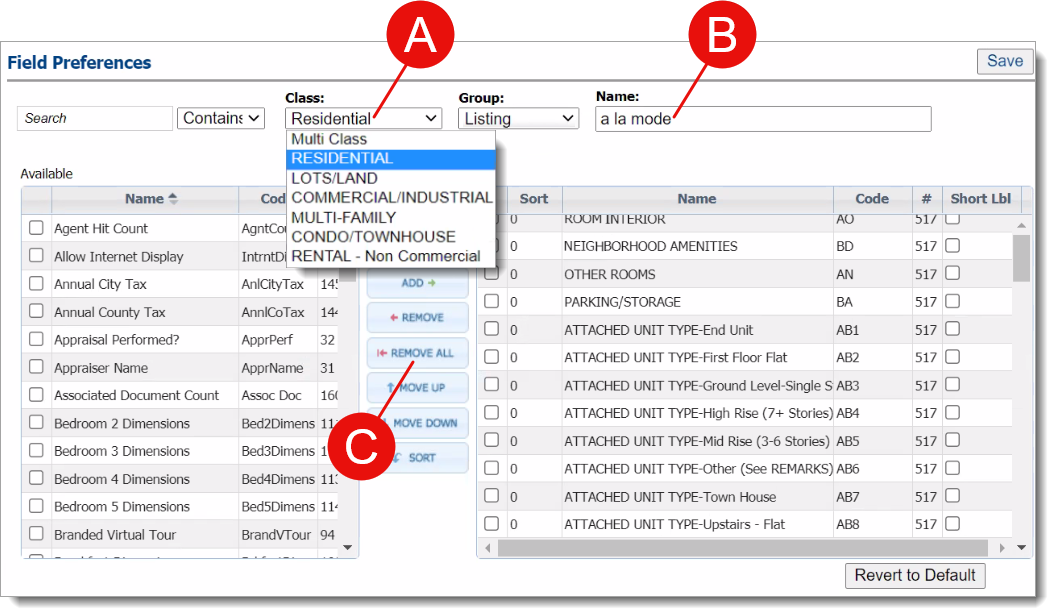
- Select the property Class that you use to search for comps. For example, if you search for comps using the RESIDENTIAL class, select RESIDENTIAL from the Class drop‑down menu to build your template for that class.
Some Paragon systems have other class types, such as SINGLE FAMILY, HOUSE, CONDO, MULTI‑CLASS, etc. Select the class that corresponds to your system and search.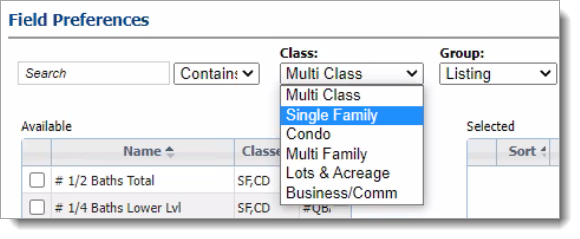 If you use more than one class for your comps searches, you'll need to build templates for each class. Follow the instructions in the note below step 6 to create templates with more than one class.
 - Enter a title or description for the template in the Name field — such as a la mode
- Click Remove All to start with a clean template
- Select the property Class that you use to search for comps. For example, if you search for comps using the RESIDENTIAL class, select RESIDENTIAL from the Class drop‑down menu to build your template for that class.
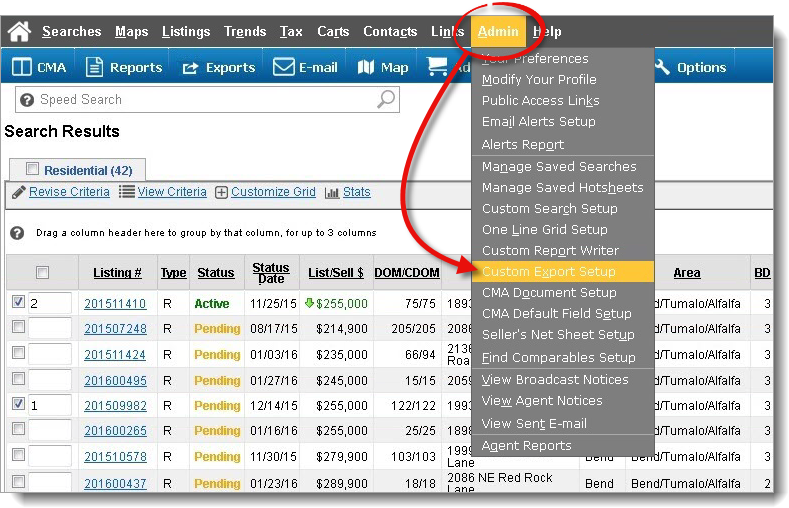
- Click Admin on the upper left, and select Custom Export Setup from the drop‑down menu.
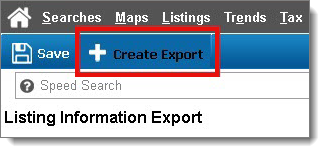
- Click Create Export to create a new export template.
- In the screen that appears:
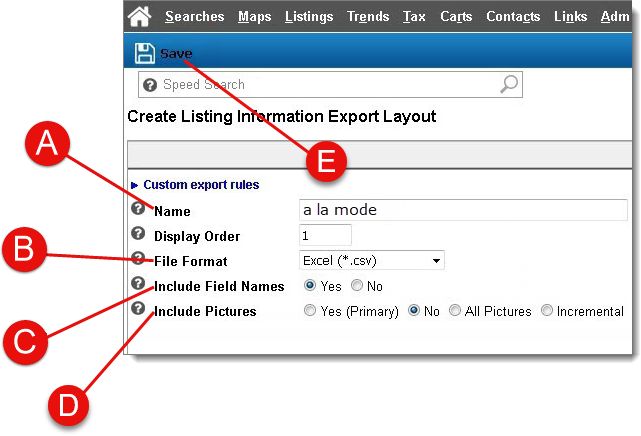
- Enter a name for the export template in the Name field — such as a la mode.
- Select Excel (*.csv) from the File Format drop‑down menu.
- Choose Yes for the Include Field Names option.
- Select No for the Include Pictures option.
- When you're finished, click Save on the upper left.
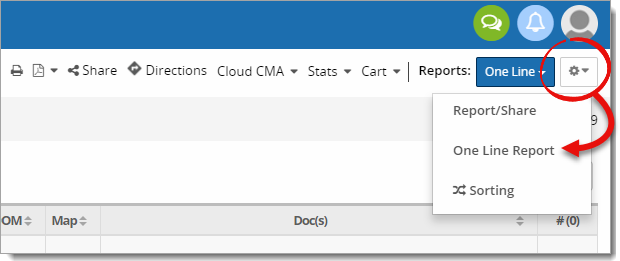
- Click the Settings icon (
 ) on the upper right and choose One Line Report.
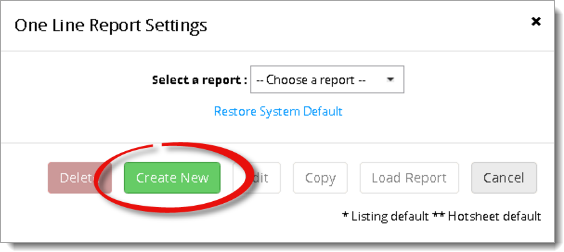
- Then, click Create New.
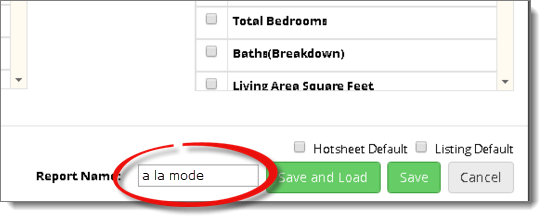
- Enter a name for the report on the lower right, such as a la mode.
- Log in to the website.
- Click the Reports tab and select Custom Reports.
- Click Add New Report to create a new export template.
- Select the property type to use for the template, and then enter a name for the export template in the Report Name field — such as a la mode.
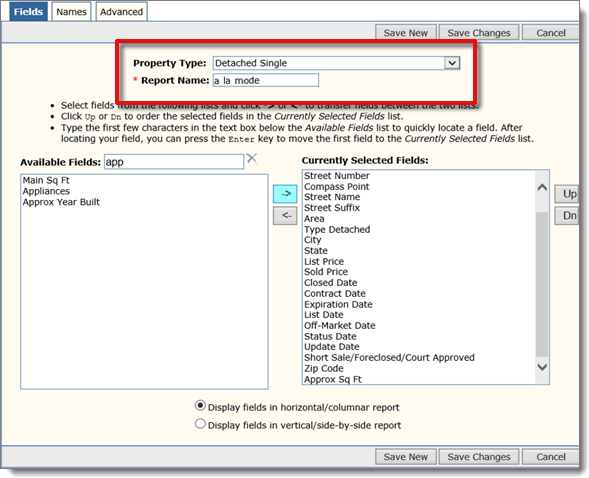 provides different field lists based on the the property type selected. If you export data for use in condo or multi‑family reports, you'll want to save separate export templates for each property type.
 -
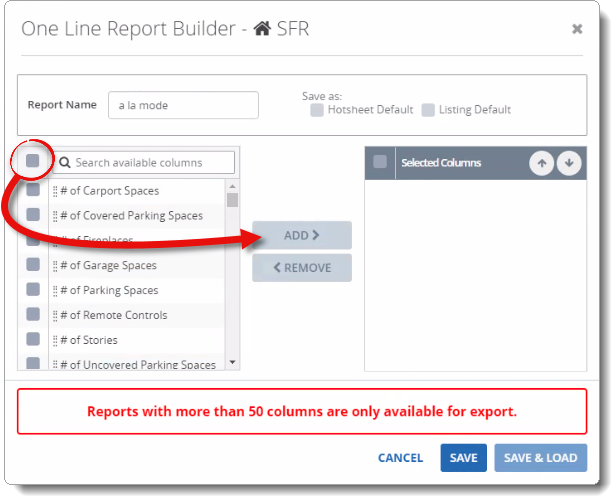
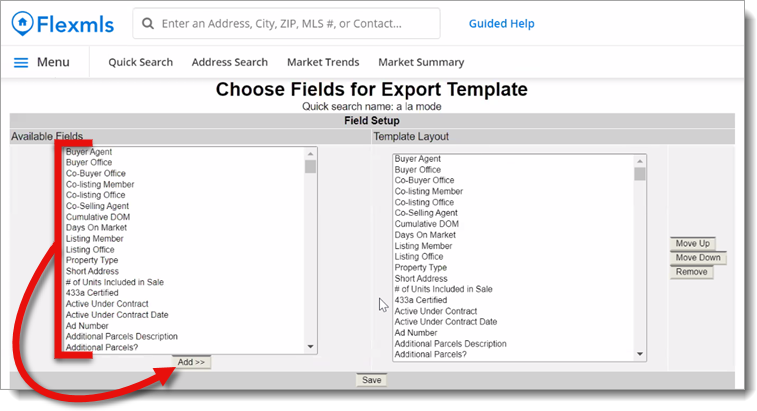
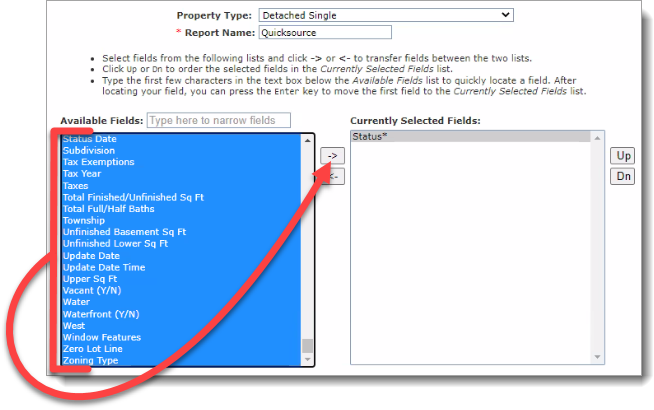
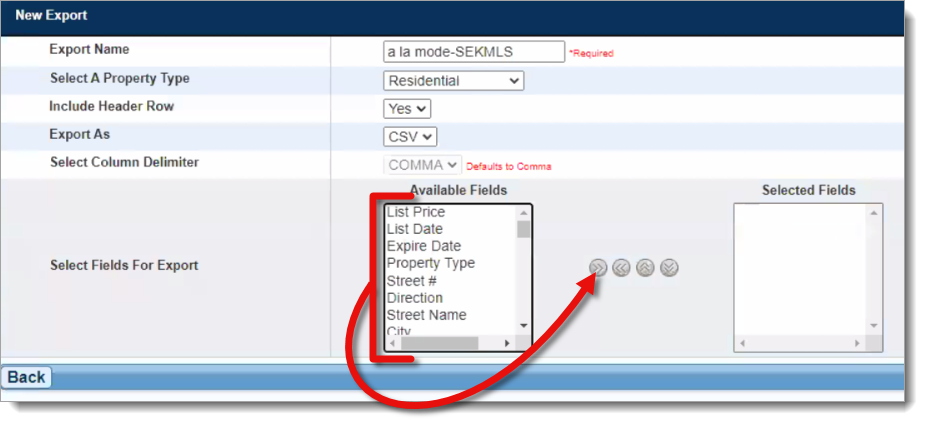
We suggest adding all fields to your export template. To do this, check the box at the top of Available Columns list on the leftselect any field from the list of Available fields on the left, press Ctrl + A on your keyboard to select all, and click Addthe right arrow (
 ) to add them to the Selected ColumnsTemplate LayoutCurrently Selected Fields Selected Fields on the right. Then, jump to step 6.
When you select more than 50 fields, a warning is displayed that states: Reports with more than 50 columns are only available for export. Since that is the type of report being created, it's safe to ignore this warning and proceed with creating your export template.
) to add them to the Selected ColumnsTemplate LayoutCurrently Selected Fields Selected Fields on the right. Then, jump to step 6.
When you select more than 50 fields, a warning is displayed that states: Reports with more than 50 columns are only available for export. Since that is the type of report being created, it's safe to ignore this warning and proceed with creating your export template.If you prefer to use only the required fields, make sure to select each field listed below from the list of Available ColumnsAvailable Fields on the left, and click Addthe right arrow (
 ) to add them to the Selected ColumnsTemplate LayoutCurrently Selected FieldsSelected Fields on the right:Add each of the fields listed below to your export template. Select a field name in the list of Available Fields on the left, and click Add to move it to the list of Export Fields on the right. Fields can be added in any order.doesn't limit the number of fields that can be added, so we recommend adding all fields. To do this, select the first field in the list of Available Fields on the left. Then, scroll to the bottom, hold down the Shift key on your keyboard, and select the last field in the list to select all fields in between. Once you've selected all fields, click Add to add them to the list of Export Fields on the right. Then, jump to step 7.
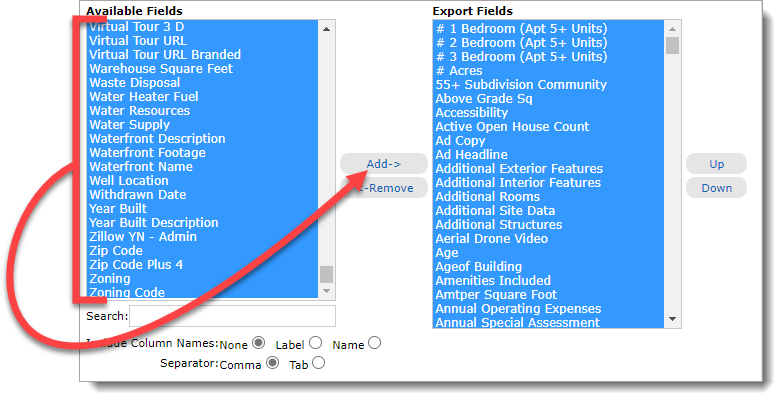
If you prefer to use only the required fields, make sure to select each field listed below from the list of Available Fields on the left, and click Add to add them to the list of Export Fields on the right:
Next, check the items to be included from the list of Available fields on the left, and click Add to move them to the list of Selected fields on the right. Below is the list of required fields that must be included:Select a field from the list of Available Residential Fields on the left, and click Add to move it to the list of Selected Fields on the right. Below is the list of required fields that must be included:- # of Carport Spaces
- # of Fireplaces
- # of Garage Spaces
- # Of Parking Spaces
- Above Grade Finished Area
- Acres
- Architectural Style
- Basement
- Below Grade Finished Area
- Below Grade Unfinished Area
- Carport or Garage
- City
- Close Date
- Close Price
- Common Walls
- Cooling
- Costs Paid by Seller
- Days On Market
- MLS#
- Heating
- Levels/Stories
- List Date
- List Price
- Lot Features
- Lower Bedrooms
- Lower Full Baths
- Lower Half Baths
- Off Market Date
- Ownership
- Parking Features
- Patio And Porch Features
- Pool Features
- Property Subtype
- Special Listing Conditions
- State
- Status
- Street Dir Prefi
- Street Dir Suffi
- Street Name
- Zip Code
Click here for tips on locating a specific field
The easiest way to find these fields is to use the search box. Some fields are displayed under the Name column, and some fields are displayed under the Code column.
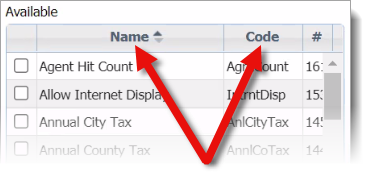
If you can't find a particular field using the Listing option from the Group dropdown, select Features or Features Categories from the Group drop‑down menu and search for the field again.

- Now, select Label for the Include Column Names option, and select Comma for the Separator option.
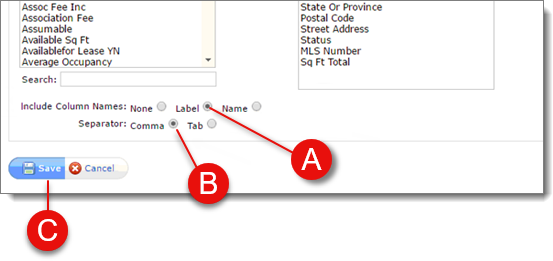
- When you're finished, review and verify that you've added all of the required fields from the list above to the column on the right, and that the boxes in the Short Lbl and Short Val columns are not checked. Then, click the Save, Save New, or Complete button.
If you use more than one class when searching, you'll need to build a template for each class you use. After saving your initital template, reopen it, select another class from the Class dropdown, and repeat steps 5 and 6. Then, repeat this for any additional classes needed. When you're finished, your custom template is available when exporting comps from each class where you created a template.
Part II — Export to file
Once you've saved your export template, use it to export the property data from your MLS search for QuickSource and/or Titan Analytics.
- Log in to the your MLS website, and perform your search as you normally would to review and select the results you want to include in your export.
- Click the additional options button (
 ) on the upper right, and select Export.
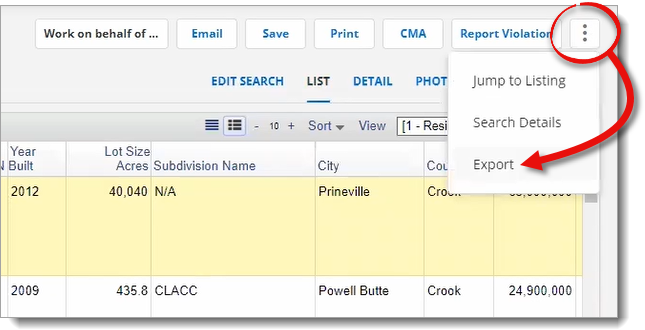
- From the export screen, choose Export Selected Matches to export only your selected comps.

- In the Select The Type of Export section, choose Custom Text Export, and use the drop‑down menu to select the custom template you created in step 4 above.
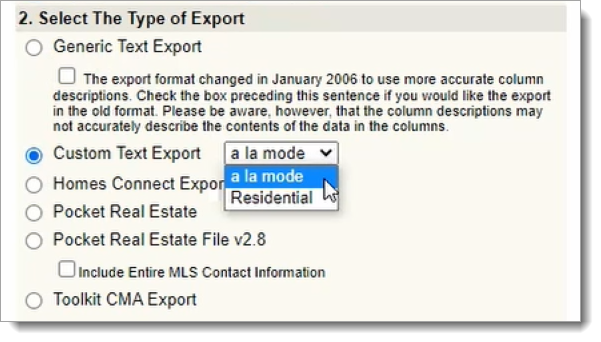
- When you're finished, click Export.
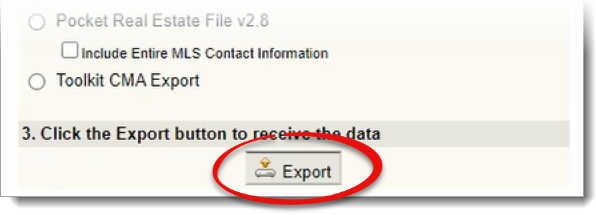
- Click the Export button on the lower right.

- From the Export file format drop‑down menu, select the template you named in step 5 of Part I above, and click Export.

- Click the Export button on the upper right.
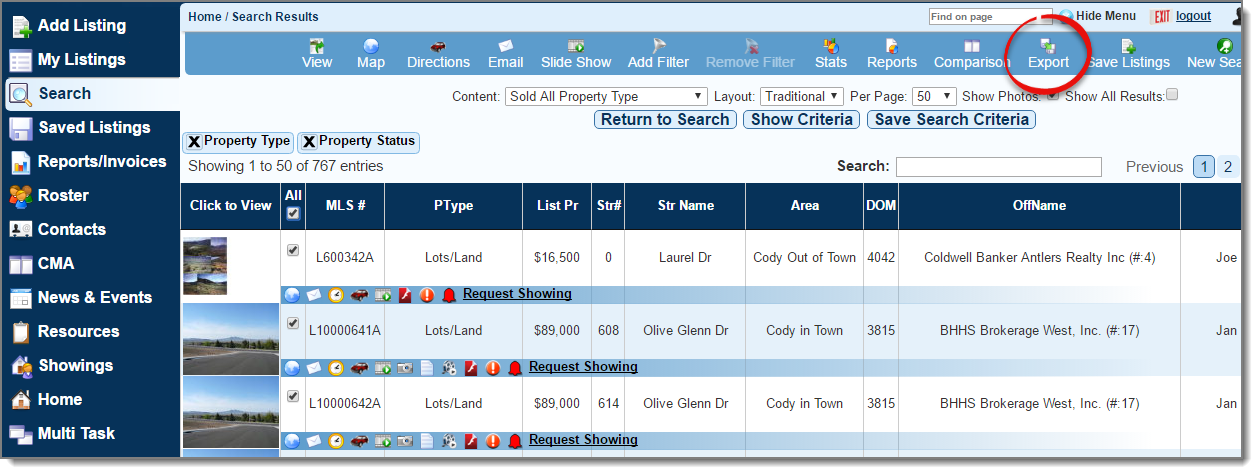
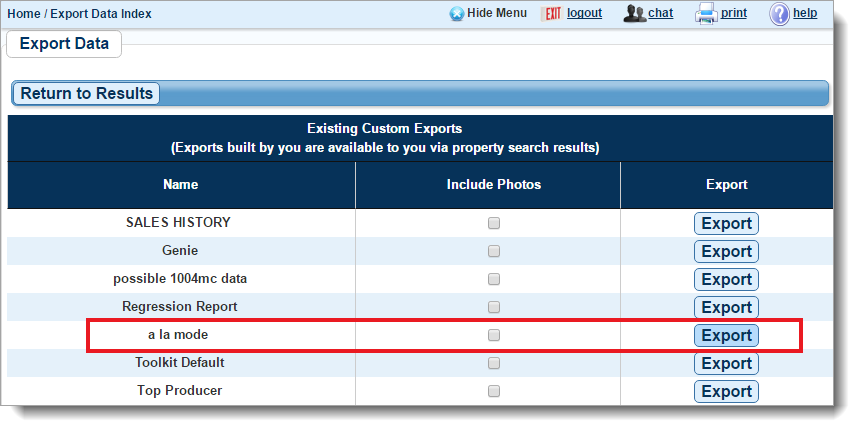
- From the list of Existing Custom Exports displayed, leave the Include Photos option unchecked, and click the Export button next to the template you named in step 4 of Part I above.
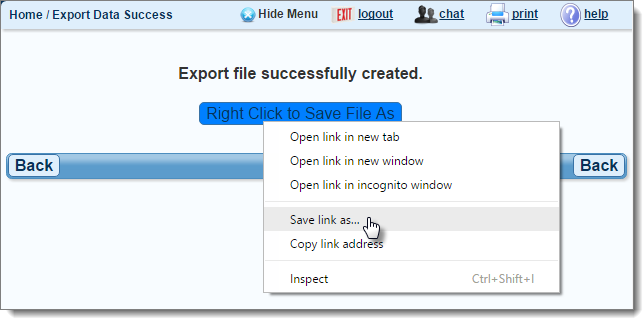
- Right‑click the button that reads "Right Click to Save File As" and, depending on your browser, choose Save link as… or Save target as… to begin downloading the export file to your computer.
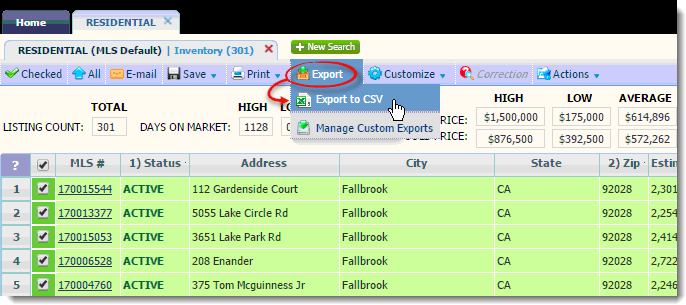
- Click Export, and then use the drop‑down to select Export to CSV.
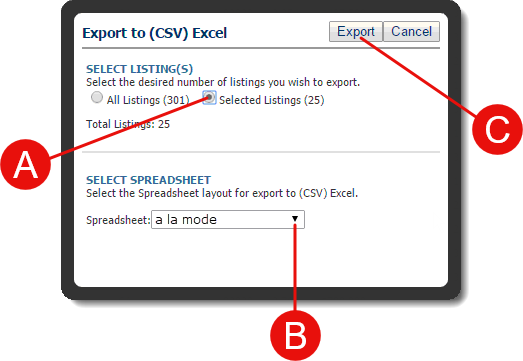
- Choose Selected Listings ( A ), and use the Spreadsheet dropdown ( B ) to select the template you named in step 4 of Part I above. Then, click Export on the upper right ( C ).
 In some cases, the data exported from doesn't match the template. Fields may be duplicated or missing, or the header row shifts and doesn't match the columns underneath. If you have a problem with your export, clear your browser cache, close your browser completely, and try again.
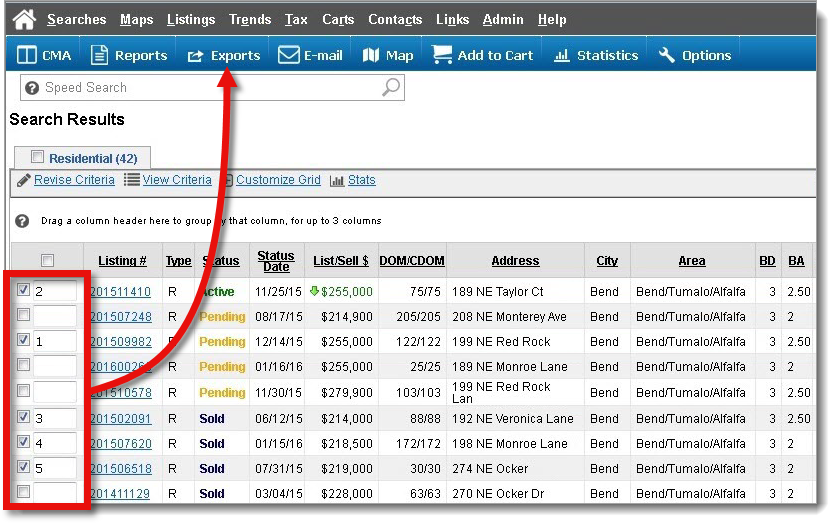
 - Click Exports on the upper left.
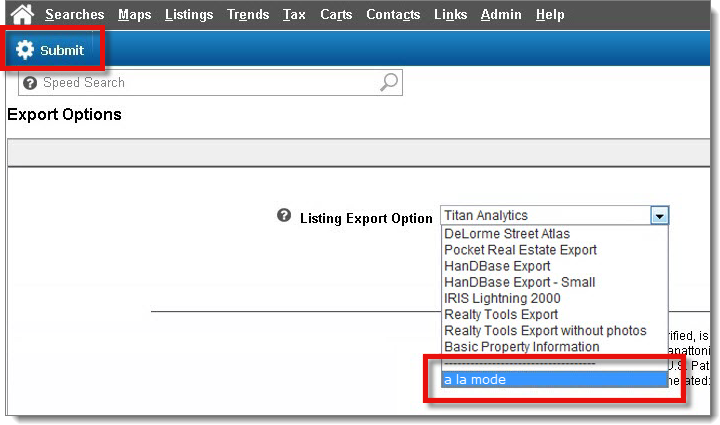
- From the Listing Export Option drop‑down menu, select the custom template you created in step 4 of Part I above. Then, click Submit.
- Now, click on the file hyperlink provided to begin downloading it to your computer.
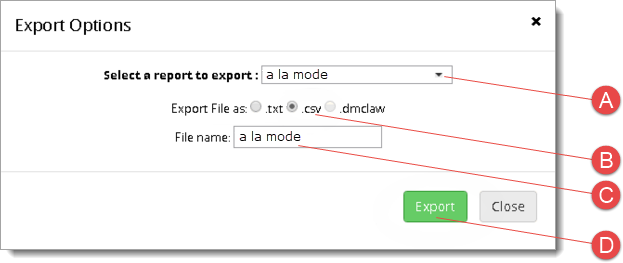
- When you're finished, click Export on the upper right.
- Select the export template you created in step 4 ( A ). Then, select the .csv option ( B ), adjust the file name as needed ( C ), and click Export again ( D ).
- Log in to the website, and perform your search as you normally would to review and select the results you want to include in your export.
-
Click the download icon (
 ) on the upper right.
-
Choose All selected listings and click Next.

-
Then, select the option for Get all fields in this report, use the dropdown to select the template you named in step 4 of Part I above, and click Next.

-
Select Tab‑delimited text and click Next.
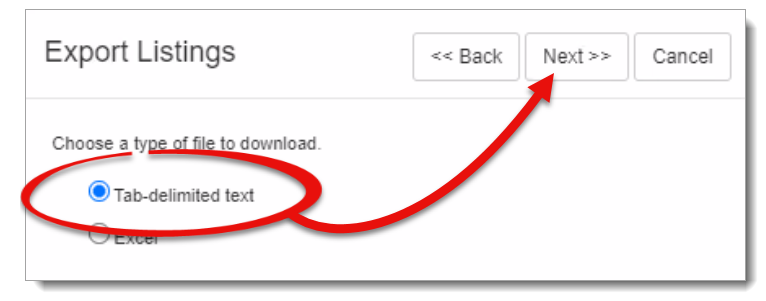
- Save the export file to a convenient location such as your Windows desktop so that you can easily browse to it.
That's it! Your exported property data is now ready to be imported into QuickSource and/or Titan Analytics. Click here for instructions on importing your MLS data into QuickSource, or click here for Titan Analytics instructions.
Follow the instructions below to create a custom export template and use it to export your property data:
- Log in to the website, and perform your search as you normally would to review and select the results you want to include in your export.
- In the Export Options on the upper left, select the CSV option, and click Save to.
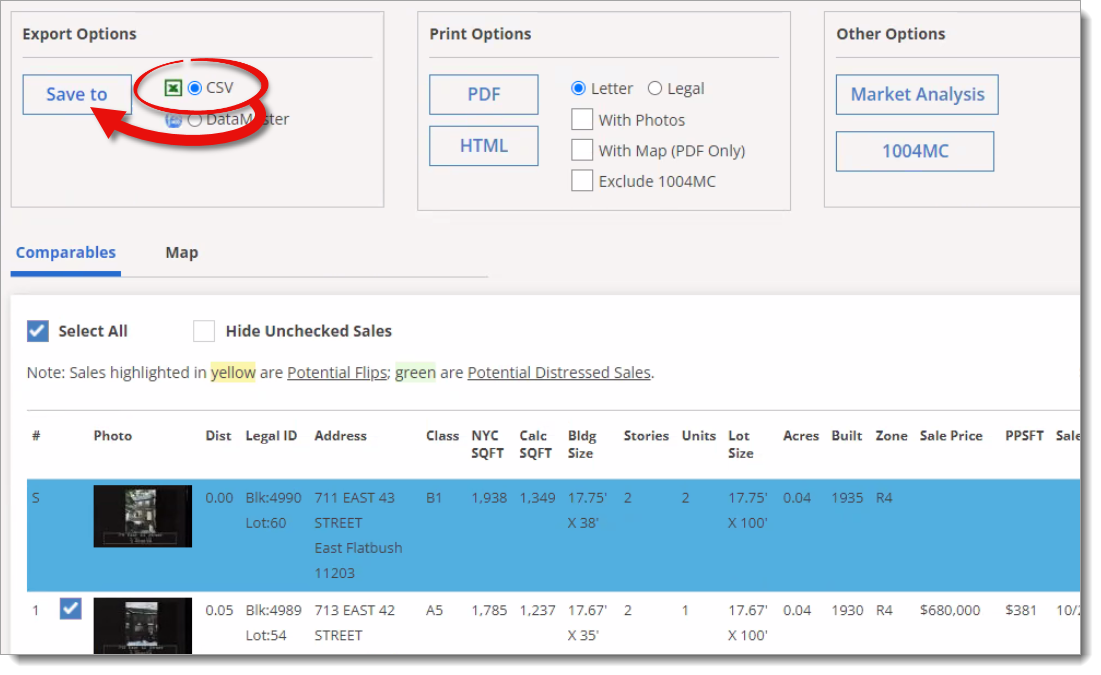
- Enter a name for the export file, and save it to a convenient location such as your Windows desktop so that you can easily browse to it.
That's it! Your exported property data is now ready to be imported into QuickSource and/or Titan Analytics. Click here for instructions on importing your MLS data into QuickSource, or click here for Titan Analytics instructions.
The following instructions are for the interface. The interface differs from other MLS providers in that it doesn't allow you create a custom export template or edit an existing template. Instead, you simply select the properties you want to include and choose Full Download as the export definition when exporting the data.
Follow the steps below for detailed instructions on exporting data from :
- Log in to the website.
- Perform your search, select the properties you wish to export, and click Download.
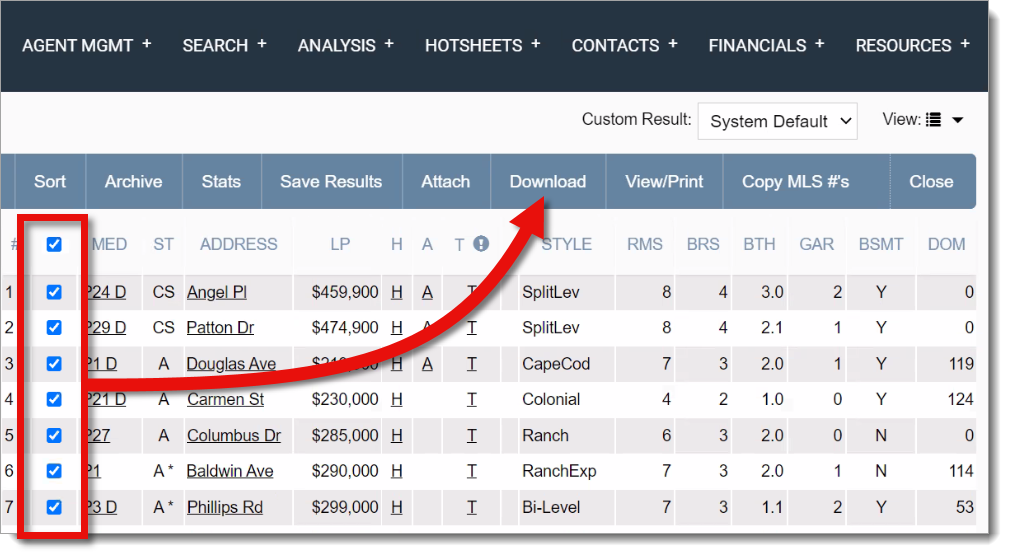
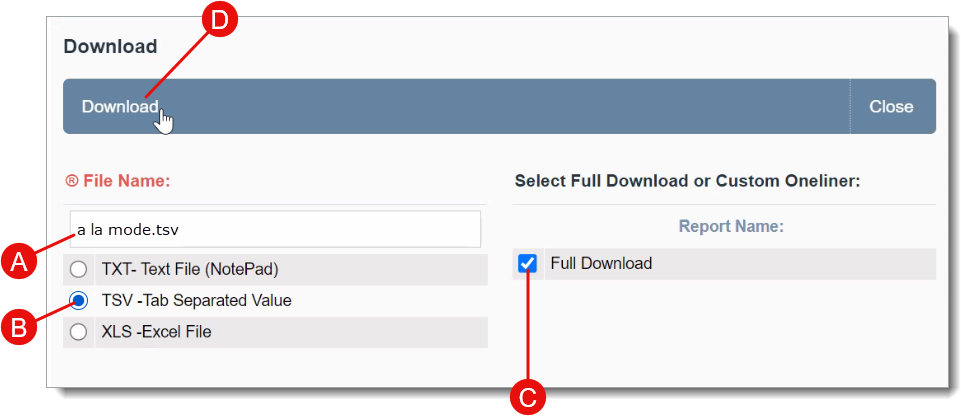
- Use the default file name, or enter a new file name ( A ). Then, select TSV ‑Tab Separated Value as the file type ( B ), and check the box next to Full download if it isn't checked already ( C ). When you're finished, click Download ( D ).
That's it! Your exported property data is now ready to be imported into QuickSource and/or Titan Analytics. Click here for instructions on importing your MLS data into QuickSource, or click here for Titan Analytics instructions.
Follow the instructions in Part I below to create a custom export template. If you've already created a custom export template and you're ready to export data, skip ahead to Part II.
Part I — Create your template (first-time setup)
- Log in to the your MLS website and go to the Search page.
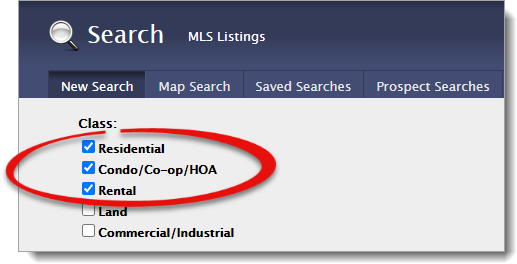
- In the Class section of the New Search tab, check the boxes next to Residential, Condo/Co‑op/HOA, and Rental.
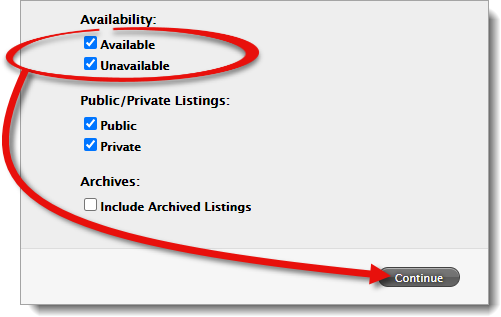
- Then, in the Availability section, check the boxes next to Available and Unavailable, and click Continue on the lower right.
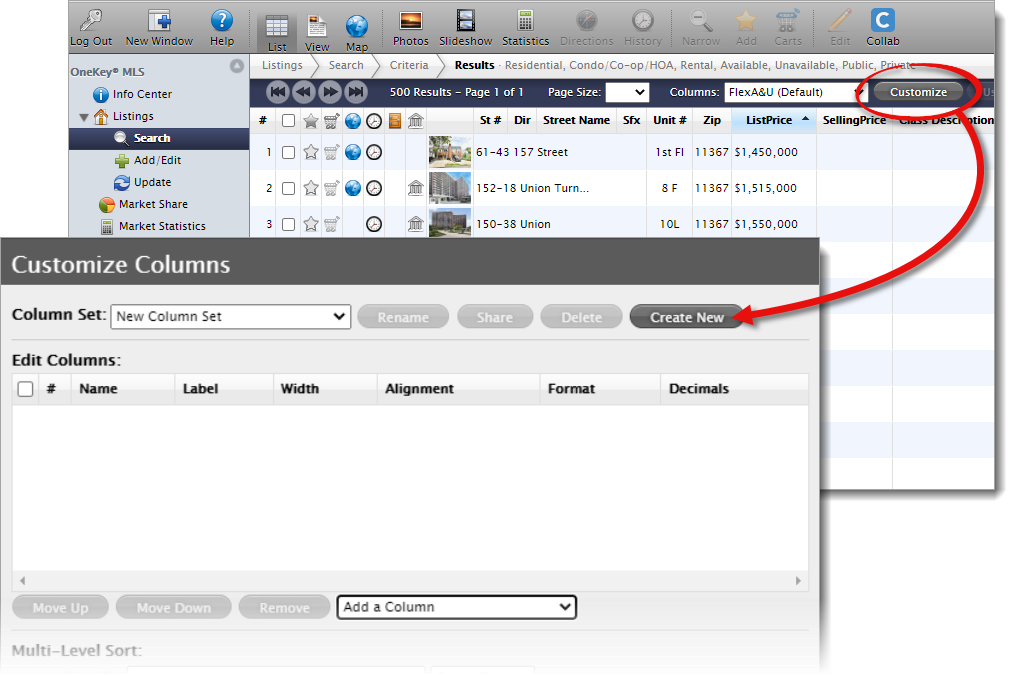
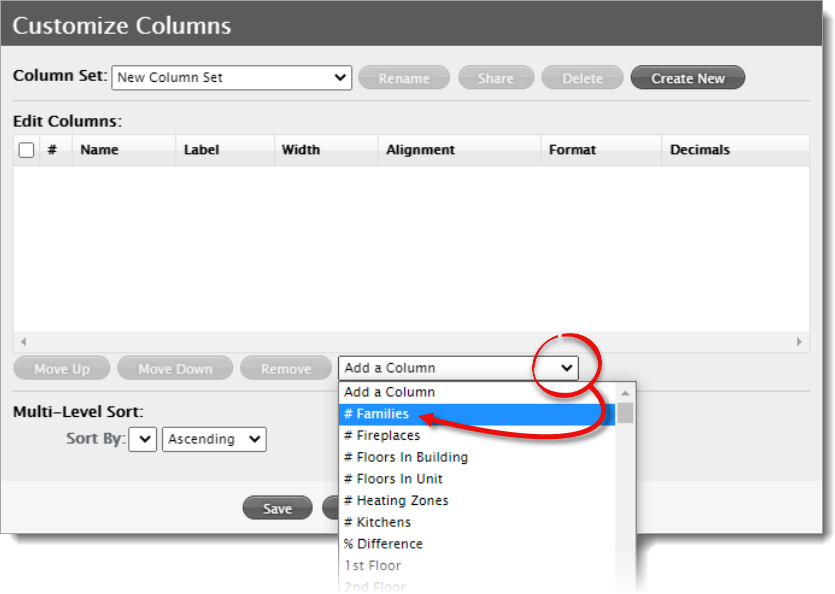
- Click Customize on the upper right. Then, click Create New.
- Click the Add a Column drop‑down menu and select the first column from the list. Then, press the down‑arrow key on your keyboard ( ) to select the next column. Repeat this process until all columns are added.
- Once you've added all of the columns, click Save.
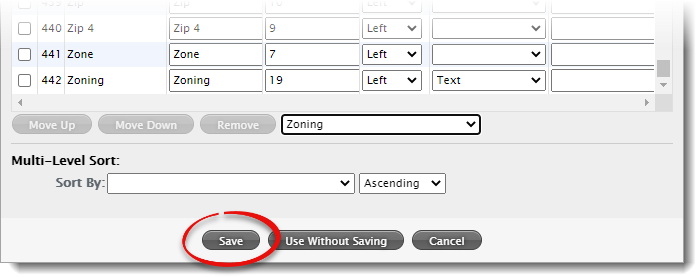
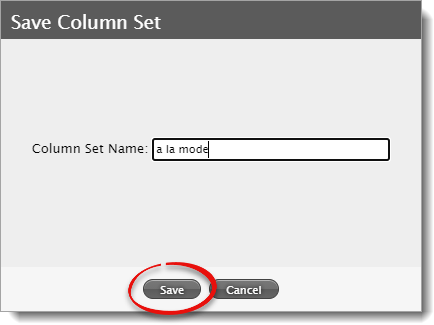
- Enter a name for the column set in the Column Set Name field — such as a la mode — and click Save.
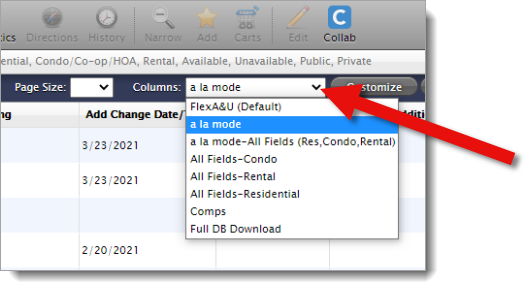
- Once you're returned to the search page, click the Columns drop‑down menu and change it back to the default view.
Part II — Export to file
Once you've saved your export template, use it to export the property data from your MLS search for QuickSource and/or Titan Analytics.
- Log in to the your MLS website, and perform your search as you normally would to review and select the results you want to include in your export.
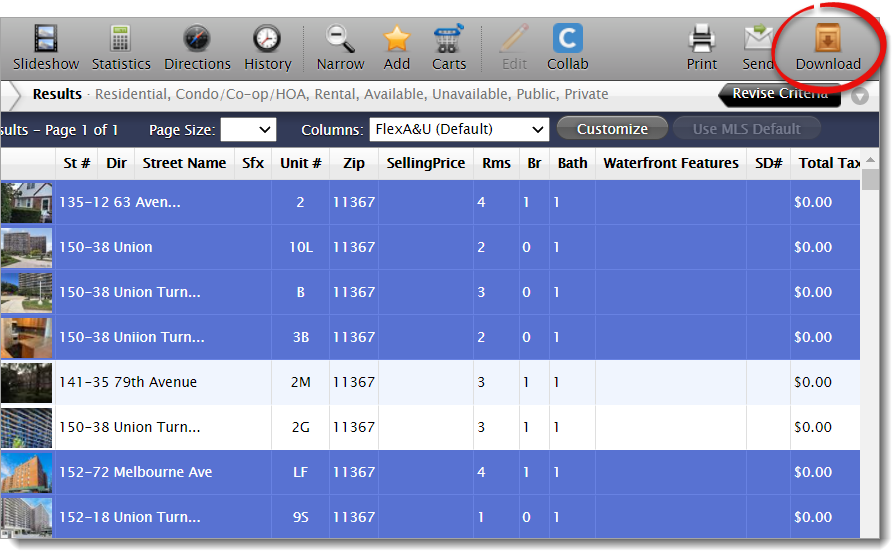
- Click Download on the upper right.
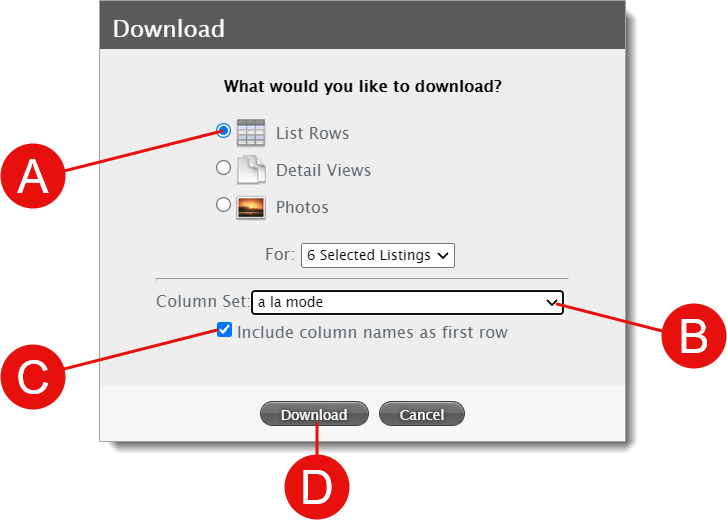
- Choose the List Rows option ( A ), select your custom a la mode column set ( B ), check the box next to Include column names as first row ( C ), and click Download ( D ).
- Save the export file to a convenient location such as your Windows desktop so that you can easily browse to it.
That's it! Your exported property data is now ready to be imported into QuickSource and/or Titan Analytics. Click here for instructions on importing your MLS data into QuickSource, or click here for Titan Analytics instructions.
Follow the instructions in Part I below to create a custom export template. If you've already created a custom export template and you're ready to export data, skip ahead to Part II.
Part I — Create your template (first-time setup)
- Log in to the your MLS website, and perform your search as you normally would to review and select the results you want to include in your export.
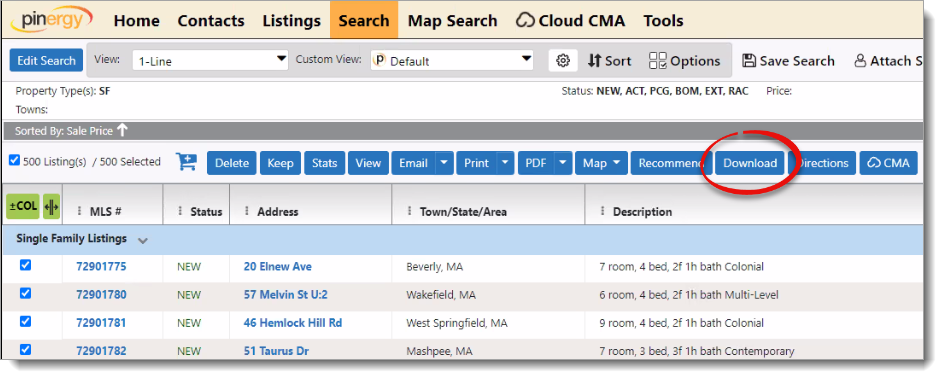
- Click Download on the upper right.
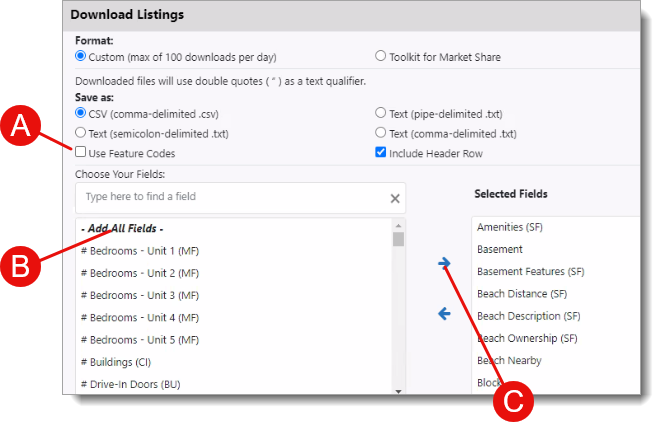
- Uncheck the box next to Use Feature Codes ( A ) and select the ‑ Add All Fields ‑ option from the list of fields on the left ( B ). Then, click the right arrow ( ) to add them to the list of Selected Fields on the right ( C ).
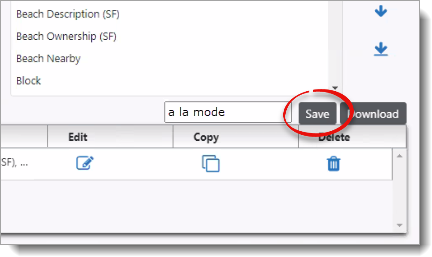
- Enter a name for your template — such as a la mode — and click Save. If you're ready to export the currently selected properties, skip ahead to step 3 of Part 2 below.
Part II — Export to file
Once you've saved your export template, use it to export the property data from your MLS search for QuickSource and/or Titan Analytics.
- Log in to the your MLS website, and perform your search as you normally would to review and select the results you want to include in your export.
- Click Download on the upper right.

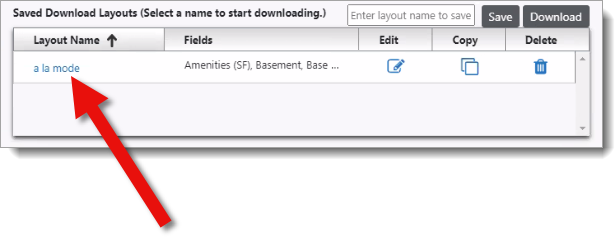
- Click the name of your custom export template in the Layout Name column to begin the download.
- Save the export file to a convenient location such as your Windows desktop so that you can easily browse to it.
That's it! Your exported property data is now ready to be imported into QuickSource and/or Titan Analytics. Click here for instructions on importing your MLS data into QuickSource, or click here for Titan Analytics instructions.
Follow the instructions below to create a custom export template and use it to export your property data:
- Log in to the your MLS website, and perform your search as you normally would to review and select the results you want to include in your export.
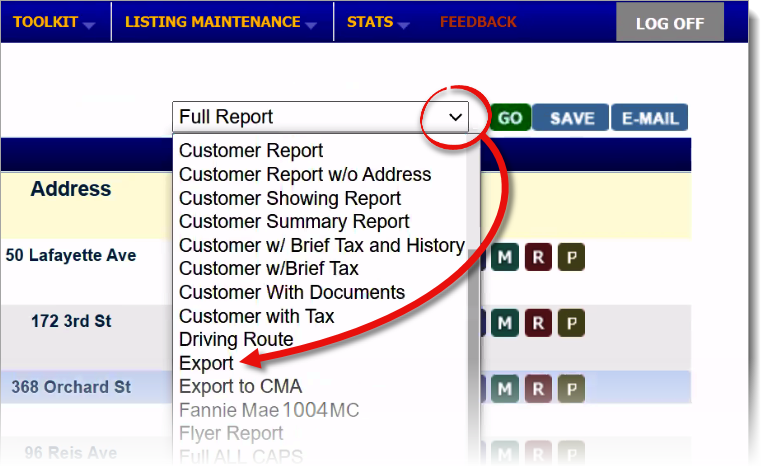
- Click the drop‑down menu on the upper right and choose Export.
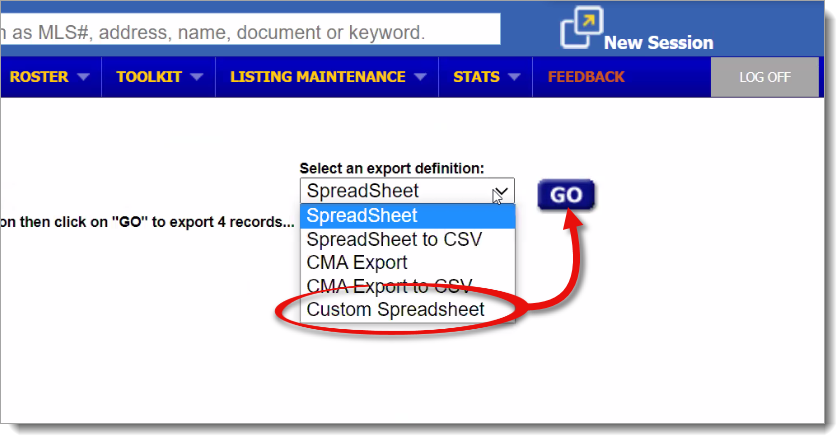
- From the Export screen, click the Select an export definition dropdown, select Custom Spreadsheet, and click Go.
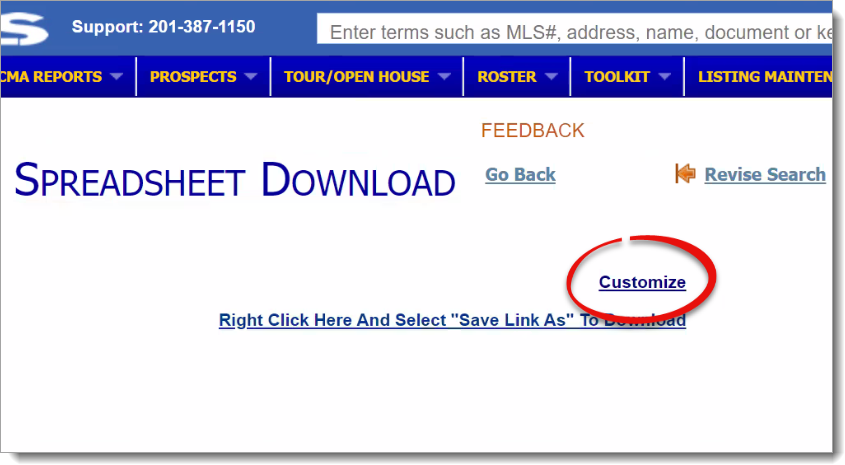
- When you reach the Spreadsheet Download screen, click Customize.
Keep in mind that you only need to Customize the spreadsheet the first time you perform a download. Once it's customized, skip ahead to step 7 to export your property data.
- Select all fields from the list of Available fields on the left, and click Add to add them to the list of Selected fields on the right.
To quickly highlight all fields, select the first field in the list. Then, hold down the Shift key on your keyboard and select the last field in the list to highlight all fields in between. Once they're all highlighted, simply click the Add button.
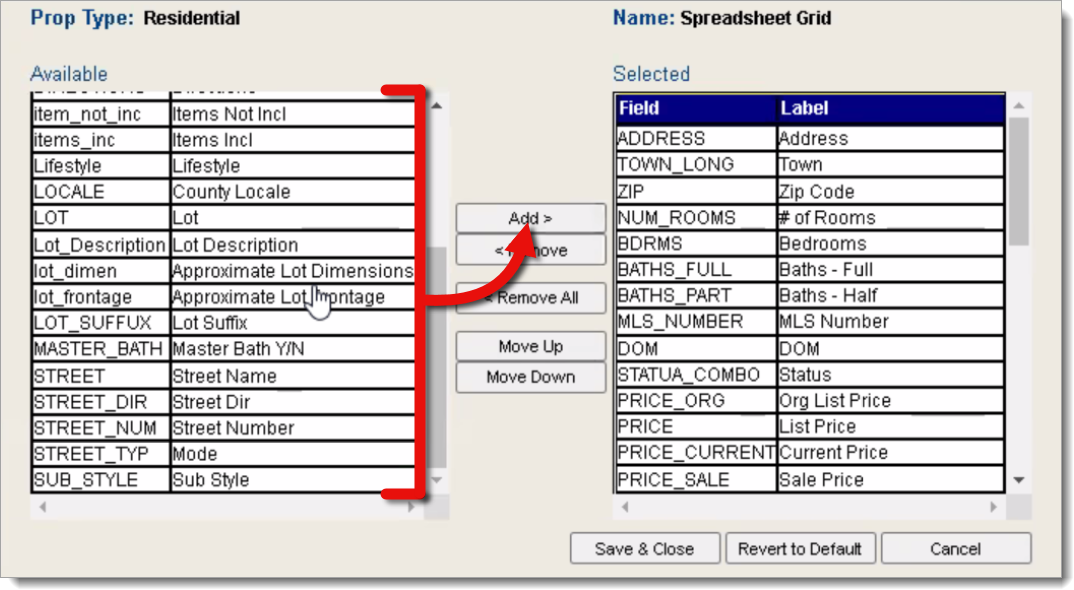
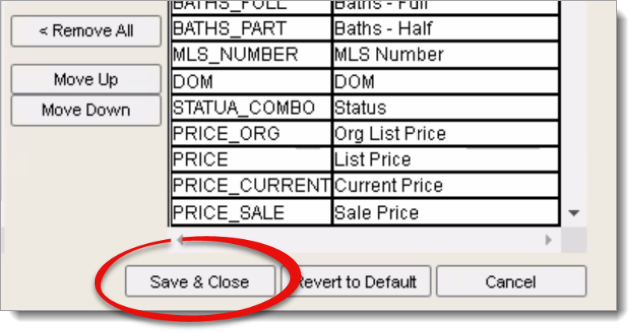
- When you're finished, click Save & Close to save your changes and return to the Spreadsheet Download screen.
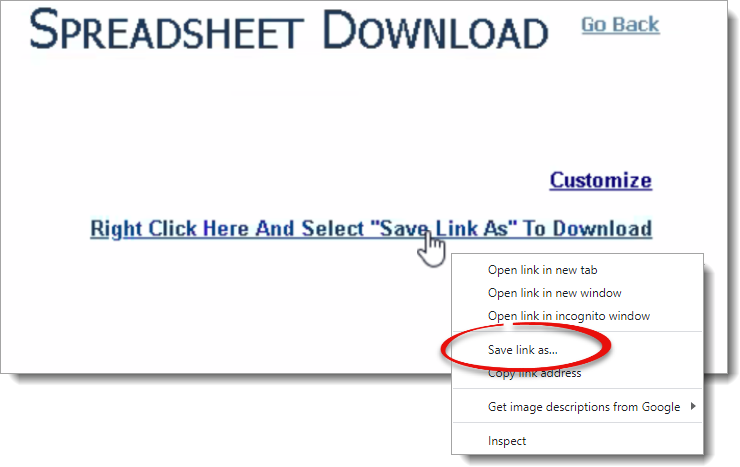
- To download the comps for any search, right‑click the Right Click Here… hyperlink, and choose Save Link As. Then, save the export file to a convenient location such as your Windows desktop so that you can easily browse to it.
That's it! Your exported property data is now ready to be imported into QuickSource and/or Titan Analytics. Click here for instructions on importing your MLS data into QuickSource, or click here for Titan Analytics instructions.
Follow the instructions below to create a custom export template and use it to export your property data:
- Log in to the your MLS website, and perform your search as you normally would to review and select the results you want to include in your export.
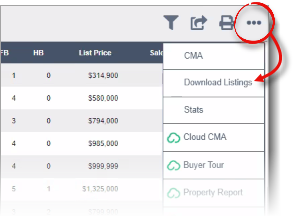
- Click the menu icon ( ) on the upper right and select Download Listings.
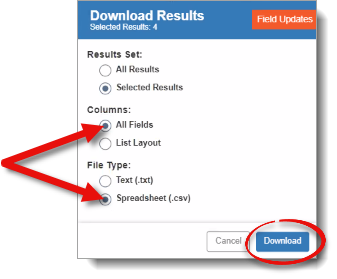
- In the window that appears, choose whether you want to download All Results or Selected Results in the Results Set section. Then, choose All Fields for the Columns, and select Spreadsheet (.csv) for the File Type.
- When you're finished, click Download on the lower right, and save the export file to a convenient location such as your Windows desktop so that you can easily browse to it.
That's it! Your exported property data is now ready to be imported into QuickSource and/or Titan Analytics. Click here for instructions on importing your MLS data into QuickSource, or click here for Titan Analytics instructions.
The following instructions are for the interface. differs from other MLS providers in that it doesn't require you to log in, and you don't create a custom export template or edit an existing template. Instead, you simply perform your property search and click Download All to export and save the data.
Follow the steps below for detailed instructions on exporting data from :
- Go to the website and perform your search.
- Scroll to the bottom of the list of properties and click Download All.
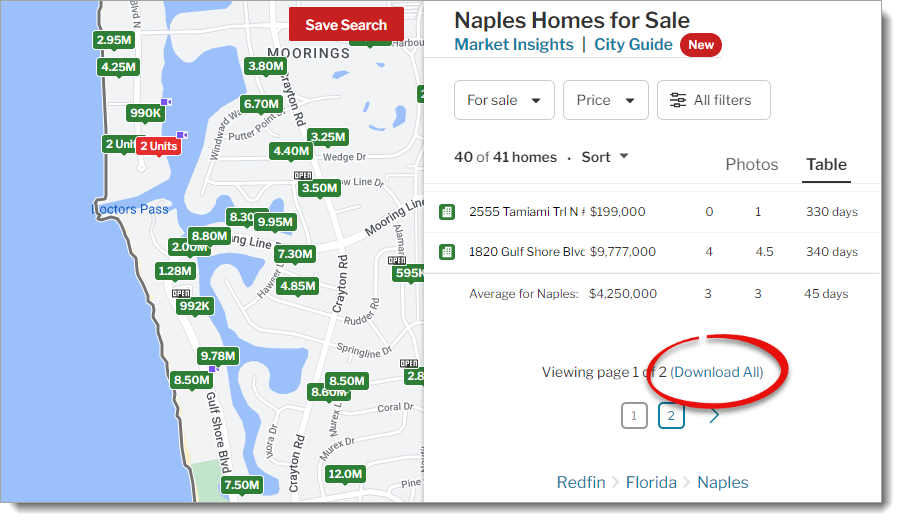
- Save the export file to a convenient location such as your Windows desktop so that you can easily browse to it.
That's it! Your exported property data is now ready to be imported into QuickSource and/or Titan Analytics. Click here for instructions on importing your MLS data into QuickSource, or click here for Titan Analytics instructions.
The following instructions are for the interface in Oregon and Washington. The interface differs from other MLS providers in that it doesn't allow you create a custom export template or edit an existing template. Instead, you simply select the properties you want to include and choose Export Residential as the export definition when exporting the data.
Follow the steps below for detailed instructions on exporting data from :
- Log in to the website, perform your search, and select the properties you wish to export.
- Click Select Report on the upper right, and choose Export.
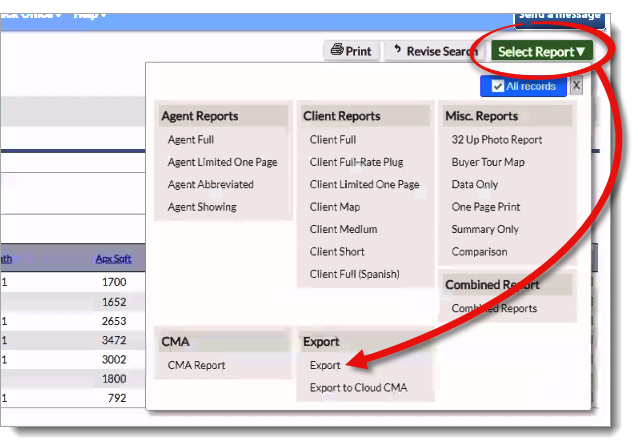
- Click the Select an export definition dropdown, choose Export Residential, and click Go.
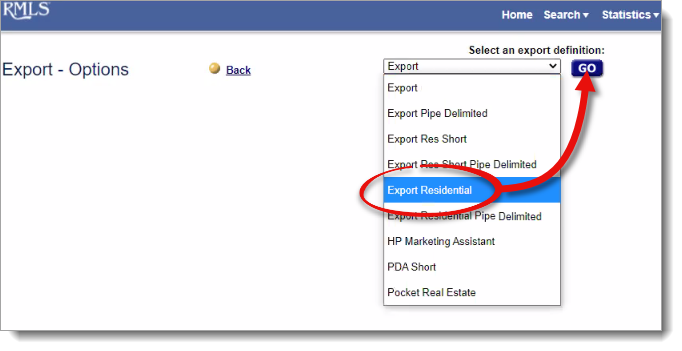
- Click Download, and save the export file to a convenient location such as your Windows desktop so that you can easily browse to it.
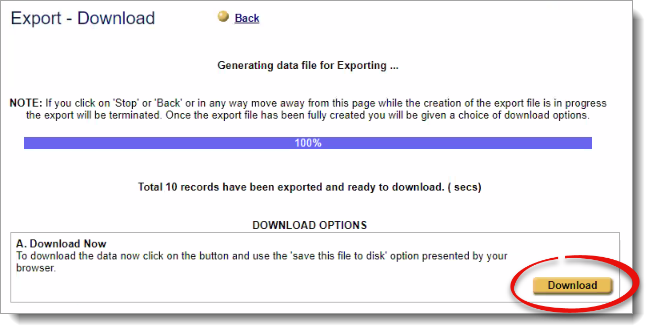
That's it! Your exported property data is now ready to be imported into QuickSource and/or Titan Analytics. Click here for instructions on importing your MLS data into QuickSource, or click here for Titan Analytics instructions.
Follow the instructions in Part I below to create a custom export template. If you've already created a custom export template and you're ready to export data, skip ahead to Part II.
Part I — Create your template (first-time setup)
- Log in to the your MLS website.
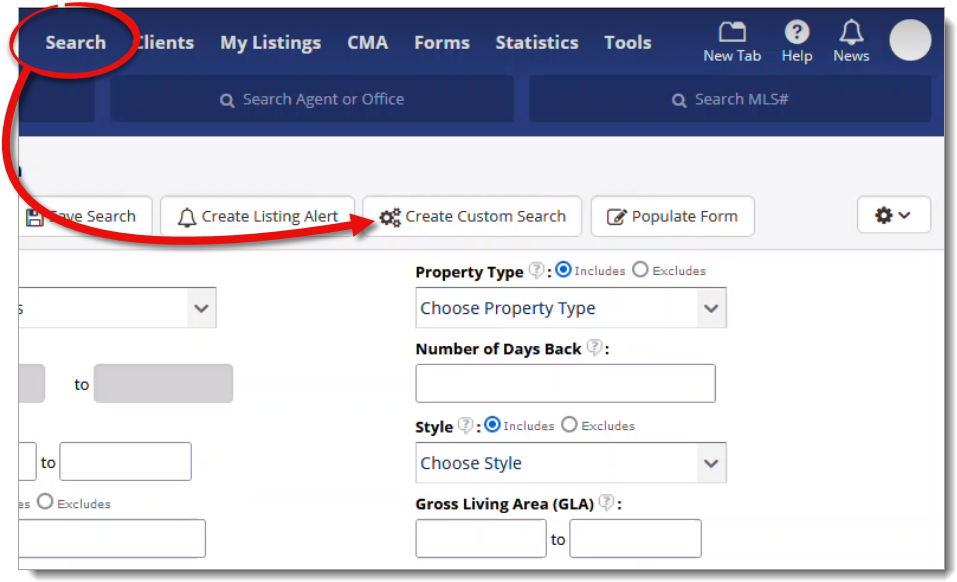
- Click Search at the top. Then, click Create Custom Search.
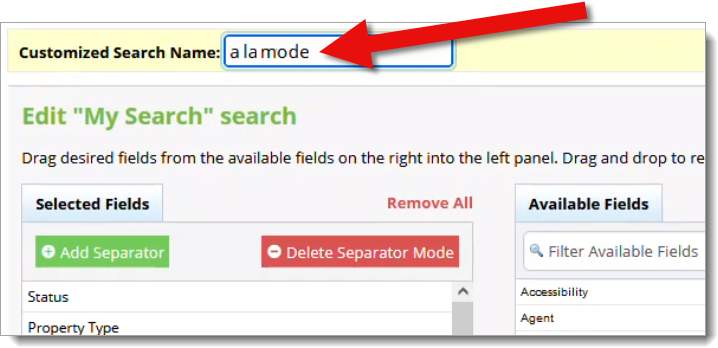
- Enter a name for the export template in the Customized Search Name field — such as a la mode.
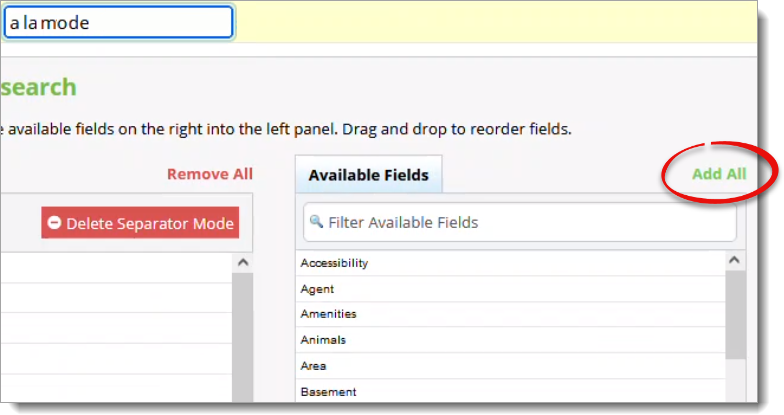
- Click Add All at the top of the Available Fields column on the right to add all of the fields to the list of Selected Fields on the left.
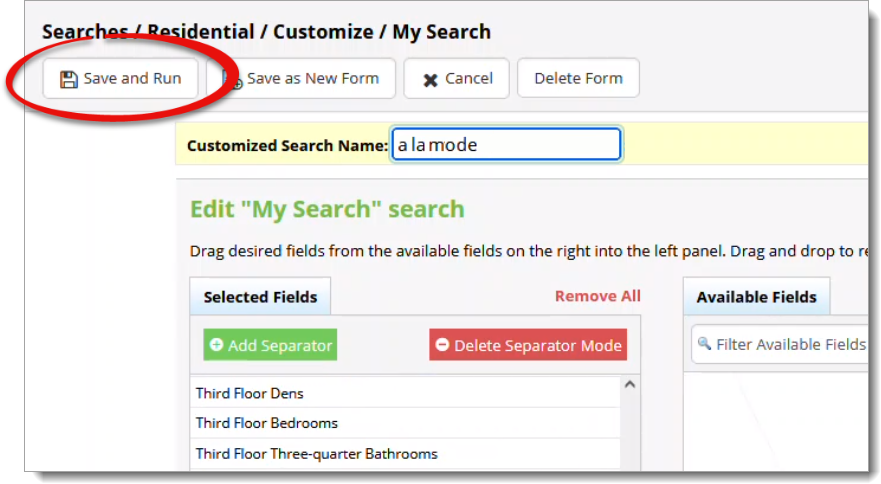
- Once you've added all fields to your export template, click Save and Run to save your template and perform a search with the new template. Or, click Save as New Form to save the template for later use.
Part II — Export to file
Once you've saved your export template, use it to export the property data from your MLS search for QuickSource and/or Titan Analytics:
- Log in to the your MLS website, and perform your search as you normally would to review and select the results you want to include in your export.
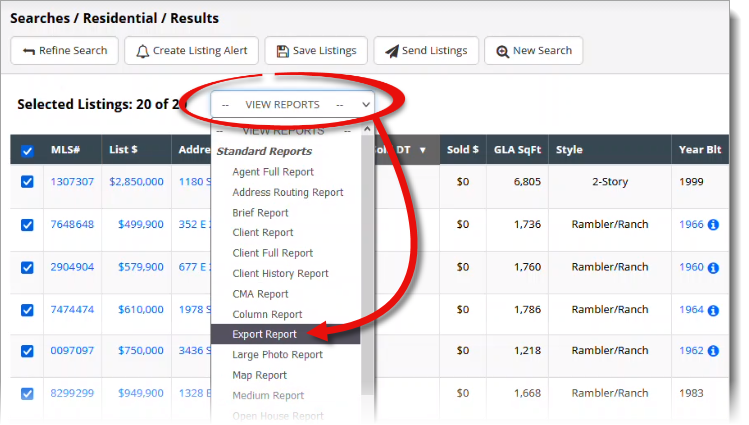
- Click the VIEW REPORTS drop‑down menu, and select Export Report.
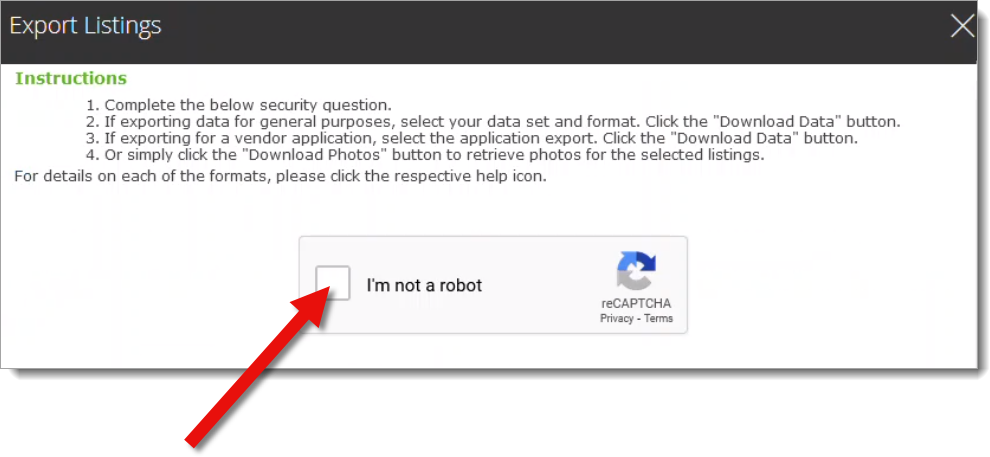
- Check the box next to I'm not a robot, and complete the verification (if necessary).
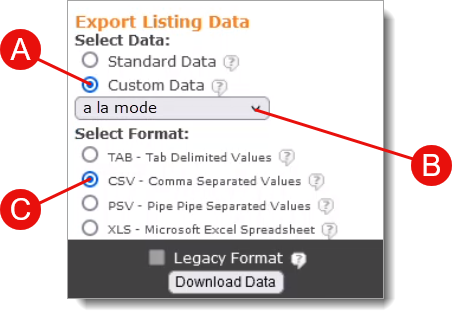
- In the Export Listing Data column on the left, select Custom Data ( A ), choose a la mode from the drop‑down menu ( B ), and select CSV ‑ Comma Separated Value ( C ) as the format.
- When you're finished, click Download Data, and save the export file to a convenient location such as your Windows desktop so that you can easily browse to it.
That's it! Your exported property data is now ready to be imported into QuickSource and/or Titan Analytics. Click here for instructions on importing your MLS data into QuickSource, or click here for Titan Analytics instructions.
The following instructions are for the MLS interface. The website differs from other MLS providers in that it offers a pre‑defined custom export template, so there's no need for you to manually create your own template. Instead, you simply run your search as you normally would, select the properties you want to include, and choose the template from the list of export templates when exporting the data.
If you're creating a custom field map instead of using the pre‑defined template, click here for the list of required fields.
Below is the list of required fields that must be included in your export template:
Follow the steps below for detailed instructions on exporting data from :
- Log in to the your MLS website, and perform your residential search as you normally would to review and select the results you want to include in your export.
- Click Export in the toolbar above the list of Search Results.
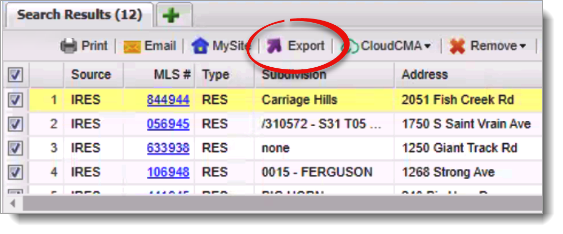
- Click the Available Downloads drop‑down menu, select the template from the list, and click the button to download or export the file.
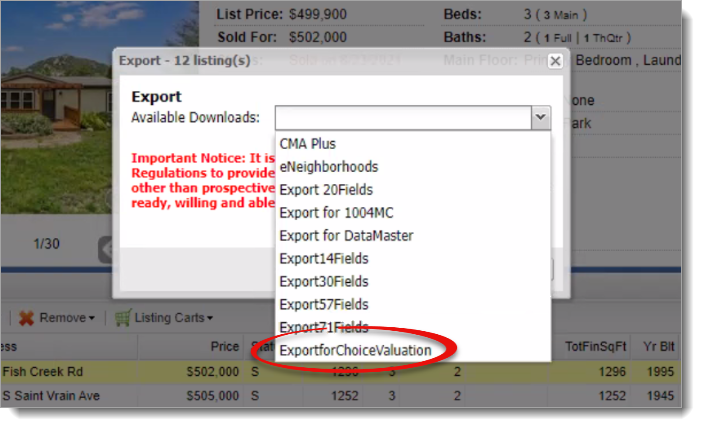
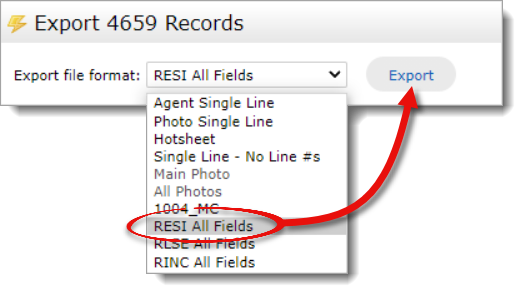
- Click the Export button on the lower right.

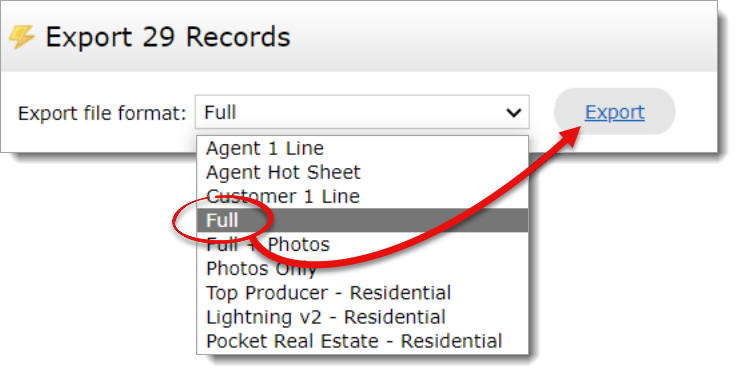
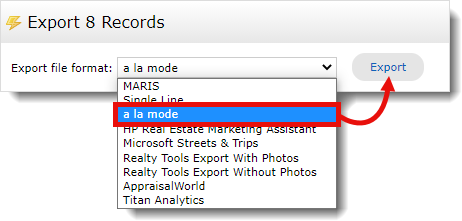
- Select the template from the Export file format drop‑down menu, and click Export.
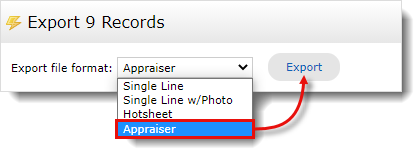
- Save the export file to a convenient location such as your Windows desktop so that you can easily browse to it.
That's it! Your exported property data is now ready to be imported into QuickSource and/or Titan Analytics. Click here for instructions on importing your MLS data into QuickSource, or click here for Titan Analytics instructions.
You can also begin typing the name of your MLS Board in the drop‑down menu above to quickly filter the list of results. Once you've found your MLS Board, select it to view detailed instructions.
General Overview
The instructions below offer general information on how to create an export template and export data from most MLS websites. It isn't specific to any particular MLS, and is intended only as a high‑level overview that gives a general idea of what to expect. Select your MLS from the drop‑down menu above to view detailed instructions specific to your MLS. If your MLS isn't listed, continue with the steps below for the general process:
Part I — Create your template (first‑time setup)
- Log in to your MLS.
- Select the option for Exports. This may be located in an Admin, Preferences, or Settings area of your MLS, or it may be in its own section.
- Select the option to create a new export. Some MLS providers may not have this option. If so, in most cases you can edit an existing export template instead.
- Enter a new name or edit the existing name for the export template in the provided field — such as a la mode. If there's an option to select the file format at this point, select a comma separated value (CSV). Be sure to enable the options to include column headers and field names, and omit column images if these options are available.
- Now, click Save or Next.
- At this point, most MLS systems display a column of available fields and a column of fields already included in your export template — with options for adding, removing, and organizing your selections. Below is the list of required fields that must be included:
- # of Carport Spaces
- # of Fireplaces
- # of Garage Spaces
- # Of Parking Spaces
- Above Grade Finished Area
- Acres
- Architectural Style
- Basement
- Below Grade Finished Area
- Below Grade Unfinished Area
- Carport or Garage
- City
- Close Date
- Close Price
- Common Walls
- Cooling
- Costs Paid by Seller
- Days On Market
- MLS#
- Heating
- Levels/Stories
- List Date
- List Price
- Lot Features
- Lower Bedrooms
- Lower Full Baths
- Lower Half Baths
- Off Market Date
- Ownership
- Parking Features
- Patio And Porch Features
- Pool Features
- Property Subtype
- Special Listing Conditions
- Status
- Street Dir Prefi
- Street Dir Suffi
- Street Name
- When you're finished, review and verify the list of fields you added to the included fields column on the right. Then, click the option to Finish, or Save.
Part II — Export to file
Once you've saved your export template, use it to export the property data from your MLS search for use in QuickSource and/or Titan Analytics.
- Log in to your MLS.
- Enter your search criteria as you normally would. Be sure to mark all property statuses you want to include in your data.
- Review and select the results to include in your export. Then, select the option to export your data.
- Select the custom template you created in step 4 of Part I above. If there's an option for selecting the file format at this point, select a comma separated value (CSV). Then, click Export or Submit.
- Save the export file to a convenient location such as your Windows desktop so that you can easily locate it and import it into QuickSource and/or Titan Analytics.
That's it! Your exported property data is now ready to be imported into QuickSource and/or Titan Analytics. Click here for instructions on importing your MLS data into QuickSource, or click here for Titan Analytics instructions.
Even though there are over 600 MLS boards in the United States, we've found most of them use one of a handful of MLS software vendors. Check your MLS login screen, the footer, or even the browser URL for something that indicates which vendor your MLS uses. Once you've identified the software vendor, select that vendor from the drop‑down menu above, or click one of the links below for detailed instructions.
If you're not sure, or you're unable to determine which software vendor your MLS uses, continue with the instructions below for general information on setting up an export template and creating a CSV from your MLS search results.
General Overview
The instructions below offer general information on how to create an export template and export data from most MLS websites. It isn't specific to any particular MLS, and is intended only as a high‑level overview that gives a general idea of what to expect. Select your MLS from the drop‑down menu above to view detailed instructions specific to your MLS. If your MLS isn't listed, continue with the steps below for the general process:
Part I — Create your template (first‑time setup)
- Log in to your MLS.
- Select the option for Exports. This may be located in an Admin, Preferences, or Settings area of your MLS, or it may be in its own section.
- Select the option to create a new export. Some MLS providers may not have this option. If so, in most cases you can edit an existing export template instead.
- Enter a new name or edit the existing name for the export template in the provided field — such as a la mode. If there's an option to select the file format at this point, select a comma separated value (CSV). Be sure to enable the options to include column headers and field names, and omit column images if these options are available.
- Now, click Save or Next.
- At this point, most MLS systems display a column of available fields and a column of fields already included in your export template — with options for adding, removing, and organizing your selections. Below is the list of required fields that must be included:
- # of Carport Spaces
- # of Fireplaces
- # of Garage Spaces
- # Of Parking Spaces
- Above Grade Finished Area
- Acres
- Architectural Style
- Basement
- Below Grade Finished Area
- Below Grade Unfinished Area
- Carport or Garage
- City
- Close Date
- Close Price
- Common Walls
- Cooling
- Costs Paid by Seller
- Days On Market
- MLS#
- Heating
- Levels/Stories
- List Date
- List Price
- Lot Features
- Lower Bedrooms
- Lower Full Baths
- Lower Half Baths
- Off Market Date
- Ownership
- Parking Features
- Patio And Porch Features
- Pool Features
- Property Subtype
- Special Listing Conditions
- Status
- Street Dir Prefi
- Street Dir Suffi
- Street Name
- When you're finished, review and verify the list of fields you added to the included fields column on the right. Then, click the option to Finish, or Save.
Part II — Export to file
Once you've saved your export template, use it to export the property data from your MLS search for use in QuickSource and/or Titan Analytics.
- Log in to your MLS.
- Enter your search criteria as you normally would. Be sure to mark all property statuses you want to include in your data.
- Review and select the results to include in your export. Then, select the option to export your data.
- Select the custom template you created in step 4 of Part I above. If there's an option for selecting the file format at this point, select a comma separated value (CSV). Then, click Export or Submit.
- Save the export file to a convenient location such as your Windows desktop so that you can easily locate it and import it into QuickSource and/or Titan Analytics.
That's it! Your exported property data is now ready to be imported into QuickSource and/or Titan Analytics. Click here for instructions on importing your MLS data into QuickSource, or click here for Titan Analytics instructions.
