Working with multiple monitors
This document discusses setting up a computer with multiple monitors.
Document 6010 | Last updated: 11/08/2021 SPB
Below is an overview of the available options for setting up a multi-montior environment. It's intended to help you to determine whether or not your computer supports additional screens, what to do if it doesn't, and offers step‑by‑step instructions on getting everything set up. Please keep in mind that a la mode technicians can't assist you over the phone with hardware issues. These are only guidelines.
We offer a couple of free eBooks to help with this process, too. Click here to download our eBook on setting up more monitors, and click here to download our eBook on appraisal devices and accessories.
Click here for information about available video output options.
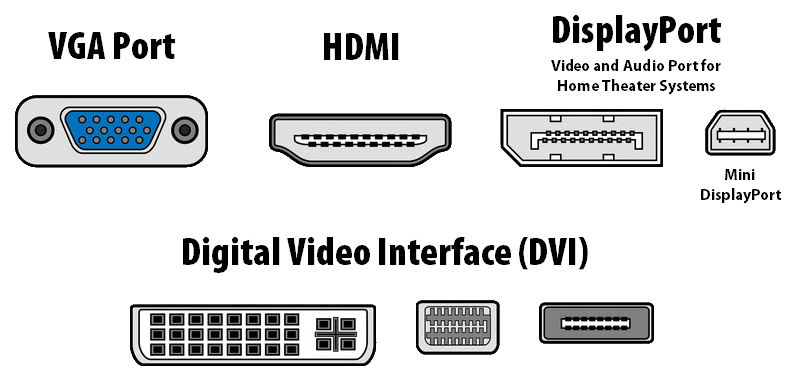
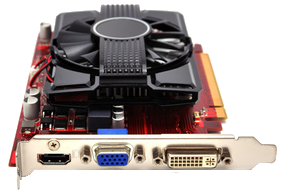
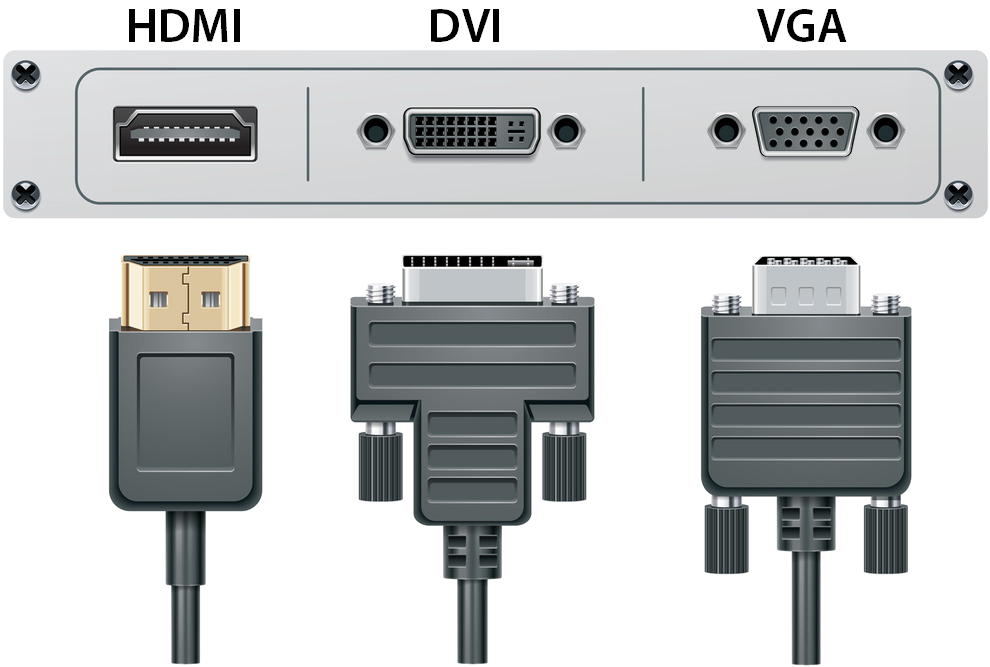
The four most common video output ports are VGA (Video Graphics Array), DVI (Digital Visual Interface), HDMI (High Definition Multimedia Interface), and DisplayPort (a proprietary video port available on newer computers).
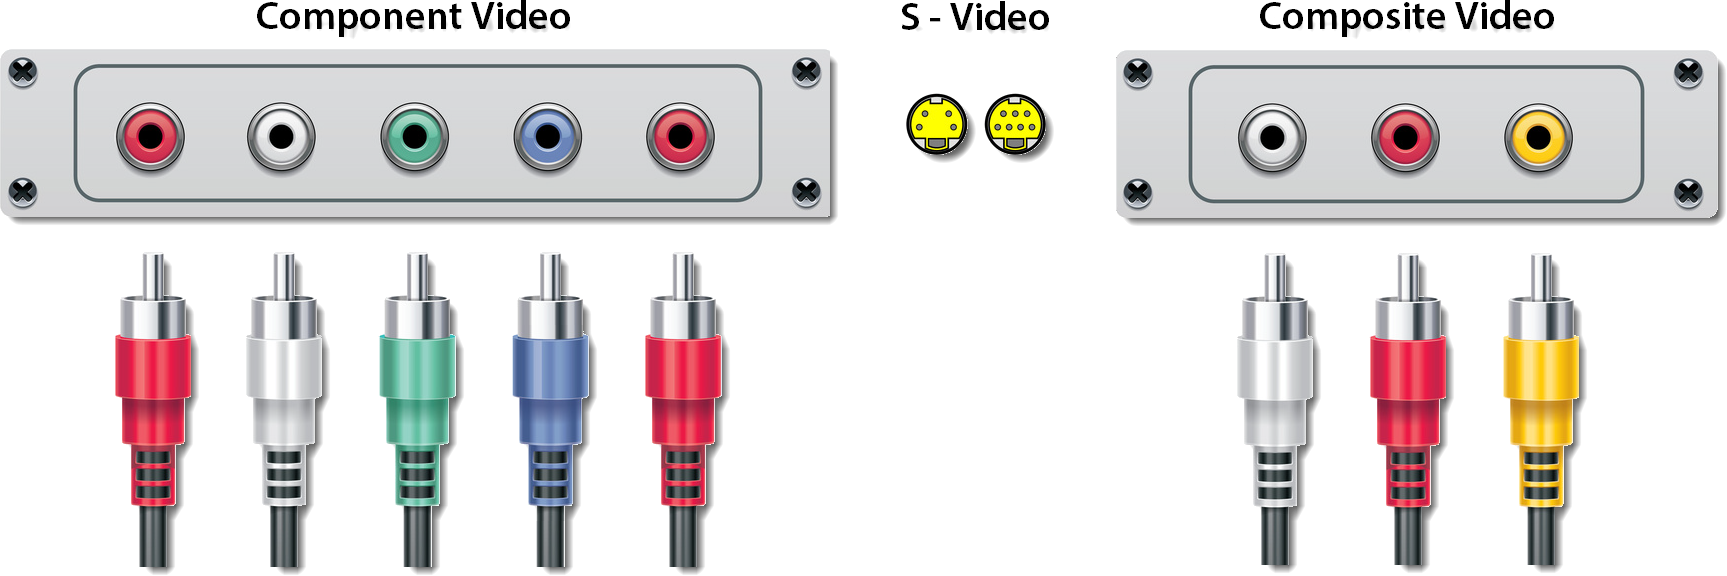
There are other video output types that are available as well, such as Component Video, S‑Video and Composite Video (RCA), but these technologies are less common, and in most cases do not offer the resolution needed for visual clarity, so they shouldn't be used with TOTAL to write appraisal reports.
Instead, this document describes the 3 most popular output types: VGA, DVI, and HDMI.

Click here for help determining whether or not your computer already supports additional monitors, and what to do if it doesn't.
To find out if your computer already supports adding an additional monitor, just look at the available ports on your PC or Laptop:
| For PC's, available ports are often found on the front and back. Follow the cable connected to your current monitor and locate where it connects to your PC. If your computer supports an additional monitor, any additional ports are typically located near the port you are currently using. |  |
| Laptops have ports on the front, sides, or back. Most modern laptops have at least one port for an external monitor, and in many cases there are more than one. If your laptop came with a docking station, it's best to use the ports on the docking station. |  |
Notice in the PC and laptop images both machines offer more than one output. If your machine is capable of running dual monitors, you may see a variety of combinations.
Certain PC models support dual monitors running from a single port using a Y‑splitter cable connected to a dual DVI port. This is a specialty port and is only available with certain video cards and certain PC models. If you're not sure if you have this type of port, consult your computer's manual, the PC manufacturer, or the manufacturer of your video card.
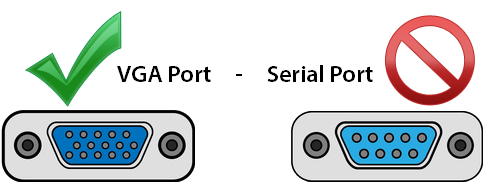
Keep in mind that when you are looking at the available ports on your computer, it is easy to mistake a serial port for a VGA port. The shape of both ports is very similar, but if you look closely the serial port only uses 9 pins (9 holes), whereas a VGA port uses 15 pins (alternating rows of 5 holes). It is important to be able to tell the difference because serial ports DO NOT produce a video signal, and can't be used to connect an additional monitor.
Click here if your computer does NOT support additional monitors.
If you find that the port on your computer doesn't match the port on your monitor or TV, you don't have an additional port, or your computer doesn't support additional monitors, don't fret. There are many inexpensive ways to upgrade your computer to use additional monitors.
Method 1 — If the port on your computer doesn't match the port on your monitor:
Buy an adapter. Adapters are very inexpensive. A quick Google search finds a DVI to VGA adapter for as little as $5, and allows you to connect a spare monitor (or even an HDTV!) that was not being previously used.
Method 2 — If you don't have an additional port, or if your computer doesn't support additional monitors:
Buy a new video card. You have the option of buying an internal video card, or an external video card:
- Internal Video Cards — An internal video card is a reliable way to add additional monitors to your setup, and saves you the hassle of lugging around extra hardware. However, this method does require an existing, open slot that is available within your machine, and it helps to have a little computer hardware knowledge. If you prefer to have it installed by a third party, most computer repair shops and electronics stores can do this for you quickly, and for minimal cost.
Adding an internal video card is the preferred method for most people when upgrading their computer, and is the option used most by professionals.
- External Video Cards — An external video card is a quick way to upgrade your computer. It requires minimal setup and typically connects via a USB cable. Simply plug in the card, allow your computer to automatically install the necessary drivers, and then connect your monitor(s). While quick to set up, the external video card is a peripheral that must always be connected, and in some cases you might experience latency or slowness when running applications with high definition video or graphics. This is especially true with computers that have earlier versions of USB ports installed (USB 1 or USB 2.0).
Once you have secured an additional port for your monitor, you're now ready to set everything up!
Click here for step‑by‑step instructions on configuring your monitors.
Once you have located or installed an additional port, you're now ready to connect and configure your monitors:
- Begin by connecting your monitor to your PC using the applicable VGA, DVI, HDMI, or other cable. Your monitor also requires a power supply, so be sure to plug that in as well.
- Press the power button to turn on the monitor.
- Depending on the monitor and video card being used, your monitor may need no additional setup. If it is working but not displaying correctly, you'll need to change your computer's display settings.
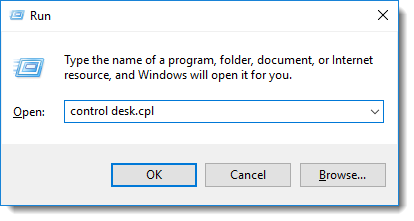
- Press the Windows Key + R on your keyboard.

- Type control desk.cpl in the Run box that opens, and then click OK.
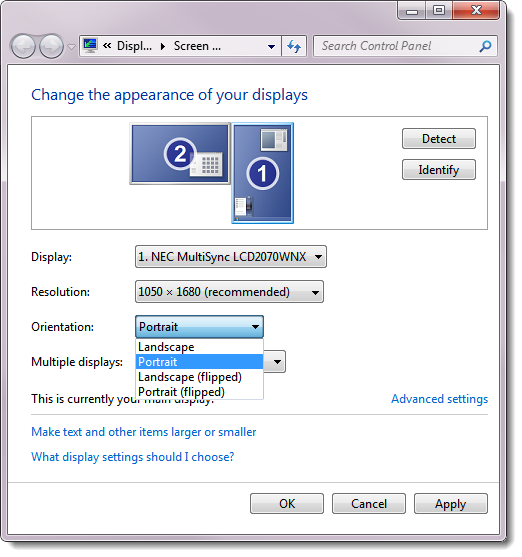
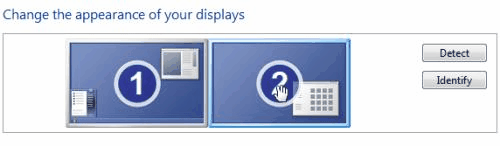
- From the screen resolution window, adjust the orientation of your monitors. At the top of the window, two (or more) monitors are represented with assigned numbers to indicate which is the primary monitor, and which is secondary. If you are not sure which is which, click Identify. The number 1 will show on your primary, and the number 2 will show on your secondary monitor.
- Once you have determined the monitor hierarchy, position the monitor icons accordingly. If your monitors are stacked on top of each other, click and drag the monitor icons to position them the same way. If they are side‑by‑side, place the icons side‑by‑side.
- Once you have adjusted the orientation of your screens, choose the display layout for your secondary monitor. In most cases you'll select to "Extend these displays" but other options are available. Find what works best for you.
- After adjusting the orientation and choosing your preferred display layout, click OK.
For additional information on connecting and setting up multiple monitors, use the following links for Windows 7, Windows 8, or Windows 10.
Setting up a widescreen monitor in portrait view

Since your appraisal reports are in portrait orientation, you can boost your productivity by rotating your monitor to match. Rotating your monitor is an easy way to view an entire page of your report without having to constantly scroll up and down to see the information you need.
If your monitors support being rotated into a portrait orientation, follow the directions below to try it out.
- First, rotate your monitor to portrait mode. If you're not sure that your monitor rotates, contact the monitor's manufacturer.
- Press the Windows Key + R on your keyboard.
- Type control desk.cpl in the Run box that opens, and then click OK.
- Now, you'll set Windows to rotate the picture on the screen. Usually, this is as easy as opening Windows' Display Properties and choosing Portrait in the screen Orientation options. For detailed instructions on adjusting your monitor's display orientation, click here.