Assigning Client Fee Lists |
||
Once you’ve set up your client fee lists, you can assign them out to your clients as you see fit. To do so…
- From desktop billing, click Fee Setup in the Navigation pane to the left.
- Then, click the Products and Client Fees link that appears below the Navigation pane.
- In the list of fee tables you’ve created on the right, click to select the fee table you wish to assign out to clients.
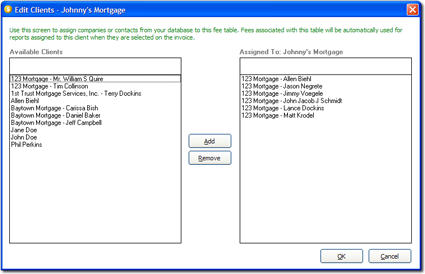
- Click Edit Clients in the top toolbar.

- All contacts you’ve flagged as either “client” or “lender” contacts appear
in the left column. Select the appropriate client(s) from the list on
the left and click Add to add them into the list of contacts
using your custom fee list. Remember that you can select multiple
contacts at a time by holding down the Ctrl key and clicking
individual contacts or by holding down the Shift key and
selecting a range of contacts.

Note: If contacts appear to be missing from this list, it is likely that they are in your contacts database, but are not flagged as Client or Lender contacts. To correct this, edit the missing contacts in WinTOTAL’s contact manager and mark Client and/or Lender as the type of contact. - When finished, click OK to assign the selected clients to your custom fee list.

Other brand and product names are trademarks or registered trademarks of their respective owners. © CoreLogic | a la mode technologies, llc | Terms of Use | Privacy Policy |