Image Maps are handy tools that you can create to break down an image into
multiple sections, linking each section to something else in XSellerate. One
illustration of an image map is a picture of the United States on a website. If
you wanted to create an image map out of the full image of the US and link each
state to a page about that state, you'd break the image down into sections
(states in this case), and link each section (or state), to a page about that
site. Before you begin working on your image map, you need to collect several
resources, including:
- An image to use as an image map
- A list of links you want to insert into your image map
- An idea or list of areas in the image into which you want to embed your
links.
- In the Content
Editor, right‑click the image into which you wish to embed links
and select Image Map Editor from the menu that appears.
- When the Image Map Editor appears, decide which type of image section will
better suit your needs and mark the corresponding choice —
Rectangle or Circle.
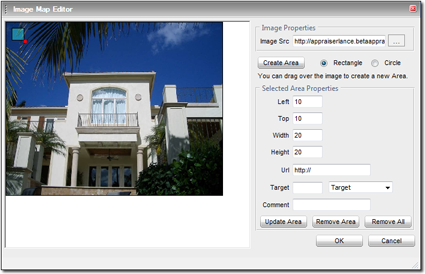
- Now, click the image where you'd like to begin drawing and drag a
rectangle or circle (depending on your choice) around the section you wish to
break into a link.
- Once you're satisfied with the size of the circle or rectangle, release
your click and then click the blue area that appears to move it to exactly the
location on your image where you want it. If you need to work with great
precision, you can move the area by increasing or decreasing its distance from
the Left and Top of the image using the
corresponding fields on the right.
- If you need to adjust the size of the area, click the red square attached
to the area and drag it until the area is the size you desire. You can fine
tune this sizing process by typing the exact Width and
Height into the corresponding fields on the right.
- Once you're satisfied with the size and placement of your image section,
type the URL (or web address) with which you want it to link into the
URL field provided.
- Pick a Target from the menu provided to determine how you
want the link to open. Options are:
- New Window — Opens the web page in a new window
- Same Window — Opens the web page in the main
window
- Frame — Opens the web page in a frame —
keeping just XSellerate header intact.
- iFrame — Opens the web page in a frame —
keeping just XSellerate header and side navigation intact.
- Type a short Comment in the available field to indicate
what this link does.
- When finished, click Update Area to apply your change to
the area you've created.
- Continue creating new areas by repeating steps 6 ‑ 13 until
you've completed your image map. If you need to remove an area from your image
map, click it and then click Remove Area. If you need to
remove all areas from your image map so you can start over, just click
Remove All.
- When finished with your image map, click OK to apply it
to your web page.