Define Areas |
||
As you complete each area in your sketch, TOTAL for Tablet PC automatically prompts you to define the completed area. Once you've defined it, you can edit the area's properties at any time. To define an area in your sketch:
- In a sketch, first draw a complete area.
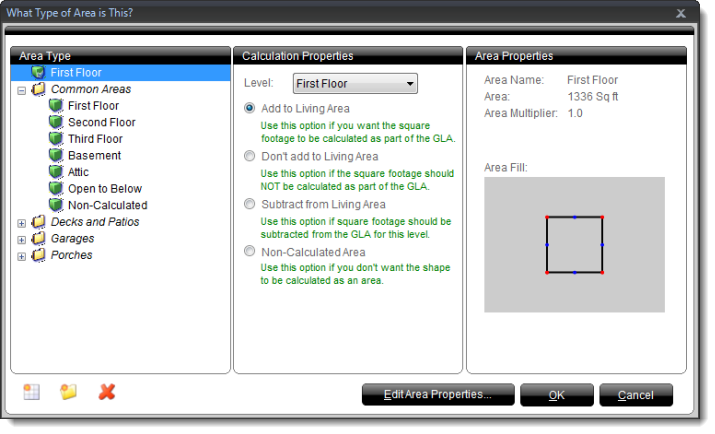
- When prompted, select an appropriate Area Type from the list on the left. TOTAL for Tablet PC guesses the area type and displays that suggestion as the first item in the list. If the appropriate Area Type is not available, you can create your own.
- The Area Type you select also changes the floor level and
calculation type for the area, but you're free to change those values if they
differ from one sketch to the next. As necessary, select the floor level
and calculation type of the area from the Level and
Calculation Properties lists respectively.
- Area Type - Changes the label and calculation
properties of an area. Area Type categories include:
- Common Areas
- Decks and Patios
- Garages
- Carports
- Porches
- Calculation Properties - Changes how an area
calculates.
- Level - Specifies the stratum of the area within the structure, such as First Floor, Second Floor, Basement, Attic, etc.
- Add to Living Area - Includes the area's square footage in the GLA
- Don't add to Living Area - Doesn't include the area's square footage in the GLA
- Subtract from Living Area - Subtracts the area's square footage from the GLA
- Non‑Calculated Area - Doesn't calculate the square footage of the area
- Area Properties - Displays the current selections
- New Area (
 ) - Creates a new
area type within the currently selected category
- New Category (
 ) - Creates a new
area type category
- Delete (
 ) - Deletes the
currently selected area type or category.
Note: Keep in mind that deleting a category also deletes all of the area types it contains.

- Area Type - Changes the label and calculation
properties of an area. Area Type categories include:
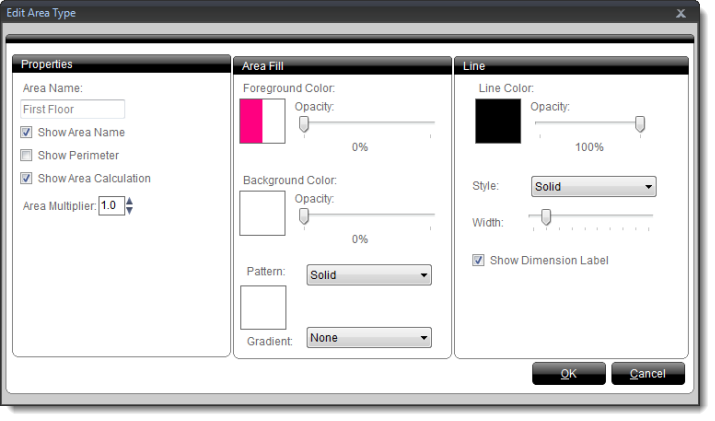
- Click Edit Area Properties
to change the color scheme, area label, and units of measure for the
area. Then, click OK to apply your changes.
Options include:
- Properties
- Area Name - The label TOTAL for Tablet PC places on the area.
- Show Area Name - Shows or hides the area's label.
- Show Perimeter - Includes the total perimeter of the area below the area's label.
- Show Calculation Area - Includes the total calculated area of the region below its label.
- Area Multiplier - Multiplies the area's square footage in the total calculation, increase or decrease the multiplier using the up and down arrows.
- Area Fill
- Foreground Color/Opacity - Controls the inner fill color of the area and its clearness. Click the Foreground Color box to select a color and use the opacity slider to increase or decrease the clearness of the fill color.
- Background Color/Opacity/Pattern - Specify a background color and apply a pattern to the background. Select a background color, pattern, and opacity (clearness) of the background to apply the change to your area.
- Gradient - Applies a gradual color transition to the
foreground color of your area. Select a foreground color and
gradient style from the provided controls to preview the transition in the
box above the Gradient drop-down.
- Line
- Line Color/Style/Width - Applies a color, style or specific width to the lines of the selected area.
- Show Dimension Label - Shows or hides the area's
dimension label.

- Properties

Other brand and product names are trademarks or registered trademarks of their respective owners. © CoreLogic | a la mode technologies, llc | Terms of Use | Privacy Policy |
