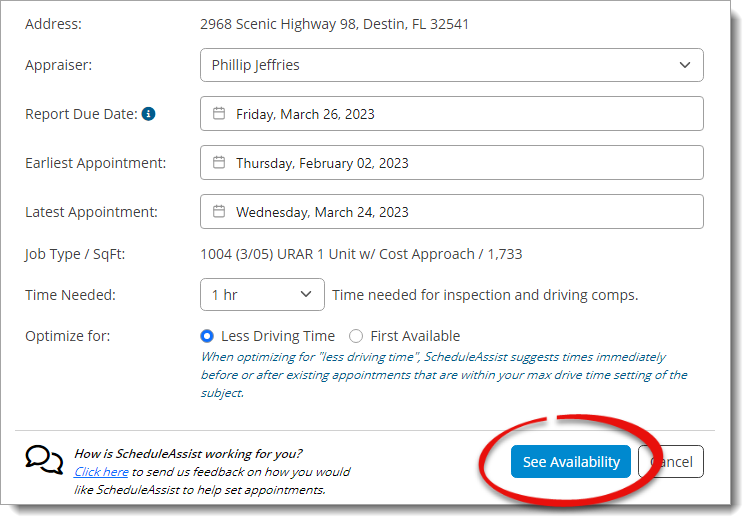
- Choose the Appraiser for the appointment from the
drop‑down menu
Not seeing other appraisers to select? Make sure each appraiser:
- Has a ScheduleAssist seat assigned to them
- Selected the I go on appointments option during setup. This setting can be changed in the Role tab of ScheduleAssist Settings.
- Toggled on the option to Allow other users on my account to schedule appointments on my behalf during setup. This setting can be changed in Calendar Access settings
- Earliest Appointment and Latest
Appointment creates a window of time in which ScheduleAssist
reviews your availability based on your settings and your calendar.
- Earliest Appointment
- This option defaults to today, plus the number of days lead time you need to be prepared for the appointment.
- Latest Appointment
- This option defaults to the due date of
the report, minus the number of days you require between the appointment
and the report delivery.
The defaults for the amount of lead time, maximum/minimum number of days, and other optimization settings for Earliest Appointment and Latest Appointment can be changed in the ScheduleAssist Settings.
- Job Type | SqFt is automatically imported from your report, if the information is available.
- Time Needed allows you to specify the amount of time needed to complete the appointment.
- Optimize for:
- Less Driving time
- This option attempts to group appointments together on days with the least amount of driving time between appointments. If there are no "close" appointments scheduled, ScheduleAssist finds the first free day/time with no appointments. The goal is to create the most efficient schedule with the least amount of driving overall.
- First Available
- ScheduleAssist doesn't attempt to group appointments to reduce your driving time, it offers the first available time slots that meet your requirements.
- When you're finished, click See Availability.

- Option 1: Lets your contact choose. A link is
created for you to send to your contact that offers up to 10 options they
can choose from.
The options presented to the contact vary depending on when the link is accessed. ScheduleAssist calculates your availability in real time so that you don't get overbooked.
- Option 2: Lets you choose a preferred time based on optimized settings
- Option 3: Lets you override and manually choose the specific time — great for when you already scheduled an appointment over the phone or through email.

- Select the contact from the drop‑down menu ( ), or manually enter a contact name.
- Enter a mobile number for the contact.
- Click the Default Templates tab to edit existing, pre‑made templates, or click the Account Templates tab to edit a custom template you've created. Then, select the message template you want to edit from the list.
- Edit the message as needed in the text area on the right.
Changes made to the message template only apply to the current outgoing text. Go to Text Templates to create and customize your templates for future use.
- Place your cursor in the message text ( D ) where you
would like to insert data from your report. Then click the Insert
Field drop‑down menu to choose the field you want to insert.
If you're inserting a field that is empty in your report, it's displayed in red in the message text ( D ) to indicate that the data doesn't exist in your report.
- Click Copy Text to copy the message text from the text area ( D ) to your clipboard so that you can paste it in an email or another location.
- Choose Save & Send Text to add the appointment
to your calendar and send the message to the contact, or click
Save to add it to your calendar without sending the
message.
If for some reason your message cannot be delivered, ScheduleAssist displays an alert to notify you. When this occurs, the appointement is added to your calendar, but you'll need to notify your contact via email or a phonecall.