Manual Sketching |
||
Sketching can be accomplished by manually inputting measurements using the virtual keypad, or by using a Bluetooth measuring device to seamlessly transfer data to the Pocket PC.
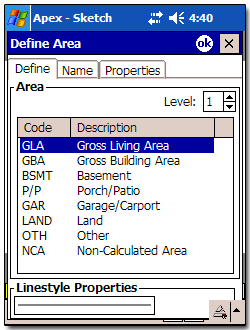
- Define the type of area that is to be drawn. When you first open
MobileSketch, the Define Area screen will open. If the
default preference setting for Define Area on
Creation has been disabled (Edit, Preferences,
Behavior tab), you will need to tap the Define
button to open the Define Area screen. Alternatively,
you can select this option by going to the Draw menu and
tapping Define Area (Draw, Define
Area).

- Tap the area code for the area you want to draw. You can also set the level by tapping the up/down arrow. Once you’ve done this, tap OK to advance to the next screen.
- Name the area that you want to draw. You can use the default name,
or you can use the integrated virtual keypad to give the area a different
name. You can also add/remove or edit names from the list by tapping the
Name button. Also, tap the Positive or
Negative option to add or subtract the area's calculation
from the property’s total area calculations and/or set the dimension color to
match the line color. Once this is done, tap OK to
advance to the drawing pad.

Note: If you select the Properties tab in the Define Area screen, you can choose the style, width, or color of the lines you will draw. This is helpful if you want to differentiate the floors of the building from one another or if you want to differentiate between positive and negative areas. Once you have selected the linestyle properties, tap OK to advance to the drawing pad. - Tap the Enter button on the keypad. You are now in
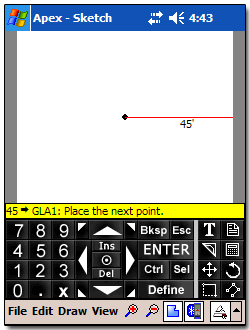
pen-down mode. This will be the Point of Beginning
(POB) for your area. To position the cursor before placing the pen in
drawing mode, you can use the directional keys, pop, or use the navigation
button on the PPC. To use the Stylus to place the POB or draw, you need
to select the Enable Stylus Drawing Input option in the
Preferences screen (Edit, Preferences, Input
tab).

- Specify the line you want to draw by typing a dimension on the keypad and
tapping the directional arrow key to denote the direction. The line will
be drawn but not anchored (colored red). Tap Enter to
anchor the line (black by default). As you are drawing, you will see
that the dimension and direction are displayed in the Help/Status Line
which is displayed in yellow on the lower left of the drawing area. You
can use the Bksp button to correct any typing errors prior to
tapping a direction.

Note: If the Help/Status Line is not visible, select Show Help/Status Line from the View menu. - Repeat step 4 for each line you sketch. When you get to the last line, you can simply tap Close to finish sketching the area.
- To sketch additional areas, tap the Define button and continue with step 2 above.

Other brand and product names are trademarks or registered trademarks of their respective owners. © CoreLogic | a la mode technologies, llc | Terms of Use | Privacy Policy |