Pop Points |
||
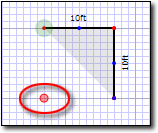
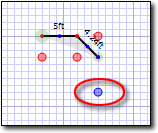
As you sketch, a variety of large dots may appear around your line. These dots - called "pop points" - are a useful tool you can leverage to line up your line with other parts of your sketch. There are two types of pop point that may appear as you draw your sketch.
- Red Pop Points - Red pop points indicate that you can
draw your line to match up in length with an intersection or wall elsewhere in
your sketch. For instance, if you're drawing the third or fourth lines in a
rectangle, you have two other points in your sketch that you can (and should)
line up with. Red point points would point those out to help you square off
your sketch.

- Blue Pop Points - Blue pop points indicate that you can
mirror a previously drawn angle in your sketch. These are particularly useful
for mirrored angles like those you typically find in bay windows.

There are two ways you can use pop points:
- If the pop point you wish to use is currently on screen, you can simply click it to draw the line it reflects.
- In some cases, the pop point you want to use may not appear on screen until you bypass other pop points that are currently on the screen. For instance, with red pop points, there are often several other intersections that you might use to draw the length of your line. In these situations, you can "jump" to pop points by holding down the Ctrl key on your keyboard, tapping the arrow key in the direction of the pop point, and hitting Enter when you're ready to set the line. For example, if there are several intersections to the right of your current location and you want your line to end so that it's flush with the right-most intersection, you'd simply hold down the Ctrl key and tap the right arrow key until the red pop point appears below that right-most intersection. Then, you'd hit Enter to set the line.

Other brand and product names are trademarks or registered trademarks of their respective owners. © CoreLogic | a la mode technologies, llc | Terms of Use | Privacy Policy |