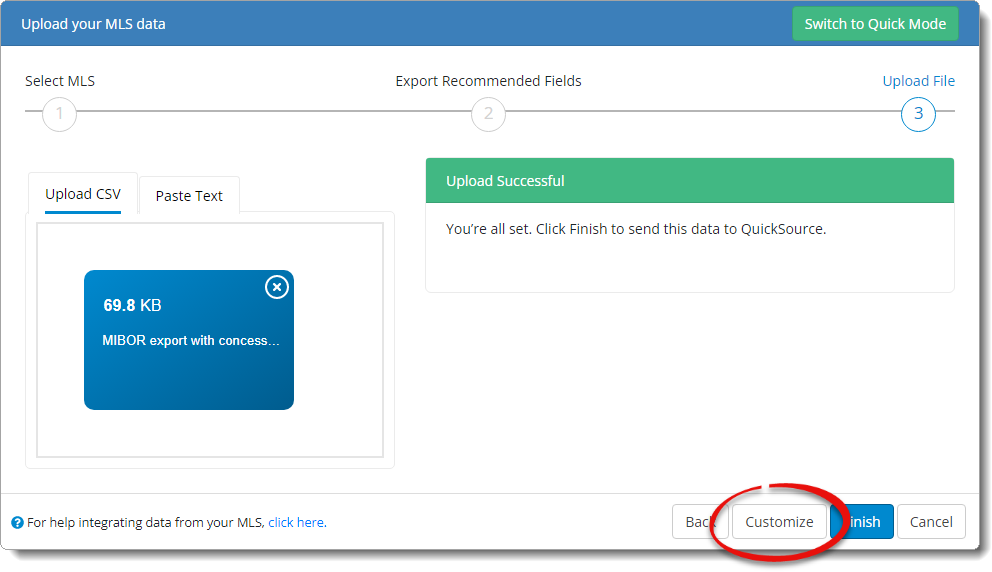
The field mapping configuration tool in QuickSource is intended only
for advanced users who are comfortable with creating and using conditional
if‑then statements, formulas, functions, and other types of
advanced calculations and formatting. Our support staff is unable to assist
with troubleshooting any of these advanced features.
Click a panel below to expand it
and view additional instructions and information about the various functions
and settings available in the field mapping configuration tool:
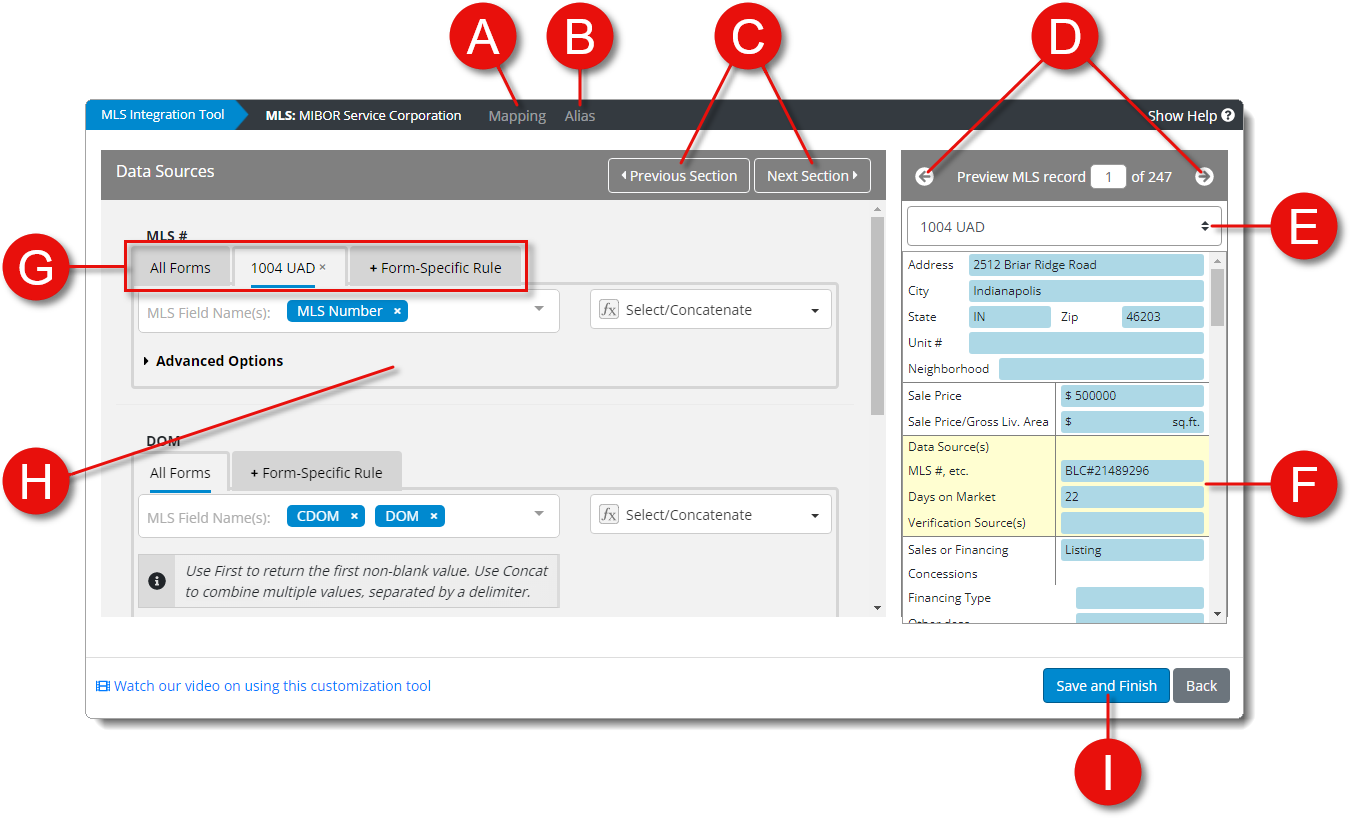
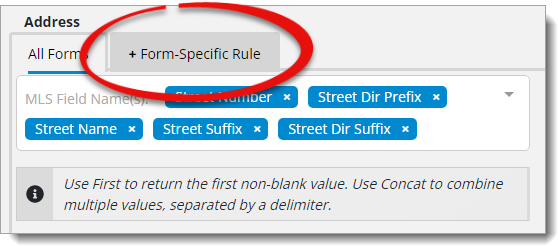
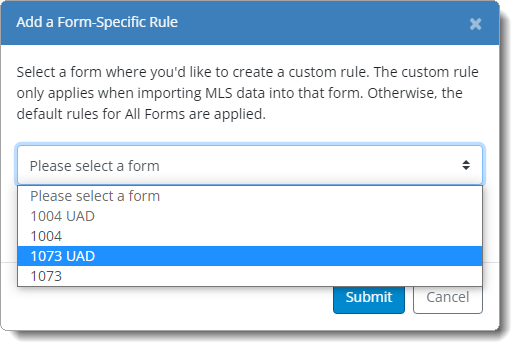
By default, mapping rules are created under the All Forms
tab and they apply to any form QuickSource supports. If you want to create a
unique rule that only applies when using a specific form, use the
+ Form‑Specific Rule tab to add a custom rule for a
specific form. To add a form‑specific rule:
- Click the + Form‑Specific Rule tab.
- Select the form where you want to apply this rule.
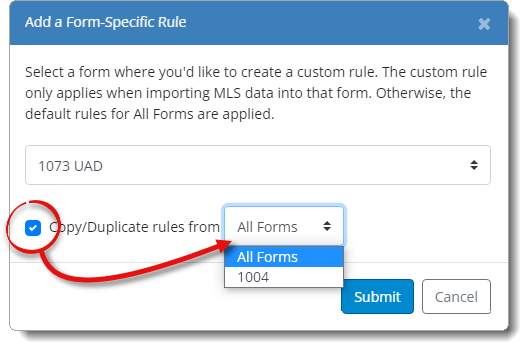
- Check the box next to Copy/Duplicate rules from and
select the source to duplicate a rule from the All Forms
tab, or another form‑specific rule. Or, uncheck the box to start the new
rule from scratch.
- When you're finished, click Submit.
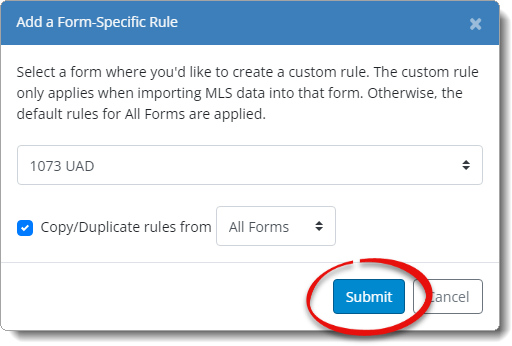
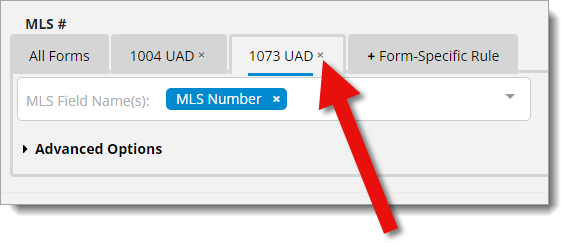
Once you've created a form‑specific rule, a new tab with that form name is
added to the right of the All Forms tab where you can edit or
adjust the field mapping rules as needed.
To delete a form‑specific rule, simply click the x next to
the form name in the form's tab.
Constant
Regardless of what is, or is not included in your MLS export, there are
some situations where you want to return a certain value to a field every
time. This is often the case with fields such as Functional Utility,
Condition, Quality, or
Leasehold / Fee Simple. Follow the instructions below
to enter a constant value that is returned for a field each time:

- Select the section of the form in the preview panel on the right that
contains the field where you want to return a constant value.
- Select Constant from the function dropdown for that
field.
- Place your cursor in the text field and enter the constant value.
- Continue adjusting settings for additional fields. Or, click
Save and Finish to save your changes and import your MLS
data into QuickSource.
Add/Subtract
The Add/Subtract function is useful in situations when you need to add
numeric values together or subtract a numeric value from a total. One example
is when you need to combine room counts for multiple property levels, subtract
below grade rooms, or subtract rooms in an ADU that are included in the count.
The key to using the Add/Subtract function is to know that the field mapping
configuration tool uses groupings. Compared to a mathematical equation, these
groupings act like parenthesis around operators so you can add and subtract
multiple fields at once.
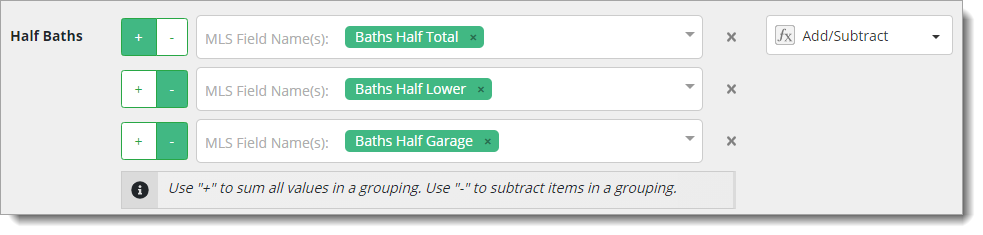
Follow the instructions below to sum two or
more fields:
- Select the section of the form in the preview panel on the right that
contains the field where you want to perform a calculation.
- Select Add/Subtract from the function drop‑down.
- Click the drop‑down arrow to select your MLS Field
Name(s), and select the first field you want to add. Then,
click the drop‑down arrow again and select the second field to add. Repeat
this process for each additional field you want to add.
- Click the plus button ( + ) to indicate
you want to add these fields together.
- If you need to perform additional calculations for this field, click
Create Grouping to add a new line, and repeat these steps
to sum additional fields, or continue with the section below to perform subtraction
calculations.
- Continue adjusting settings for additional fields. Or, click
Save and Finish to save your changes and import your MLS
data into QuickSource.
To subtract one or more fields from
another field:
- Select the section of the form in the preview panel on the right that
contains the field where you want to perform a calculation.
- Select Add/Subtract from the function dropdown next to
that field.
- Click the drop‑down arrow to select your MLS Field
Name(s), and select the field with the larger numeric
value from which you want to subtract. If multiple MLS fields need to be
summed to build a total, select each one. Click
here to jump to the section above for instructions on adding.
- Click Create Grouping to add a new line, and click the
minus button ( - ) on the left.
- Click the drop‑down arrow to select your MLS Field
Name(s), and select each field you want to subtract.
- Continue adjusting settings for additional fields. Or, click
Save and Finish to save your changes and import your MLS
data into QuickSource.
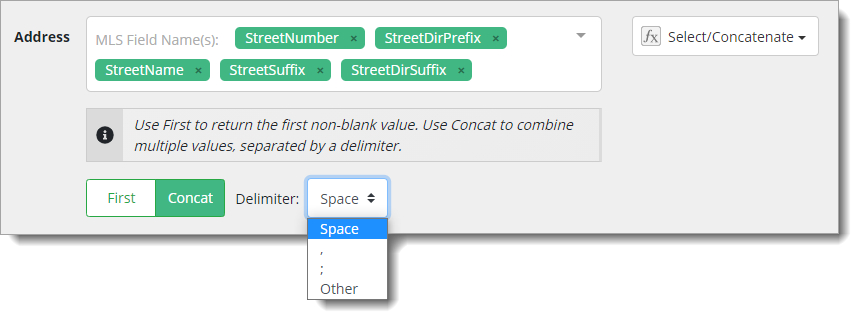
Select/Concatenate
Occasionally, it's necessary to combine data from multiple MLS fields to
get the result you want to transfer the form field. One example of this is
when an MLS separates each component of an address into individual fields,
such as Street Number, Street Name, and/or Street
Suffix. When you need to combine more than one MLS field to derive a
value for your form, use Concatenate to combine two or more
MLS fields to build a form field:
- Select the section of the form in the preview panel on the right that
contains the field where you want to combine and concatenate two or more MLS
fields.
- Choose Select/Concatenate from the function drop‑down.
- Click the MLS Field Name(s) dropdown next to the field
name and select the field you want to appear first in the sequence.
- Click the MLS Field Name(s) dropdown again to select
the field you want to appear next in the sequence. Repeat this step to
select each field you want to concatenate. If you need to remove a field
from the sequence, click the X next to that field.
- Once you have selected two or more fields, additional options appear.
Select Concat to concatenate the currently selected fields.
- Next, choose your Delimiter. By default, the field
mapping configuration tool separates concatenated fields with a space. Click
the Delimiter dropdown to change it to a comma, semicolon,
or choose Other to enter your own delimiter.
- Continue adjusting settings for additional fields. Or, click
Save and Finish to save your changes and import your MLS
data into QuickSource.
In some cases, a form field potentially corresponds to multiple, individual
MLS fields. For example, some MLS providers have separate fields for square
feet, acres, and dimensions — all of which could be used for the
Site field on a form. For scenarios like this, the
configuration tool allows you to configure a field so that it uses data from
the first field that contains data:
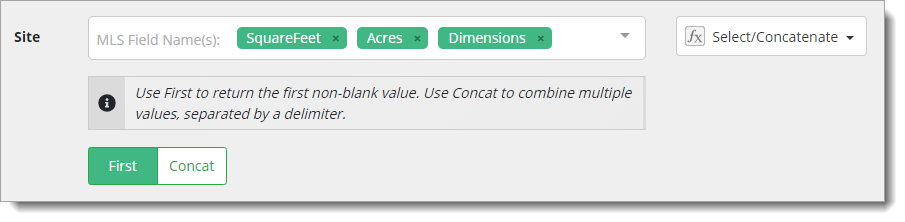
- Select the section of the form in the preview panel on the right that
contains the field you want to configure to use the first available data.
- Choose Select/Concatenate from the function drop‑down.
- Click the MLS Field Name(s) dropdown next to the field
name and select the first field where you want to check for data.
- Click the MLS Field Name(s) dropdown again to select
the next field where you want to check for data. Repeat this step to select
each field you want to look for available data.
- Click the First button to indicate that you want
QuickSource to check each of the selected fields, and use the first field
that contains data. In our example, QuickSource will use data from the
Square Feet field each time data is available. If there is no data for
Square Feet, QuickSource checks for data in the Acres field, and then falls
back to the Dimensions field if no data is available for the first two
fields.
The MLS Integration tool knows to automatically convert between acres
and SF and do a basic calculation if two dimensions are input for the
site.
- Continue adjusting settings for additional fields. Or, click
Save and Finish to save your changes and import your MLS
data into QuickSource.
Conditional
Sometimes, you need to change data from your MLS and/or replace it with
something else — such as changing CONV to
Conventional for the Financing Type. Follow the instructions
below to create a conditional statement to change or replace text:
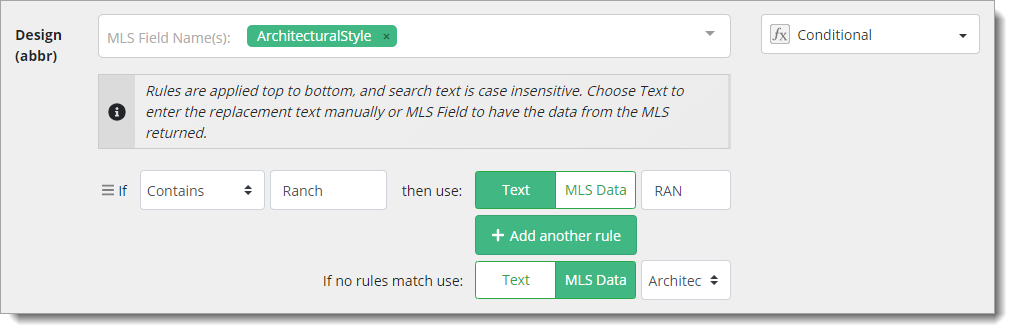
- Select the section of the form in the preview panel on the right that
contains the field where you want to create a conditional statement.
- Choose Conditional from the function drop‑down.
- Click the MLS Field Name(s) dropdown and
select the MLS field that contains the data you want to change or replace.
Repeat this step to add any additional fields you want to include in the
conditional statement.
- Choose whether you want to apply the rule if the MLS field
Contains or Equals a specific value.
Choose Contains if you want to apply the rule if your
search text appears anywhere in the MLS field, or choose
Equals if the MLS field must match your search text
exactly.
- Enter the criteria to use for your Search Text. This
MLS field must contain or equal it for the rule to be applied
- Choose the data you want to use to change or replace the data from your
MLS export:
- Text
- Select Text and enter the Result
Text you want to use as a constant value that is used each time
the rule is applied.
- MLS Data
- Select MLS Data and choose the MLS field you want to
use from the drop‑down menu. Only the MLS Field Name(s)
added in step 3 are available to choose from.
- Standardized UAD Response
- If you are creating a conditional statement for a UAD field that
requires a standardized response, the Text and
MLS Data options are not available. Choose the
standardized response you want to use from the drop‑down menu.
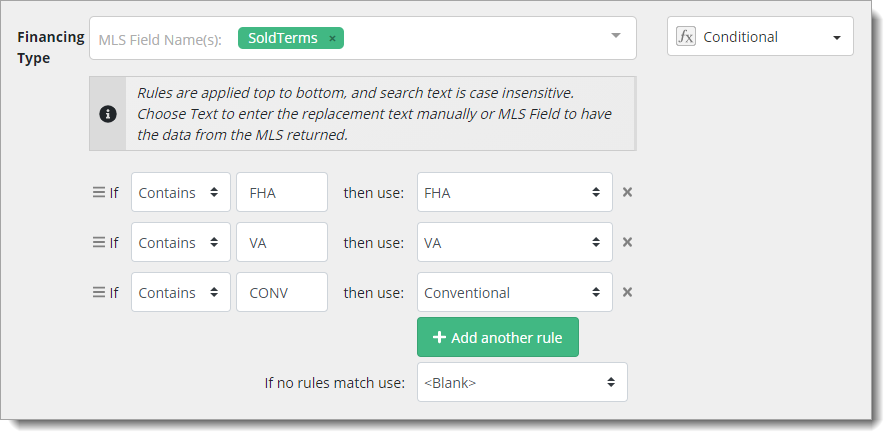
- To add another rule, click Add
another rule, and repeat steps 4 through
6. Once you've created two or more rules, click and drag the textured
icon ( ) to the left of a rule to
rearrange and adjust the order in which rules are applied. Rules are applied
top to bottom.
- Choose what happens if no rules match. Select Text and
enter the Result Text you want to use, select MLS
Data and choose the MLS field you want to use, or select a
standardized response from the drop‑down menu if it is a standardized UAD
field.
- Continue adjusting settings for additional fields. Or, click
Save and Finish to save your changes and import your MLS
data into QuickSource.
The MLS Integration tool has default formats in place for most fields.
Follow the instructions below to adjust the Advanced Options for a field:
- Select the section of the form in the preview panel on the right that
contains the field where you want to change formatting.
- Click Advanced
Options for the field to expand that section and view the
formatting options.
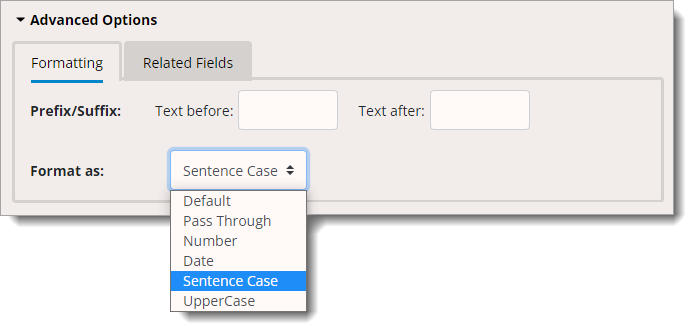
- To add a prefix, enter the text you want to use for the prefix in the
Text Before field.
- To add a suffix, enter the text you want to use for the suffix in the
Text After field.
- Choose your Formatting type: options include
Default, Pass Through,
Number, Date, Sentence
Case, or UpperCase.
Wherever possible, we've set the default format for each field to match
the required formatting on appraisal forms, and to automatically perform
data conversions. Here are some examples:
- Year built is converted automatically by subtracting the year provided
from the current year.
- Lot sizes are converted to/from acres/sf. Any lot size less than 161
is converted to acres, and whenever acres is used, the number is displayed
to two decimal places. When lot sizes are provided as two dimensions, the
default formatting automatically calculates them.
- The architectural design field is automatically converted to a
standard abbreviation, such as TRA for Traditional.
- HOA fees are rounded to a whole number.
You can turn off any of the automatic conversions by setting the
Formatting to anything other than
Default.
- Click the Related Fields tab to select any fields that
are related to the current field. Related fields are fields that don't map
directly to a form field, but are "related" to a form field and might give
you additional MLS information to help you complete the form values. Related
Fields are displayed in QuickSource when you hover over an MLS data point
- Continue adjusting settings for additional fields. Or, click
Save and Finish to save your changes and import your MLS
data into QuickSource.