A graphic element on a page adds balance and makes it eye catching. comes
stock with a library of images and "jelly buttons" that you can use, but you can
also add your own images via the File Library. To add your own image to your
content:
- In the Content
Editor, click the image icon (
 ) in your toolbar.
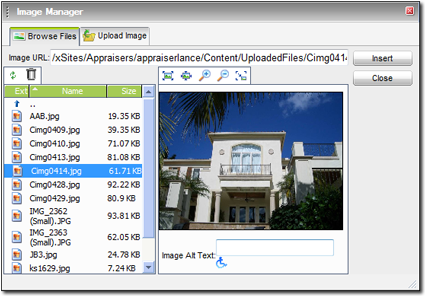
- You're presented with a list of files (if any) that you've uploaded to
XSellerate. Click the file you want to insert into your page.

- If you need to upload an
image to XSellerate, click the Upload Image tab to do so.
- A preview of the image appears in the box on the right. Verify that the
image is indeed the one you want to insert. If you need to adjust the image
preview so that it's smaller or larger, you can use the zoom buttons above the
image preview. If you're unsure which button is which, just hover your cursor
over each button for a description of how it zooms. Options are:
- Best Fit
- Actual Size
- Zoom In
- Zoom Out
- Type a short description of the image into the Image Alt
Text field. This description appears whenever viewers hover their
cursor over the image and can improve your search engine ranking (when
combined with other techniques in XSellerate) as search engines can read this
text.
- Finally, click Insert to place the image into your page.
Once an image is in your web page, of course, you may also want to do some of
the following things:
- Click the Hyperlink Manager icon to add a link into the
image.
- Click an image and then press DEL on your keyboard to
delete it.
- Click one of the image handles and drag it across the screen to resize the image as it appears
in your page.
- Create a thumbnail (miniature version of the image) for the image by
clicking the Image Manager icon and using the
Thumbnail button.
 ) in your toolbar.

 ) in your toolbar.
