Tips and tricks for working with images on your XSite
This document describes several ways the Content Editor helps you work with your images on your XSite pages.
Document 7034 | Last updated: 09/14/2015 MJY
Images can be used on XSite pages to grab visitors' attentions, help them navigate, and professionally communicate your message. For this to work, you need to carefully control the size, placement, and other attributes of every image on your page.
There are many ways to work with images on a web page, and with that flexibility comes a bit of complexity. Below, you'll find tips and tricks to help you quickly create a polished page using images.
Ensure you have the rights to display an image on your website. Copyright infringement carries hefty penalties, so double‑check before placing any image on your page. One exception: the built‑in clip art is free to use anywhere on your XSite.
Place images on your XSite page
The Content Editor makes it easy to take an image from your PC and place it on your page.
Here's how to do it:
- Log into your XSite and click the XSite button at the top to access the Wizard.

- On the left, click on the My Content step of the Wizard.

- On the right, click the name of the page where you intend to place the images. This will open the Content Editor.
- In the Content Editor, place your cursor anywhere you want to place the image.
- Click the Image Manager icon (
 ) on the Content Editor's toolbar.
 - Click Upload in the Image Manager toolbar.
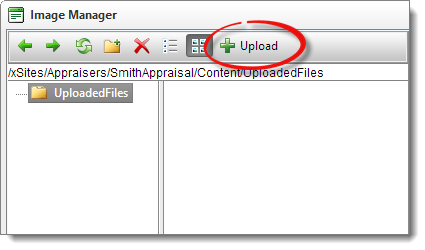
- Click Browse in the lower-left, then locate the image on your PC. When you find it, double-click it, then click the Upload Files button on the Upload Image tab. This will start uploading the image to your site.
- When the image has been uploaded, you'll automatically return to the Browse Files tab, which shows you all the images that have been uploaded to your XSite. Select the intended image in the list and click Insert on the right. This will close the Image Manager and return you to your page where you'll see the image you inserted at your cursor's position.
That's all there is to it. If you like what you see, remember to save click Save and Continue at the bottom of the Content Editor.
Use your XSite's built-in clip art
Your XSite comes with a lot of clip art that is widely useful across your pages. You're free to use these images anywhere on your XSite. Read on to find out how to use clip art.
- Log into your XSite and click the XSite button at the top to access the Wizard.
- On the left, click on the My Content step of the Wizard.
- On the right, click the name of the page where you intend to place the images. This will open the Content Editor.
- Place your cursor anywhere the in Content Editor where you intend to insert clip art.
- On the Content Editor toolbar, click the File Manager icon (
 ).
). - In the File Manager, click the Clip Art tab, then scroll through the list of images. As you do, you'll see a preview in the area to the right.
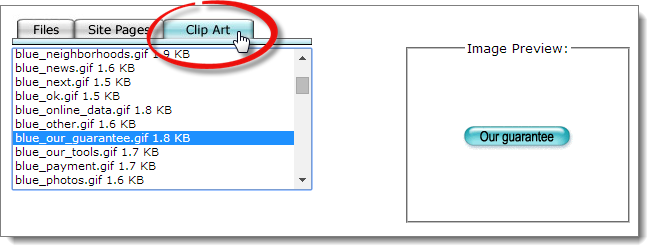
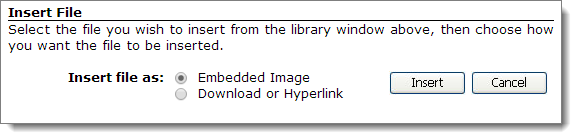
- When you find an image you'd like to use on your page, click Insert at the bottom of the File Manager. For our purposes, the Insert file as setting should be Embedded Image.
That's it! Now you'll see your page with the clip art inserted at your cursor's position. If you like what you see remember to save click Save and Continue at the bottom of the Content Editor.
Understand and adjust image sizes
Controlling image sizes on your page is important, and there's more to it than you might imagine. Below are the biggest considerations:
Image size
This is the width and height of the image. On a web page, it's typically measured in pixels (px). The width is usually listed first — the image to the right is 90 x 117px.
It's important to know that the image can be one size when you're looking at it on your computer (we'll call it the "source"), but can be a totally different size as it appears on the web page (call it the "display size."). It's best if the source size is as close as possible to the display size you want before you put it on your page. Usually, that means you need to resize your image before you place it on your page.

Aspect ratio
This is the ratio of the width to the height of the image. In most cases, you won't want to change the aspect ratio of the image because it will end up looking "squeezed" in one direction. For instance, the image to the right has been resized by changing the height, but not the width. When you resize an image, you'll likely want to constrain, or "lock", the aspect ratio so the image doesn't look weird after resizing.

How do I resize an image?
There are many image resizing tools available, and most of them function about the same way. One really easy tool that's available for free on the web is called Image Resizer for Windows. Click here to download it. It only resizes images, so if you're looking for more advanced tools you could use something like Paint.NET.
Here's how to resize an image with Image Resizer for Windows:
- Browse to the image on your PC.
- Right‑click the image, and choose Resize Pictures.
- In the dialog that appears you have a few options:
- You can choose any of the preset sizes.
- Select Custom, then enter your intended width for the image in the first field as shown. If you leave the second field blank, the aspect ratio will be maintained — which is good.
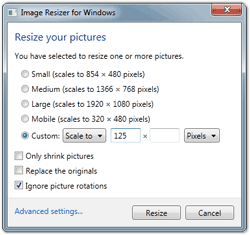
- Don't check Replace the originals. That way, you'll keep the original files in case you need to use them at their original size.
- Click Resize, and you'll find the newly created image in the same folder as the original. The new image will be have the same name as the original with (Custom) appended to the end.
You're done! Now the image is ready to be placed on your page.
Align images with text on your XSite page
The way your text aligns with your images can affect the readability of your page. Fortunately, there's a simple way to arrange your text and images to make your content easier to read.
- Log into your XSite and click the XSite button at the top to access the Wizard.
- On the left, click on the My Content step of the Wizard.
- On the right, click the name of the page where you intend to place the images. This will open the Content Editor.
- In the Content Editor, place your cursor anywhere in on the page where you want to place the image.
- Click the Image Manager icon ( ) on the Content Editor's toolbar.
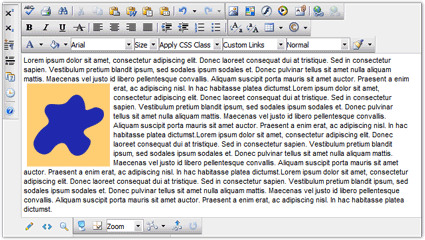
- In the list, click the image you want, then click Insert. You'll now see the image appear at your cursor's position in the Content Editor. Since images placed on web pages are "inline" with the text by default, this may not be optimal, you can improve this with just a few clicks.
- Now, right-click the image, and choose Set Image Properties.
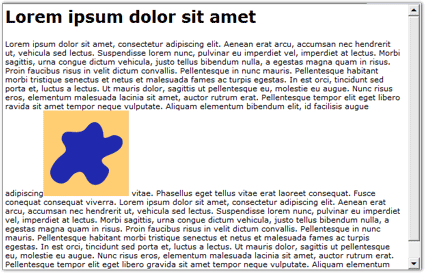
- In the dialog that appears, use the Image Alignment button to choose a left or right alignment. You could use any alignment choice, but left or right alignment will give you the best results in this case.
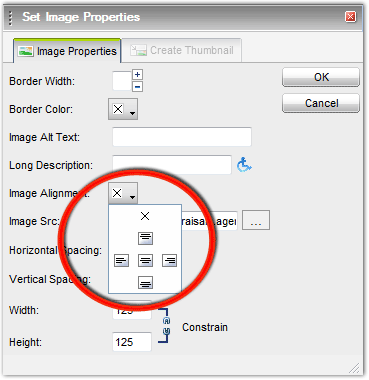
- To make sure that the text doesn't bump up against the image, use the Horizontal and Vertical Spacing fields to give the image a little breathing room. Enter the amount of space in pixels.
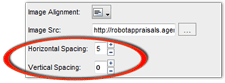
- Click OK on that dialog to see the results of your work. The results you see below used a left alignment with a horizontal spacing of 5, and a vertical spacing of 0.
If you are happy with the results, remember to save click Save and Continue at the bottom of the Content Editor.
Image placement tricks
In the earlier section titled Place images on your page, you saw how to place images on the page. But you might need more control over the location of the image than placing it "inline" with the text.
Here's how to get the precision you're looking for:
Tables
Tables give you a way to structure the layout of your page by creating columns and rows of varying sizes. For example, let's say you want to create a row of 3 images, each with a caption just beneath. Here's what you would do:
- Log into your XSite and click the XSite button at the top to access the Wizard.
- On the left, click on the My Content step of the Wizard.
- On the right, click the name of the page where you intend to place the images. This will open the Content Editor.
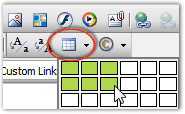
- Click the Table icon, then click and drag to highlight the first 2 rows and the first 3 columns as shown at the right. When you release the mouse, this dialog will close and you'll see the empty 2x3 table in the Content Editor as shown below.
By itself, that's confusing because it doesn't look like it would hold any images. But things will improve shortly.
The next step assumes there are three images that have been resized and uploaded to your XSite. If you need help uploading images, see the previous section Placing images on your page. For this example, the images are 125 x 125px. If you're following along, click here to download the images, and then upload them to your XSite.
Here's what to do:
- Place your cursor in the top-left cell of the table.
- Click the Image Manager icon ( ) on the Content Editor's toolbar.
- In the list of your images select the one that will be farthest left in the row, then click Insert.
 Now you'll see that the left‑most column in the table has expanded to accommodate your image. If you've already sized the remaining images the way they should be, you can repeat the steps above to place images in the other two cells on the top row of the table. As you do, each cell will resize to to fit the image. Then, you can place text in the second row below each image, and end up with something like this in the Content Editor:
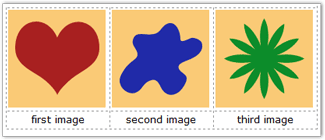
This is the result on the page:
 |
 |
 |
| first image | second image | third image |
If it turned out like you thought, remember to save click Save and Continue at the bottom of the Content Editor.
That's just a basic example of how you can use tables to arrange images and text on you page. Some people use tables exclusively because of the accuracy and flexibility in placing sections of text, videos, and other elements on the page. For more info on tables, see the user's guide here.
Advanced image tricks
Once you've become accustomed to using the Content Editor for the steps mentioned above, you're probably ready to take advantage of some more advanced features it offers.
For this section we'll assume you know how to get to the Content Editor, open the Image Manager, and other steps discussed previously in this document.
Image Maps
Quite often, images are used to get a site visitor to click something. It's easy to create a hyperlink from an entire image, but if you need different parts of the image to link to other locations, you'll need to create an Image Map. Here's an example:

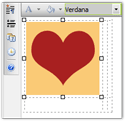
Let's say you have created this image, and you need all of the "tabs" to link to different pages on your site. But this is a single image, so you'll need to "map" the areas of the image that should work as hyperlinks. The Content Editor makes this easy, and here's how:
- Insert the intended image into the Content Editor.
- Right‑click the image and choose Image Map Editor.
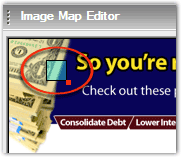
- Now you'll see the Image Map Editor window with a preview of your image and a couple of options to the right. Select Rectangle or Circle to set the shape of the first "clickable" area you'll create. If you're not sure, just try Rectangle for now — you can always change it later.
- Click Create Area. When you do, you'll see a tiny colored square with a red "handle" appear on the image as shown.
- Place your cursor over the square until it becomes a four‑pointed arrow (
 ). This means that you can move the area around with your mouse, so click and drag to position it close to the area of the image you want to make clickable.
 - Now you can change the size of the area: use your mouse to grab the little red "handle" on the lower‑right corner of the area. Move the handle to resize the area until it covers the portion of the image that should be clickable. If you were using the image in this example, it would end up looking something like this.
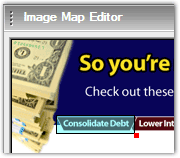
- Now that you have a clickable area, you'll need to set its properties. On the right side of the Image Map Editor, you'll see several fields — shown below. If you don't see these fields, you'll need to click the area to select it. These are the fields you'll want to set for now:
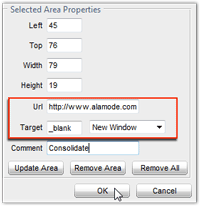
- Url: Enter the entire web address for the page this area should link to.
- Target: Use the drop‑down to select the type of window in which the new page will open. When you do, the HTML code for that window type will appear in the field just to the left. If you knew the HTML already, you could simply enter it in the field.
- Once you've configured the first area, you can repeat steps 4‑7 s to create additional areas until you have all the links you need. When you're done editing the image map, click OK. You'll return to the Content Editor, and the image will now be mapped. The links won't work in the Content Editor though, so you'll need to view your XSite page to test and make sure the map works as intended. If you need to make changes later, you can always right‑click the image and select Image Map Editor once again.
Create Thumbnails
When you want to display several images on a single page, it's often handy to show your visitors a smaller version of each image (called a "thumbnail") that, when clicked, will display the original image. This lets you manage the space on your page better, and reduces the amount of time it takes your page to load.
Creating thumbnails is usually a lot of work, but your XSite makes it easy. Here's how:
- In the Content Editor, open the Image Manager icon ( ) in the toolbar.
- Use the list in the Image Manager to select the photo for which you'd like to create a thumbnail.
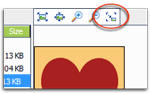
- On the right side of the Image Manager just above the preview of your image, you'll see a row of five icons. The right‑most icon is the Create Thumbnail icon, so click it.
- Now you'll see the Create Thumbnail dialog. Here's what each of these options will do for you:
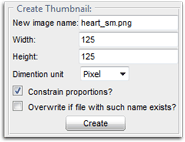
- New image name: This is the file name that will be used when the thumbnail image is created in your file library. By default, _sm will be appended to the end of the file name, which is pretty standard naming for thumbnails.
- Width: This will be the width for the thumbnail. By default, it displays the original width of the image, and the aspect ratio is constrained so changing this value will also change the height.
- Height: This will be the height for the thumbnail. Like the width, the original height is displayed and altering this value will change the height by default.
- Dimension unit: This is the unit of measure for resizing the thumbnail. You can use pixels (the default) or set a percentage of the image's original size.
- Constrain proportions?: Un-check this if you'd like to change the aspect ratio of the image.
- Overwrite if file with such name exists?: Check this box only if you're sure that you are creating a new version of the same thumbnail with the same name. Otherwise you might end up replacing an image you didn't mean to.
- When you're done setting the thumbnail's properties, click Create, and you'll return to the normal view of the Image Manager.
- In the list of images, you'll see the new file with the name you specified. Click it to see the preview on the right. When you do, you'll see a couple of new options on the right side of the Image Manager:
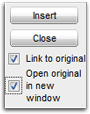
- Link to original: This option will let a visitor click the thumbnail to view the original, full-size image.
- Open original in new window: Check this box, and the full‑size original will open in a new window so your visitor can return immediately to view the page where they clicked the thumbnail. It avoids disturbing them if they were reading your content, but wanted to see the full-size image.
- When you've set all the options you want, click Insert, and the thumbnail will appear on the page at your cursor's location.