Resizing your images before uploading them to your XSite
This document explains how to resize images before uploading to your XSite.
Document 7006 | Last updated: 09/06/2017 MJY
In the age of digital cameras, it's easy to snap photos and upload them to your XSite. But today's multi‑megapixel photographs can slow your web pages to a crawl. Generally, you should keep any image on your site less than 800 pixels wide.
When you place images on a web page on your XSite, you can "resize" it by clicking and dragging the corners of the image. However, this does NOT affect the actual file size of the image — only the "display size" of the image on the page.
There are a number of applications available to help you edit the dimensions of your photos, and we have outlined one below. However, if you intend to use a number of images on your site, you'll be better served to use one of the more comprehensive image editing utilities, as they provide additional capabilities, such as cropping, image enhancement and color depth adjustment.
Most digital cameras come with some kind of image editing software, so you may already own a suitable application. If not, some examples include:
| Free Tools | Premium Tools |
Rather than editing photos on your computer, you may be able to save time by changing the default settings on your camera. That way, the files it creates are already small, and may not need further editing. Consult your camera's User Guide for details on limiting the size of your pictures.
Microsoft Image Resizer
This handy utility — part of Microsoft's Power Toys collection — lets you quickly resize one or several images with just a couple of clicks, without affecting the original source files. To use the Image Resizer:
- Click here to download the Microsoft Image Resizer.
- Once the Image Resizer has been installed, open any folder on your system containing images. Select one or several image files, then right-click and select Resize Pictures from the pop‑up menu.
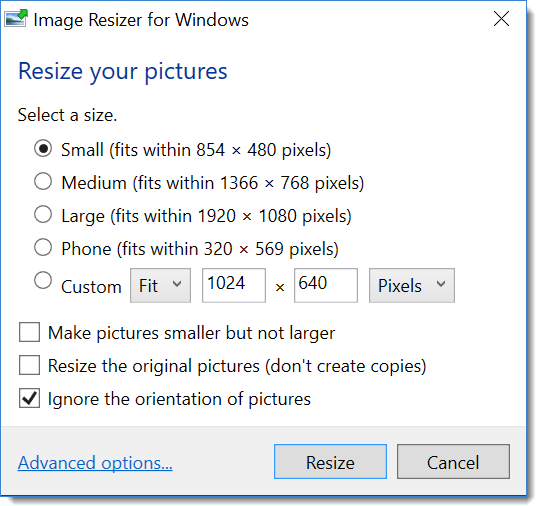
- Select the Custom option, then type the desired dimensions for your image in the text boxes, width first, then height.
If you leave the second field (height) blank, the program resizes the image to the width you specified, and calculates the height based on the original dimensions of your image. This ensures that your image maintains its aspect ratio and won't appear stretched or compressed.
- Make sure the Resize the original pictures box is NOT checked so your source files won't be affected. This means you'll still have the original files sizes to work with in the future.
- Click OK and the tool automatically resizes your images and saves them with the original file name, with (Custom) added, For instance, if you picture was named house.jpg the tool would name the file house (Custom).jpg. Now, just use these smaller images on your website.