iPad
- From the home screen of your mobile device, tap Settings
to open the mobile device's global Settings application. This is the same
application you use to configure other mobile device settings such as the
sounds and brightness.
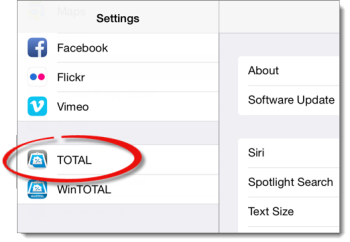
- Scroll past the native mobile device settings until you reach the
application specific settings in the list on the left, and tap
TOTAL.
- Once TOTAL is selected, a list of options is displayed on the right. Below
is a rundown of each available option and its intended function:
General
- Default PowerView
- Tap this option to choose which PowerView is loaded by default when you
open a report in TOTAL for Mobile. For example, if you want TOTAL for Mobile
to go straight to the Sketch PowerView each time you open a report, select
that as the default from the list of PowerViews. Keep in mind that this is a
global setting and it changes the default PowerView for all of your existing
reports as well as any new reports you create.
- Type — Report Description
- This setting determines which keyboard appears when you enter the report
description field in a new report. Choose between Numbers and
Alphabet.
- All Caps on Forms
- When this is enabled, any text entered on the forms is entered in all
caps.
- Auto‑Correction on Forms
- Auto‑corrects your data entry as you enter it. The auto‑correction works
much as it does for e‑mails, text messages, and other programs that use data
entry on your device.
- Auto‑Update Room Counts
- With this option checked, the app counts your Above Grade Rooms
automatically in order to populate your form. To enter your room counts
manually, disable this.
- Offer 2nd Level QuickLists
- This option enables the use of secondary QuickLists. Using the
Floors field in the Improvements section as
an example, the primary QuickList entry describes the material used, then a
2nd level QuickList appears allowing you to describe the quality or condition
of that material (i.e. Carpet/Good or Tile/Repairs
Needed).
- Keep Screen On in Report
- With this enabled, your device's screen will stay on if a report is open,
regardless of your device's settings.
- Recovery Files Removed After
- This option lets you specify the number of days to keep files available
after deletion. Choose 1, 4, or 7 days.
- Use Google Directions
- With this enabled, directions come from Google Maps instead of Apple Maps.
- Auto Address Update
- With this enabled, address information is automatically corrected per USPS
standards.
- Auto Update Total Area
- With this enabled, the Total Area field in Fannie Mae's
Property Data Collection (PDC) form is automatically updated to match the
sketch.
- Use Zip + 4
- With this enabled, your zip codes are appended with +4 automatically.
Regional
Settings
- Region
- Press this option to specify whether you want to use U.S. forms or
Canadian forms in your reports.
- Regional Page Size & Type
- For each page listed, you can select a default size or type as needed. If
you enabled Canadian forms, you'll see (US) and (CAN) forms.
Photos
- Use System Camera
- This option allows you to choose whether you want to use your mobile
device's stock camera or TOTAL Mobile's camera when you take photos in the
app.
- Photo Size
- Tap this to set the default size for photos. Choose between Compact,
Standard, Large, Extra Large, or Original (which leaves your photos their
original size).
- Photo Quality
- This setting allows you to choose the quality of the photos used in the
report file. Like Photo Size, this setting affects the size of your reports:
Extra Fine requires the most space, and Standard requires the least space.
- Save Copy to Camera Roll
- With this option enabled, images that are added to a report are also saved
to your device's Camera Roll.
- Default Photo Action
- This option allows you to specify whether you want to launch your mobile
device's camera app, or view images already saved to your mobile device when
you tap a photo slot in your report.
- Comp Photo at Top
- With this option checked, TOTAL for Mobile displays the photo for your
comparable at the top of the comp details section instead of the default
position at the bottom.
- Room Photos at Top
- With this option enabled, TOTAL for Mobile displays your room photos at
the top of the Room form instead of the default position at the bottom.
Sketcher
- Units
- This option determines the units of measure for your sketches — choose
between Decimal Feet, Feet and Inches, or
Meters.
- Line Dimension Precision
- Choose the number of decimal places to round your line dimensions between
0 decimal places, 1 decimal place (0.1), or 2 decimal places (0.02).
- Snapping
- Specify the distance from which the sketcher "snaps" to the grid and other
lines when drawing walls, drawing angles, and auto‑closing an area:
- In the Length Snapping and Auto Close Area
Snapping sections, select the snapping options when drawing using
Decimal Feet, Feet & Inches, and
Meters:
- Decimal Feet:
- When sketching an area, the line you are drawing automatically snaps
to another line or auto closes the area any time it is within .1 ft, .25
ft, .50 ft, or 1 ft of another line based on your selection here.
- Feet & Inches:
- When sketching an area, the line you are drawing automatically snaps
to another line or auto closes the area any time it is within ¼ ft, ½ ft,
or 1 ft of another line based on your selection here.
- Meters
- When sketching an area, the line you are drawing automatically snaps
to another line or auto closes the area any time it is within 0.01 m, 0.1
m, 0.25 m, 0.50 m, or 1 m of another line based on your selection here.
- Tap Degrees in the Angle Snapping
section to specify the degree to which you want your angles to "snap" when
sketching. This helps avoid inaccuracies when drawing angles because they
"snap" to a common degree specified here.
- In the Merge Area Snapping section, choose the distance
in Decimal Feet, Feet & Inches,
and/or Meters that an area being dragged will "snap" and
merge with another area. The snapping threshold defaults are higher for this
setting to allow for easier merging.
- Distance to Close
- With this enabled, a dimension label appears in real‑time as you draw your
lines to indicate the distance from your starting point. This is useful for
keeping track of your position in relation to your sketch — especially
handy when you're zoomed in and/or fine tuning your sketch.
- Show
- Toggles the Distance To Close feature on or off.
- Color
- This allows you to set the color of the distance label. Options include
Black, Blue, Green, and Red.
- Cursor Move Distance
- Specify the distance you'd like to move the cursor when using the sketch
keyboard's arrow keys.
- Place Cursor Mode
- After you place your cursor, the sketcher automatically changes modes to
keep your workflow uninterrupted. Choose the default mode from three options:
- Return to Wall Mode:
- The cursor immediately returns to Draw mode so you can
continue drawing walls.
- Stay in Move Mode:
- This prevents the sketcher from changing modes after placing the cursor.
If you need to change modes after placing the cursor, you must manually
select it.
- Startup Mode
- Decide the default mode in which you are started when you first access the
sketcher: Draw mode or Modify mode.
- Grid
- This toggles the grid lines for the sketch canvas on or off.
- Auto Zoom
- When this is enabled, the sketcher automatically zooms to fit the contents
of the sketch canvas.
- Swipe to Draw
- With this enabled, swiping your device's screen in a given direction
creates a line in that direction.
- Show New Area Labels
- When checked, the Area name and size labels are visible on your sketch.
Uncheck this option to have them hidden by default.
- Enable DISTO in Sketcher
- Enable this option to allow DISTO measurements when sketching.
- Round DISTO Measurements
- This option allows you to round the measurements taken by your DISTO.
Choose between .05 units, .1 units,
.25 units, .5 units, 1
unit, or set it to None to disable rounding.
ScanToSketch
- ScanToSketch Buttons On Left Side
- Enable this option to display buttons on the left side of the screen, or
disable this option to display button on the right side of the screen.
- Last Wall Detection Tolerance
- Adjust the tolerance for corners of 90°,
45°, and Other°. To
increase the detection of the last wall, raise the tolerance threshold that
matches the wall angle. If the last‑wall popup appears too frequently, lower
the tolerance threshold.
Mobile
Sync Web Services URL
- URL
- This setting provides a URL that tells TOTAL for Mobile where to upload
your files when synchronizing. Do
not change this setting unless instructed to do so by a technical support
representative.
About
- Version
- This displays the version of TOTAL for Mobile and the update currently
installed on your device.
- Tech Support
- This displays the toll‑free phone number where you can reach an
a la mode technical support representative.
iPhone
- From the home screen of your mobile device, tap Settings
to open the mobile device's global Settings application. This is the same
application you use to configure other mobile device settings such as the
sounds and brightness.
- Scroll past the native mobile device settings until you reach the
application specific settings in the list on the left, and tap
TOTAL.
- Once TOTAL is selected, a list of options is displayed on the right. Below
is a rundown of each available option and its intended function:
General
- Default PowerView
- Tap this option to choose which PowerView is loaded by default when you
open a report in TOTAL for Mobile. For example, if you want TOTAL for Mobile
to go straight to the Sketch PowerView each time you open a report, select
that as the default from the list of PowerViews. Keep in mind that this is a
global setting and it changes the default PowerView for all of your existing
reports as well as any new reports you create.
- Type ‑ Report Description
- This setting determines which keyboard appears when you enter the report
description field in a new report. Choose between Numbers and
Alphabet.
- All Caps on Forms
- When this is enabled, any text entered on the forms is entered in all
caps.
- Auto‑Correction on Forms
- Auto‑corrects your data entry as you enter it. The auto‑correction works
much as it does for e‑mails, text messages, and other programs that use data
entry on your device.
- Auto‑Update Room Counts
- With this option checked, the app counts your Above Grade Rooms
automatically in order to populate your form. To enter your room counts
manually, disable this.
- Offer 2nd Level QuickLists
- This option enables the use of secondary QuickLists. Using the
Floors field in the Improvements section as
an example, the primary QuickList entry describes the material used, then a
2nd level QuickList appears allowing you to describe the quality or condition
of that material (i.e. Carpet/Good or Tile/Repairs
Needed).
- Keep Screen On in Report
- With this enabled, your device's screen will stay on if a report is open,
regardless of your device's settings.
- Recovery Files Removed After
- This option lets you specify the number of days to keep files available
after deletion. Choose 1, 4, or 7 days.
- Use Google Directions
- With this enabled, directions come from Google Maps instead of Apple Maps.
- Auto Address Update
- With this enabled, address information is automatically corrected per USPS
standards.
- Auto Update Total Area
- With this enabled, the Total Area field in Fannie Mae's
Property Data Collection (PDC) form is automatically updated to match the
sketch.
- Use Zip + 4
- With this enabled, your zip codes are appended with +4 automatically.
Regional
Settings
- Region
- Press this option to specify whether you want to use U.S. forms or
Canadian forms in your reports.
- Regional Page Size & Type
- For each page listed, you can select a default size or type as needed. If
you enabled Canadian forms, you'll see (US) and (CAN) forms.
Photos
- Use System Camera
- This option allows you to choose whether you want to use your mobile
device's stock camera or TOTAL Mobile's camera when you take photos in the
app.
- Photo Size
- Tap this to set the default size for photos. Choose between Compact,
Standard, Large, Extra Large, or Original (which leaves your photos their
original size).
- Photo Quality
- This setting allows you to choose the quality of the photos used in the
report file. Like Photo Size, this setting affects the size of your reports:
Extra Fine requires the most space, and Standard requires the least space.
- Save Copy to Camera Roll
- With this option enabled, images that are added to a report are also saved
to your device's Camera Roll.
- Default Photo Action
- This option allows you to specify whether you want to launch your mobile
device's camera app, or view images already saved to your mobile device when
you tap a photo slot in your report.
- Comp Photo at Top
- With this option checked, TOTAL for Mobile displays the photo for your
comparable at the top of the comp details section instead of the default
position at the bottom.
- Room Photos at Top
- With this option enabled, TOTAL for Mobile displays your room photos at
the top of the Room form instead of the default position at the bottom.
Sketcher
- Units
- This option determines the units of measure for your sketches — choose
between Decimal Feet, Feet and Inches, or
Meters.
- Line Dimension Precision
- Choose the number of decimal places to round your line dimensions between
0 decimal places, 1 decimal place (0.1), or 2 decimal places (0.02).
- Snapping
- Specify the distance from which the sketcher "snaps" to the grid and other
lines when drawing walls, drawing angles, and auto‑closing an area:
- In the Length Snapping and Auto Close Area
Snapping sections, select the snapping options when drawing using
Decimal Feet, Feet & Inches, and
Meters:
- Decimal Feet:
- When sketching an area, the line you are drawing automatically snaps
to another line or auto closes the area any time it is within .1 ft, .25
ft, .50 ft, or 1 ft of another line based on your selection here.
- Feet & Inches:
- When sketching an area, the line you are drawing automatically snaps
to another line or auto closes the area any time it is within ¼ ft, ½ ft,
or 1 ft of another line based on your selection here.
- Meters
- When sketching an area, the line you are drawing automatically snaps
to another line or auto closes the area any time it is within 0.01 m, 0.1
m, 0.25 m, 0.50 m, or 1 m of another line based on your selection here.
- Tap Degrees in the Angle Snapping
section to specify the degree to which you want your angles to "snap" when
sketching. This helps avoid inaccuracies when drawing angles because they
"snap" to a common degree specified here.
- Distance to Close
- With this enabled, a dimension label appears in real‑time as you draw your
lines to indicate the distance from your starting point. This is useful for
keeping track of your position in relation to your sketch — especially handy
when you're zoomed in and/or fine tuning your sketch.
- Show
- Toggles the Distance To Close feature on or off.
- Color
- This allows you to set the color of the distance label. Options include
Black, Blue, Green, and Red.
- Cursor Move Distance
- Specify the distance you'd like to move the cursor when using the sketch
keyboard's arrow keys.
- Place Cursor Mode
- After you place your cursor, the sketcher automatically changes modes to
keep your workflow uninterrupted. Choose the default mode from three options:
- Return to Wall Mode:
- The cursor immediately returns to Draw mode so you can
continue drawing walls.
- Stay in Move Mode:
- This prevents the sketcher from changing modes after placing the cursor.
If you need to change modes after placing the cursor, you must manually
select it.
- Startup Mode
- Decide the default mode in which you are started when you first access the
sketcher: Draw mode or Modify mode.
- Grid
- This toggles the grid lines for the sketch canvas on or off.
- Auto Zoom
- When this is enabled, the sketcher automatically zooms to fit the contents
of the sketch canvas.
- Swipe to Draw
- With this enabled, swiping your device's screen in a given direction
creates a line in that direction.
- Show New Area Labels
- When checked, the Area name and size labels are visible on your sketch.
Uncheck this option to have them hidden by default.
- Enable DISTO in Sketcher
- Enable this option to allow DISTO measurements when sketching.
- Round DISTO Measurements
- This option allows you to round the measurements taken by your DISTO.
Choose between .05 units, .1 units,
.25 units, .5 units, 1
unit, or set it to None to disable rounding.
Mobile
Sync Web Services URL
- URL
- This setting provides a URL that tells TOTAL for Mobile where to upload
your files when synchronizing. Do
not change this setting unless instructed to do so by a technical support
representative.
About
- Version
- This displays the version of TOTAL for Mobile and the update currently
installed on your device.
- Tech Support
- This displays the toll‑free phone number where you can reach an
a la mode technical support representative.
 ) and press
Settings.
) and press
Settings.

 ) or Bluetooth key to
place the line.
) or Bluetooth key to
place the line.