
Click to enlarge
With ScanToSketch, you can create a sketch of the interior footprint of a property in minutes! Just walk around the property, mark each wall in consecutive order, and then transfer it back to your sketch canvas to get an instant sketch.
Check out the animation on the right for an overview of the scanning workflow, or click the play button on the video below to see it in action. Check out the video below to see the interior scanning process in action, or check ot the animation after the jump for an overview of the scanning workflow.
Before you begin your scan, enable Do Not Disturb mode on your device — phone calls or app switching ends the scan. Then, plan your scanning route to optimize scanning time and accuracy. It's best to reserve the easiest or most accessible wall with the least number of obstructions as the wall where you will begin and end your scan.
Once you've planned your route and enabled Do Not Disturb mode, go to your first wall and follow the instructions below to begin your interior perimeter scan using ScanToSketch:
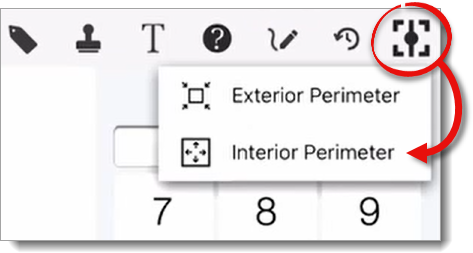
 ) in the toolbar at the top, and
select Interior Perimeter.
) in the toolbar at the top, and
select Interior Perimeter.
 ) on the right to place a
wall marker. (You can adjust the orientation of the buttons between the left
and right side of the screen in TOTAL for Mobile's Settings.)
) on the right to place a
wall marker. (You can adjust the orientation of the buttons between the left
and right side of the screen in TOTAL for Mobile's Settings.)

If the green square appears in the wrong location or doesn't appear at all, adjust your position and/or the angle of the device to capture more of the structure's walls. Move the crosshairs slowly to the left and right, up and down, closer and further, and then back to the wall. Pointing the device at the ground or at another wall and back also helps with detection.
Alternatively, you can manually place a wall point by aiming the crosshairs exactly at the wall and tapping the white Manual button (
). However, we recommend using the green Auto wall markers whenever possible.
 ) to remove it and try again.
Keep in mind that walls must be scanned in consecutive order. If you inadvertently scan the same wall twice or you scan a wall out of order, ScanToSketch alerts you with an Unexpected Wall message. Press Try Again and use the mini‑map at the bottom of the screen to identify the last wall that was scanned, and proceed to the next sequential wall from that location.
) to complete the scan.

ScanToSketch attempts to automatically detect when the scan is complete and displays a prompt asking if you would like to close the area. Press Yes to close the area, or press No to continue scanning.
If ScanToSketch is unable to detect when the scan is complete, or you're intentionally performing a partial scan, you can end the scan at any time (after placing 3 or more wall markers) by pressing the ✓ Done Marking Walls button on the upper right. You can adjust the tolerance level for automatic detection in TOTAL for Mobile's Settings.

That's it! Once you've exported the scan to your sketch canvas, verify the sketch as needed with public records, spot check or remeasure difficult areas, and then edit, stitch, and merge the elements of your sketch to fine‑tune it as necessary.