TOTAL's photo settings affect how TOTAL automatically optimizes and formats
your images.
TOTAL's image optimization settings are preset to those which have been
tested to return the best results overall. However, it's possible that you
can adjust these settings to achieve better quality for your own images.
To change TOTAL's photo settings:
- In TOTAL, click Tools, Configure
Settings.
- Click the Photos tab on the left.

- These settings help you set several options that determine how TOTAL will
optimize your images. The default settings have been shown to work
across a broad cross-section of images. However there are settings you
can change if you'd like a different result:
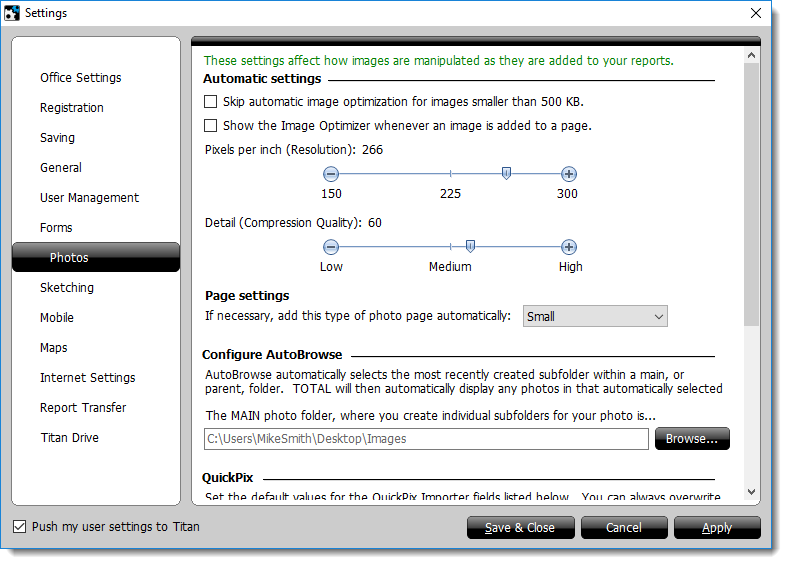
- If you'd like TOTAL to Skip image optimization for images
smaller than 500KB, check the first box. This is checked by
default, because it's unlikely that further optimization of any image this
small will be of much help, since 500KB is already a relatively small image
size.
- If you'd like to see the Image Optimizer appear anytime you add a new
image to your report, check the box labeled Show the Image Optimizer
whenever an image is added to a page.
- Adjust the Pixels per inch (Resolution) slider to
change the resolution to which your images will be optimized.
- Adjust the Detail (Compression Quality) to change the
level of compression that will be applied when optimizing your images.
- Occasionally, TOTAL will need to add a new photo page to accommodate an
image you have inserted. You can choose what type of photo page to add
in the Page Settings dropdown.
- Click Apply or Save & Close to save
your changes.
To configure AutoBrowse:
- From the Tools Menu, click Configure Settings.
- When the window opens, click Photos on the left.
- In the Configure AutoBrowse section, click
Browse to set your parent folder.
- Click OK, then click Apply or
Save & Close to save your changes.
- In TOTAL, click Tools, select Configure
Settings and click Photos on the left. Or,
simply click the Settings button in the QuickPix Importer.

- In the QuickPix section, you can customize your QuickPix
Importer and Database:
- Enter the values that you'd like to automatically populate for the City,
State, Zip, and/or Neighborhood. You can enter values for all of the
fields, or fill out a single field such as the City or State.
- Select which labeling option to use when placing photos from your
QuickPix Database into a report. You can use the label in your
database, use the label that's already on your form, or have TOTAL prompt
you for each photo you add.
- When you're finished, click Save & Close on
the lower right.