Creating Order Invoices |
||
Once you’ve enabled desktop billing, generating a trackable invoice is as easy as adding a form to your report and putting in the date due. To create or edit an invoice for an order…
- From WinTOTAL’s Order PowerView, click Report Invoice in the View pane in the lower left corner of the screen.
- Click Add Invoice in the toolbar at the top of the screen. If you’ve already added an invoice to your report, the button is labeled Edit Invoice.
- The WinTOTAL Invoice Editor opens, already populated with
information about your order. Choose your invoice type by selecting an invoice
from the Choose Invoice menu in the Options
pane on the left.

- Change any items for your invoice by typing the new information in the
appropriate text box. As an alternative, you can use QuickLists to
pre-fill recurring information into your invoice to save time. Keep in
mind that some fields – particularly contact fields – cannot be edited
directly, but require that you select the desired contact from the provided
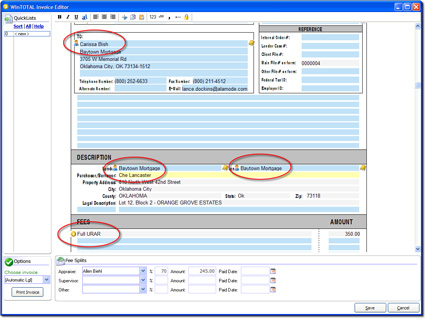
drop-down list. The fields you must select from drop-down menus are
indicated in the diagram below.

- Choose your lender, client, and bill to contacts using the drop-down lists provided if they aren’t already pre-populated.
- Enter a due date into the provided field.
- As necessary, click the dollar sign icon beside each new line item in the Fees list and then, choose a product from the list to populate the invoice with the appropriate fee (as defined in your client fees list) for that product.
- Add any miscellaneous charges for additional services beyond the report, like a mileage fee, by typing them into an available line item in the invoice.
- Add any necessary payment information in an available Payment fields below the fees list. Use the calendar icon to quickly select the date for the payment.
- If there are any appraiser fee splits you need to take into account, choose the appraiser with whom the split will occur from the available appraiser list. If you’ve configured a fee split for that appraiser, the split amount and percentage populate automatically. If you need to alter this fee split on a case by case basis, just type the new dollar value or percentage split into the appropriate fields to override the default splits. Then, mark a date paid using the calendar icon to choose a date.
- If necessary, print a copy of the invoice by clicking Print Invoice in the Options pane on the left.
- When you’re finished updating your invoice, click Save to save your changes.
Once your invoice is complete, you can also include a copy of the invoice in the contents of the report. Just check the Include Invoices in Report box in the Invoices pane on the left.

Other brand and product names are trademarks or registered trademarks of their respective owners. © CoreLogic | a la mode technologies, llc | Terms of Use | Privacy Policy |