Including a text header is a lot easier than creating a custom header image
or formatting your logo and still gives you several options for highlighting
your company name.
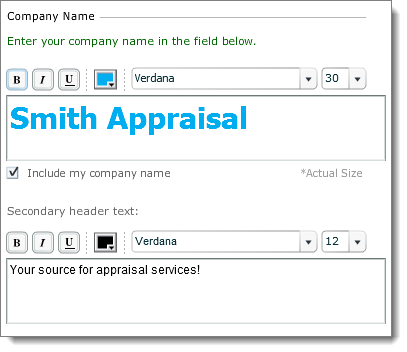
To add your company name to the header of your XSite:
- In the Theme
Prefs section of the XSites Wizard, ensure that the Include my
company name check box is checked.
- Type your company name in the large text box. This information is
preloaded with the company name you provided when you signed up for your Agent
XSite, but you can change it here.
To insert a line break in your company name, press
Shift+Enter.
- Above the text box, you'll find several options for modifying the text.
The options are similar to those found in many word processors and email
clients.
- Turn on Bold, Italics, or Underline by clicking the appropriate button.
- Select the font color by clicking the colored box and choosing a shade
from the palette. Note that on dark backgrounds you may want to use white or
some other light‑colored text. If necessary, the background of the text box
will change so you can still see the text.
- Choose the font style and size you desire from the appropriate drop‑down
menu.
You may select any available web font; that way, your company name
appears as intended on nearly all browsers.
- On the sample screen above, you'll see how your text looks on your XSite's
header. Simply use your mouse to position your company name exactly where you
want it.
- Enter your Secondary header text. This is the slogan that
appears in your site header and one of the first things people see on your
site.
- Above the text box, there are several options for modifying the text. As
necessary, turn on Bold, Italics or Underline by clicking the corresponding
button.
- Select the font color by clicking the colored box and choosing a shade
from the palette. Keep in mind that on dark backgrounds you may want to use
white or some other light‑colored text. If necessary, the background of the
text box changes so you can still see the text.
- Choose the font style and size you desire from the appropriate drop‑down
menu.
If you're using a custom logo file with your company name in it, you can turn
off the text by unchecking the Include my company name box.