If you've been keeping a schedule in a different application, you can
transfer appointments and tasks to and from your online schedule. Here's how to
import appointments:
- In the contact manager, and
then click Tools, Schedule
Import / Export.
- Select the Import method and either
Activity or Task for your type.
- In most programs, "Activities" are like appointments with a definite
start/stop time and often a way to mark you as busy. "Tasks" are more like a
To‑Do list with a due date and schedule. XSites scheduling presently handles
activities and tasks in the same manner.
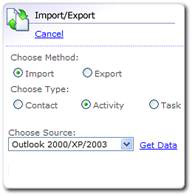
- Click the drop‑down menu and choose the program from which you are
importing. Depending on the program you choose, different instructions will
appear in the "Help" part of the screen to assist you with specifics.
- Click Get Data and the possible entries are first
displayed on the right. Mark the ones you wish to copy into your online
schedule (or use Select All) and then click
Import.
If you're using Microsoft Outlook 2003, you may be warned that a program
is trying to access your email addresses. This is, of course, what the import
function is doing. To continue, click the Allow access for
check box, then select 10 minutes from the drop‑down menu and click
Yes.
Exporting activities from your online schedule works in reverse of
importing.
- After clicking Import/Export, mark the
Export option.
- Change the type to Activity.
- You should be presented with the Activities in your
schedule. Mark the ones you wish to copy to your 3rd party
scheduling program.
- Then, click Export. All the items you marked are then
copied directly into your other scheduler.
If you use a 3rd party contacts program not directly supported our
online scheduling tools, try using the Excel option as your
Destination format. It is likely that your program includes
features to read from this common format.