Moving images to a new PC
This document explains how to manually move your images to a new PC.
Document 6555 | Last updated: 09/24/2019 MJY
Here's how to manually move the images for your Comps Database and Quickpix database from your old PC to your new PC. Prior to following these steps, ensure you have an external hard drive or flash drive with sufficient free space to store all of your images at once.
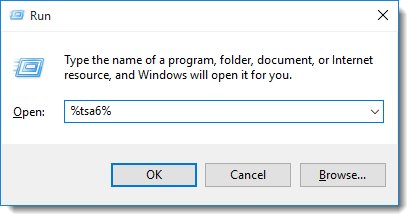
- On your old computer, press the Windows Key + R to open a Run dialogue.

- In the Open: field, type %tsa6% and click OK. This opens TOTAL's Tech Support Assistant (TSA).
- Once the TSA opens, select the Common Paths tab at the top of the window.
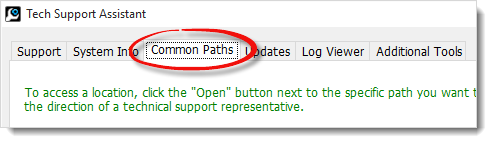
- Now, locate the line that says Image Files and select Open next to it.

After selecting Open in the previous step, a Windows Explorer window opens to where your image files are located. However, it's inconvenient to copy and paste all of the individual folders. So, go up a level in Explorer ‑ that way, you only have to copy and paste a single folder. You can accomplish that by clicking the up arrow ( ) near the top left of the window, or clicking the word Database in the address bar.

- Now, right-click the Images folder, and select Copy.

- Finally, open your external storage, right‑click an empty area, and choose Paste.
After the images are transferred to your external storage, move the external storage to your new PC and simply follow the steps again. When you get to step 5, choose Paste instead of Copy. If you're asked to overwrite any existing files, choose Yes.